Blasted orange peel!

danwatt

Doing stuff.
I've had my Mercedes w126 (90' 300SE) for over a year now. Unfortuanatly, the previous owner got a seemingly cheap repaint on it (long story... let's just say that he NEEDED to change the color fast... I bought it at an auction, after it was impounded). Anyways, I've been reading a lot about it on the site and I've come to the conclusion that I'm capable of getting rid of it. I work at an auto parts store, so I am able to get a lot of off the shelf products cheap (or order the better ones). Anybody have any suggestions (where to start, products, etc...) to get me going?


Here are some pictures...


The Car Itself:


corner2.jpg


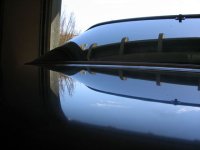
Close up of orange peel effect (320kb, 768x1024:

http://dano.pocketrubbish.com/images/photos/cars/IMG_0476.JPG


A little further back, 344kb:

http://dano.pocketrubbish.com/images/photos/cars/IMG_0984.JPG


It isn't very bad... most Fords I've seen lately have worse orange peel (but that isn't saying much, as the only surface with worse orange peel than a factory painted Ford is an orange peel itself). But I know that it has a lot more potential, and I'd like to bring it out.
 
I second that on the Ford Orange peel. I wasn't sold a Lemon... I was sold an ORANGE!!

I think I remember reading wet sanding may get rid of it, but nobody wants to remove that much of the surface.
 
It's clearcoated.


Also, is that a Mercedes in the reflection? Can't tell with all that orange peel . :lol
 
I would rather remove a bit of paint than live with that level of OP ! I wonder what pad to use that would work on the high spots and not the low spots, or would i have to wet sand ? Sometimes its best to bite the bullet and go for the improvement IMO. Clear has to be shot over fresh paint , or am I mistaken, so redoing the clear is not a possiblity? One wetsanding couldnt ruin the life of the paint with proper care thereafter....
 
If the orange peel is in the paint, and it's clearcoated...that means you have to sand all the way through the clearcoat and into the paint. Then after sanding the paint, if you don't go through, the car will have to be re-clearcoated about 5-8 times to replace the clearcoat that was sanded off.


Good luck.
 
I'm going to wetsand it. Not sure what grits I should start with. Probably buy some 1500, 2500, 3000, and maybe higher. Start with the finest, see if that has any effect. If not, use a coarser grit until it has an effect. I'll probably practice on an area like the rocker panels. Worst comes to worst, I'll save up and get a somewhat cheap paintjob ($1000 range) and remove all the trim, windows, etc... myself.


But I really like the qualities of the paint I have now. Nowhere near as good as the OEM Mercedes paint, but nothing is... not even the new Mercedes paints.


I don't really know what I need to do after I wet sand. That is where I need my hand held (yes, I'll suck it up and admit it).


I have experience with wet sanding and I consider myself a fast learner, so I can probably pick a lot of this up myself (and if that fails, the search feature). I just need an outline.


I'll have three days to do this, as the girlfriend is gonna be in Vegas with family and I was able to get out of work, so time isn't really an issue either.


So anyways, I need to buy some fine grit sandpaper (gonna go get some Unigrit), some sanding blocks (any recommendations... size, material, etc?), a lot of 3M rubbing compound (unless somebody suggests something else to use after I finish the wet sand), a lot of masking tape (planning on doing one panel at a time, don't want to accidentally skip across panels or hit the chrome, rubber trim, etc), and a few other odds and ends.


I also have a few questions....


1. What is the preferred soap to soak the sandpaper in overnight. Will any car shampoo do? Planning on just using my Meguiars Gold Class. Don't know if it has silicone in it, don't know if it matters.


2. What is a safe, effective way to remove all the wax off? I've got a gallon of WD40 sitting here, but any comments are welcome.


3. Preparation. Should I just wash the car like normal and then start the wet sanding, or should I use some paint cleaning compound, clay bar, etc. to get it ready for the wet sanding?


4. I'm going to be left with a bunch of fine clear coat dust as I'm sanding. How should I clean this off to check my progress? I'm thinking that I should either use an air compressor or hose to rinse it off. Maybe a duster or something (mmm, French maid...)


5. I understand that after I wet sand it, I'm going to need a machine polisher to buff the tiny scratches out. I'll probably buy a Porter Cable clone for now. I've used random orbitals before, but my experience is limited. Once I get it, I'll practice my techniques on the old 85 Toyota Pickup. No way I'm going to learn how to use this on a Mercedes. I'd like to know what sort of backing plates, pads, and compounds I'm going to need for this stage. I'm going to be doing some extensive searching on this forum, but any comments in this thead with make it a lot easier for me to plan.


Thank you to anybody that even considers replying. Any knowledge, tips, tidbits, and personal experiences will be extremely valueable to learn. Hell, maybe if I do a good job, I can consolidate everything I've learned into a How-To. On the other side of the token, if I do a bad job, I can make a What-Not-To-Do.


Lastly, sorry for the long post.
 
I've only done very localized wet sanding so I won't be of any help. There are a few 'paint' guys' (I'm not going to put them on the spot by naming them) but I'm sure they'll offer some great advice. Good luck, keep us posted...

JonM
 
Clay the car first so you don't have any big pieces of crud under the sand paper putting deep scratches in the paint.


Start with the 1500 wrapped around a flexible foam sanding block. Soak the paper in a bucket of slightly soapy water and start sanding. You'll immediately notice that the low spots of the o-peel will stay shiny. Keep rinsing your paper so it doesn't get clogged and squeegy the surface regularly to check your progress.


When you cant seen any more low spots stop. Rinse the car and go again with the 2500. This time, you're less concerned with removing so much paint as you are with smoothing out the scratches you left with the 1500.


Then you'll need a rotary or pc with a wool pad and heavy cut compound to buff out the 2500 marks. Then a cutting pad with meduim cut, then a finishing pad with machine glaze. A rotary will make the first step MUCH easier.


3M has a little tutorial on their website.


http://www.3m.com/us/auto_marine_aero/aad/solutions/fprofessional.jhtml


Don't let anyone scare you away from this. And don't let anyone tell you not to use a wool pad and heavy cut compound. You'll need that action to get the paint down after sanding. If you go easy and take your time, you'll be fine. I suggest doing one full panel like the trunk from start to finish to see if you want to do the whole car yourself.


Jason
 
Wow, this is coming along pretty well. I went to a local Meguiar's retailer, bought some unigrit 1500 and 2000 (I'll pick some 2500 up if it looks like I'll need it, we'll see). Washed my car with dawn to get the wax off. I decided to do the trunk, start to finish, just like stiege suggested. Gave it a nice treatment of the clay bar and began. I've got most of the orange peel off of the trunk with the 1500, it's getting closer and closer to a mirror like finish. Every once in a while, I'll use some 3M rubbing compound to get the scratchs out of spots to check the shine. Making little "windows" to check my progress.


But these pictures will tell it all...


Before sanding (original orange peel)

before1.jpg


Initial sanding with 1500 Unigrit:

first1500pass.jpg


Note how the low spots in the peel are still shiny. You must keep sanding until all is dull.

lowspots.jpg


After another 20-30 minutes of sanding:

1500progress1.jpg


You can see the little "windows" I made with 3M rubbing compound. I did this in several spots to check my progress in each area of the trunk to insure that I do it evenly.

1500progress2.jpg


Close-up of "window" (check the first picture to compare before/after):

window1.jpg


This seems to be going pretty well. To anybody that's thinking about trying this but is scared to: don't be. It's pretty easy to gauge your progress... when you wipe all the water and dust off, you can see the low spots pretty easily.


I'd like to thank stiege for his insight. Without his post, I probably wouldn't have started this right away. His advice is right on.


I will post some updates in an hour or two. Back to the trunk lid for now.
 
Looks like alot of time consuming work but I'm sure it will be well worth it in the end. How much time have you spent on the trunk lid alone? Looks good so far!


JJ
 
As of right now, two hours. But it's been a learning expierence, so the rest of the panels should be quicker.
 
Alright, I'm pretty much done wet-sanding the trunk lid for now. Just finished going over it with some 2000 unigrit, 3M rubbing compound, and Meguiar's Deep Crystal System Step 2 Polish.


I'm waiting for my PC-clone rotary to arrive so I can get this thing looking beautiful. I should probably pick some 2500 or 3000 unigrit up as well, as it seems like it could be smoothed out more (less work with the rotary). I took some pictures of what it looks like now, mainly to compare the flatness of the surface to what it looked like only a few hours ago. I took them at a steep angle to maximize the reflective properties.
 

Attachments

  • semifinal2small.jpg
    semifinal2small.jpg
    35.5 KB · Views: 681
More pics of the post-2000 grit stage:


2000grit1.jpg


Here is a good comparison shot of a panel with the OP, and with the OP almost gone:


compare.jpg


After a good polishing (still need to buff, this is kind of a preview?):


semifinal1.jpg


What it really looks like, direct angle:


imperfectfinal.jpg
 
Back
Top