I have a bottle of the consumer line Meguiars Body Scrub Paint Cleaner. It says it is clear coat safe, removes dead paint, stains, and blemishes. Also says it is an safe, modern alternative to rubbing compound. I was wondering if this stuff will remove scratches and swirls also, as there is no mention of this on the bottle. I already have a layer of Klasse AIO and SG on my car, which I put on last week.
Navigation
Install the app
How to install the app on iOS
Follow along with the video below to see how to install our site as a web app on your home screen.
Note: This feature may not be available in some browsers.
More options
Style variation
You are using an out of date browser. It may not display this or other websites correctly.
You should upgrade or use an alternative browser.
You should upgrade or use an alternative browser.
Work Truck Detail by Kevin Brown
- Thread starter bboy850
- Start date
ISLANDSBEST
New member
If it does the things it says it will do, it will most likely remove the Klasse, which you will end up doing, anyway, if you get rid of the swirls
It says on the bottle direction's that it may be used with an orbital buffer. Also says, good for cars not waxed more then once a year and this unique, cleaning formula blends mild abrasives (i'm guessing and thinking to remove scratches and swirls???) and chemical cleaners with rich nutrients that feed and protect the paint during the cleaning process.
Should I follow this product up with the SG and skip the AIO process again?
Should I follow this product up with the SG and skip the AIO process again?
vettefan67
New member
Hey bboy850:
I'd recommend using AIO before SG as the AIO offers shine and protection all on its own! It also cleans the surface, preps well for SG to bond to, and reduces VERY MINOR micromarring/swirls depending on how firmly you apply it.
HTH!
I'd recommend using AIO before SG as the AIO offers shine and protection all on its own! It also cleans the surface, preps well for SG to bond to, and reduces VERY MINOR micromarring/swirls depending on how firmly you apply it.
HTH!
imported_Eric
New member
But until then, its their "Joe Six-Pack" line.
<blockquote class='ipsBlockquote' >
<em class='bbc'>Originally posted by adc100 [/i]
<strong class='bbc'>But until then, its their "Joe Six-Pack" line. [/b]</blockquote>

Couldn't have said it better myself.
Meguiars Mirror Glaze or Body Shop Professional products are far superior to their 'Joe Six-Pack' line.
In any event, like darhb pointed out, it will remove the Klasse that is already on your paint. Body Scrub is pretty aggressive.
<em class='bbc'>Originally posted by adc100 [/i]
<strong class='bbc'>But until then, its their "Joe Six-Pack" line. [/b]</blockquote>
Couldn't have said it better myself.
Meguiars Mirror Glaze or Body Shop Professional products are far superior to their 'Joe Six-Pack' line.
In any event, like darhb pointed out, it will remove the Klasse that is already on your paint. Body Scrub is pretty aggressive.
<blockquote class='ipsBlockquote' >
<em class='bbc'>Originally posted by Scottwax [/i]
<strong class='bbc'>I'd recommend not using any 'burgandy' bottle Meguiars product. Try #2 Fine Cut Cleaner followed by #9 Swirl Remover 2.0. [/b]</blockquote>
I can only find #9 Swirl Remover on Meguires website..Is this the same thing as 2.0??
LW
<em class='bbc'>Originally posted by Scottwax [/i]
<strong class='bbc'>I'd recommend not using any 'burgandy' bottle Meguiars product. Try #2 Fine Cut Cleaner followed by #9 Swirl Remover 2.0. [/b]</blockquote>
I can only find #9 Swirl Remover on Meguires website..Is this the same thing as 2.0??
LW
<blockquote class='ipsBlockquote' >
<em class='bbc'>Originally posted by Lone Wolf [/i]
<strong class='bbc'>
I can only find #9 Swirl Remover on Meguires website..Is this the same thing as 2.0??
LW [/b]</blockquote>
It is an updated version of #9, hence the 2.0. carguy did a review in the Product Review forum. You might want to check it out, then order either #9 2.0 or Swirl Free Polish at www.meguiars.com
imported_Kevin Brown
Jedi Master
Flash Gordon thought I should repost this write-up here on TID. I can't believe it was completed 2 years ago!
Thanks for recommending I share this thread here. I hope y'all like it.
We all like to read about detailing, especially when it?s done to exotic cars. Reality is, most of us work on common vehicles, and I am no exception. Although I do get to work on some really trick rides, I?ve washed & detailed thousands of daily drivers.
Recently, I spent some time detailing a Toyota Tundra. It had logged 77k miles in about 1-1/2 years, and was used as a work truck. The owner decided to have it cleaned up, as it was no longer going to be used in the field. A friend of mine asked if I could do the truck. The owner of the truck has given my friend lots of work, so it was important that the truck be done right. Here?s some pics of the detail.
I did not plan on doing a write-up... I took pictures for my own reference.
Consequently, I didn?t get all the shots I should have (such as a finalized engine). I think you?ll get the idea, though.
The truck was used off-road quite a bit. Dirt and tar are plentiful.

More dirt PLUS a lot of bugs litter the radiator area.

The engine looks as if it?s ten years old.

The wheels are hammered, and feature bush & dirt scratches, with a dose of tar.

Hood area matches the rest of the truck: Dirty.

Making our way to the interior, more of the same.

Doorjambs, carpet and the rest will need thorough cleaning.

Removal of the kickpanels reveal electronics I don?t want to get wet!

Doorpanels were removed to properly clean the backsides, speakers, & grills.
Window rubbers and felts are much easier to access this way, too.

Shot of the door panel.

Gauges are dirty and the plastic fascia very scratched.

Under the dash reveals a grimy a/c area and airbag.

A pile of easy to remove parts that will be thoroughly cleaned and reinstalled.

Air vents are pretty loaded with dirt and old interior dressing.

Driver?s seat removed.
The center console and carpet were much easier to clean, too.

See? Incredibly, the carpet was not too bad in the rest of the truck.

That's where that cookie went!

Exterior- Needs a lot of attention.

M105 applied by hand will tackle the areas which cannot be machine polished.


There were MANY scratches- Some required 2500 grit sanding.


Some scratches were very deep. This one was only partly removed.
It was hard to locate it once the polishing was done, as the scratch-edges were smoothed...

Lots of heavy scuffs that were completely removed via M105.


A test spot helps dial-in the polishing system. M105. Okay, that way easy.

This scratch was deep. It really stood out, so I had to sand it with 2500.

Gonna have to leave it like this and polish to an acceptable finish.


Meguiar?s Detailer D103 All Purpose Cleaner Plus was used throughout the interior.
No extractor, here... Just APC+, water, brushes, and a Craftsman wet/dry vac.
Towels and a warm summer day handle the drying duties.
Carpets are rinsed until dirt & APC+ is removed.
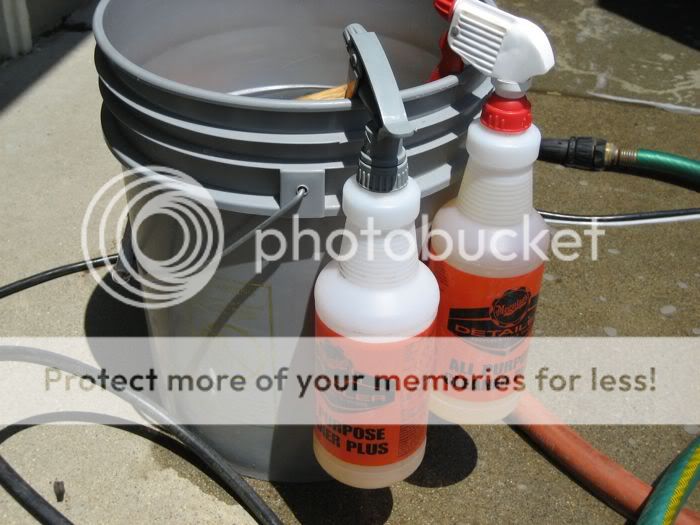
Door sills are cleaned easily.
Meguiar?s M40 Vinyl/Rubber Cleaner & Conditioner applied for beauty & protection.

Small parts are cleaned. Electronic buttons, such as this were cleaned sans water.
A dry towel & horsehair brush to clean. G134 Exterior Trim Coating to dress.
No water, so it?s safer to use around electronics (versus traditional dressings).

Thanks for recommending I share this thread here. I hope y'all like it.
We all like to read about detailing, especially when it?s done to exotic cars. Reality is, most of us work on common vehicles, and I am no exception. Although I do get to work on some really trick rides, I?ve washed & detailed thousands of daily drivers.
Recently, I spent some time detailing a Toyota Tundra. It had logged 77k miles in about 1-1/2 years, and was used as a work truck. The owner decided to have it cleaned up, as it was no longer going to be used in the field. A friend of mine asked if I could do the truck. The owner of the truck has given my friend lots of work, so it was important that the truck be done right. Here?s some pics of the detail.
I did not plan on doing a write-up... I took pictures for my own reference.
Consequently, I didn?t get all the shots I should have (such as a finalized engine). I think you?ll get the idea, though.
The truck was used off-road quite a bit. Dirt and tar are plentiful.
More dirt PLUS a lot of bugs litter the radiator area.
The engine looks as if it?s ten years old.
The wheels are hammered, and feature bush & dirt scratches, with a dose of tar.
Hood area matches the rest of the truck: Dirty.
Making our way to the interior, more of the same.
Doorjambs, carpet and the rest will need thorough cleaning.
Removal of the kickpanels reveal electronics I don?t want to get wet!
Doorpanels were removed to properly clean the backsides, speakers, & grills.
Window rubbers and felts are much easier to access this way, too.
Shot of the door panel.
Gauges are dirty and the plastic fascia very scratched.
Under the dash reveals a grimy a/c area and airbag.
A pile of easy to remove parts that will be thoroughly cleaned and reinstalled.
Air vents are pretty loaded with dirt and old interior dressing.
Driver?s seat removed.
The center console and carpet were much easier to clean, too.
See? Incredibly, the carpet was not too bad in the rest of the truck.
That's where that cookie went!
Exterior- Needs a lot of attention.
M105 applied by hand will tackle the areas which cannot be machine polished.
There were MANY scratches- Some required 2500 grit sanding.
Some scratches were very deep. This one was only partly removed.
It was hard to locate it once the polishing was done, as the scratch-edges were smoothed...
Lots of heavy scuffs that were completely removed via M105.
A test spot helps dial-in the polishing system. M105. Okay, that way easy.
This scratch was deep. It really stood out, so I had to sand it with 2500.
Gonna have to leave it like this and polish to an acceptable finish.
Meguiar?s Detailer D103 All Purpose Cleaner Plus was used throughout the interior.
No extractor, here... Just APC+, water, brushes, and a Craftsman wet/dry vac.
Towels and a warm summer day handle the drying duties.
Carpets are rinsed until dirt & APC+ is removed.
Door sills are cleaned easily.
Meguiar?s M40 Vinyl/Rubber Cleaner & Conditioner applied for beauty & protection.
Small parts are cleaned. Electronic buttons, such as this were cleaned sans water.
A dry towel & horsehair brush to clean. G134 Exterior Trim Coating to dress.
No water, so it?s safer to use around electronics (versus traditional dressings).
imported_Kevin Brown
Jedi Master
My helper, Annie, is not much help.

Under dash components are cleaned (to a degree). Not perfect, but pretty good.

Vents cleaned with APC+, agitated, and a pressure washer rinse.
Once dried, Exterior Trim Coating adds sheen without stickiness.

Results of APC+, thorough cleaning & vaccuuming, & M40.
Rest assured, carpet is super-clean.


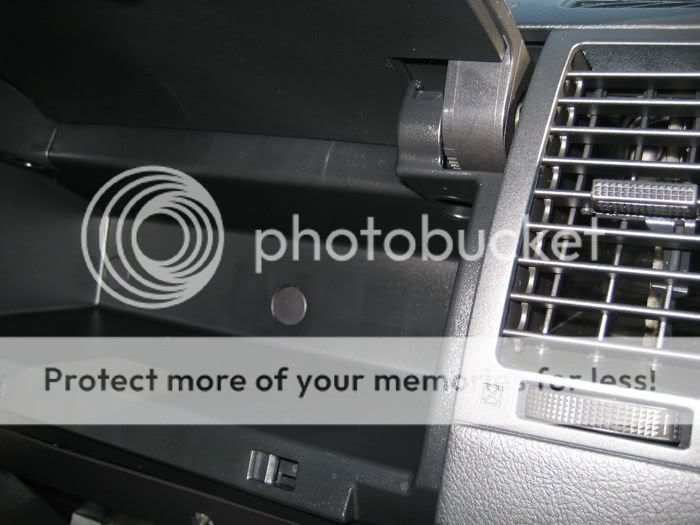
Glove box hinges & latches are free of sticky dressing & gritty dirt.
Water-spots & dust particultate handled upon final wipedown.
Plastic gauge fascia polished via M105 & Meguiar?s Ultimate Wipe.
All other dash areas cleaned with APC+. M40 & G135 protect & beautify.

Pressure washer, towels, & vacuum super-sanitize center console.
Not shown- Two other cubby areas & cupholders built into console. They looked good.

Headliner cleaned up nicely with APC+ and a bit of lacquer thinner.

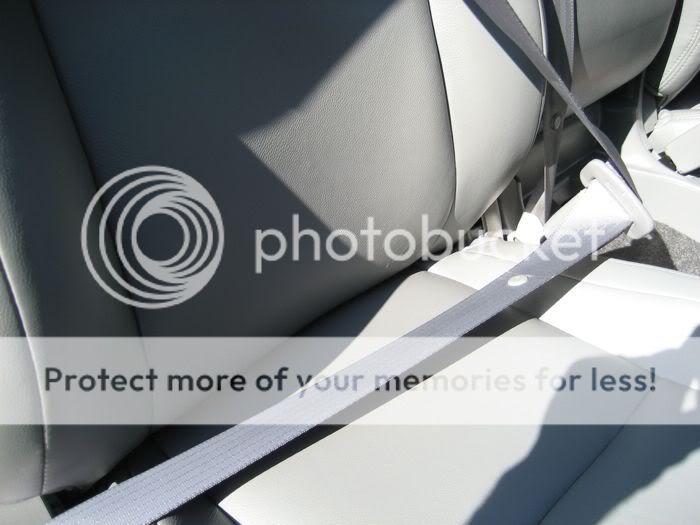
Seatbelts cleaned with APC+, a green Scotchbrite, and a pressure washer.
Fully extend seatbelts to outside of cab, shut door, clean.
Areas that cannot be pulled outside of cab surround with towels and vacuum excess water.
Wipe aggressively with towels, and leave fully extended to air-dry.
Under-seat areas were dialed in by hand. Yellow wiring means airbag!

Doorjambs cleaned just like the engine bay.
Rinse with deionized water, mist on APC+, & agitate with a brush & sponge.
Then, use Meguiar?s Detailer D130 Body Solvent to remove stuck-on tar & dirt-embedded grease.
These particular jambs had a lot of calcium deposits (as did the emblems).
An application of Meguiar?s Detailer D32 Wire Wheel Cleaner handled the situation.
Mist, agitate, & rinse. A soapy-water rinse negates acid remnants.

Meguiar?s Detailer D140 Wheel Brightener cleans the wheels.
Meguiar?s Detailer D130 Body Solvent removes tar speckles.
Meguiar?s M105 Ultra Cut Compound used to polish wheels.
I was able to use my Metabo SXE400 random-orbital with 3? foam pads to apply.


Meguiar?s Detailer D108 Super Degreaser cleans tires, fenderwells, & mudflaps.
Meguiar?s D170 Hyper Dressing diluted 50/50 with water used to dress tire tread & fenderwells.
Meguiar?s M40 Vinyl & Rubber Cleaner/Conditioner used to dress sidewalls & mudflaps.

Cowl area cleaned with APC+, than dressed with M40.
All exterior glass polished M105, applied with Metabo & a 3? foam pad.
Residue removed with D112 Super Soap and water. Pressure washer rinse.
Windshield edges carefully scraped with a razor blade.

Underhood looks fresh again.

Grill cleaned with APC+, then acid, then soap, and finally dressed with M40.


Radiator support- Sorry, no pic of the radiator & support... DOH!

Undercarraige looks respectable again.
Tailpipe cleaned with APC+, acid, Soap rinse.
Wish I?d seen the scratches on the tip- M105 would have removed them easily!

It?s these areas that really make a detail right- Time-consuming, but what a difference.

Emblems cleaned via APC+ & a toothbrush & ventsbrush.
After a soapy water rinse, acid is applied & agitated.
Water rinse again. After machine paint-polishing, M105 is applied by hand to and around
the emblem. Soapy water is applied via trigger bottle, agitated, & pressure washer rinsed.

This is the spot where that big scratch was- Look closely and you can still see it.

From most angles, and in most light situations, it?s hardly noticeable.

Pickup bed looks nice.

Side shot.


Doorhandles look clean and feel smooth. M105 & Ultimate Wipes did the trick.


Looks like a different truck.

Thanks!
Under dash components are cleaned (to a degree). Not perfect, but pretty good.
Vents cleaned with APC+, agitated, and a pressure washer rinse.
Once dried, Exterior Trim Coating adds sheen without stickiness.
Results of APC+, thorough cleaning & vaccuuming, & M40.
Rest assured, carpet is super-clean.
Glove box hinges & latches are free of sticky dressing & gritty dirt.
Water-spots & dust particultate handled upon final wipedown.
Plastic gauge fascia polished via M105 & Meguiar?s Ultimate Wipe.
All other dash areas cleaned with APC+. M40 & G135 protect & beautify.
Pressure washer, towels, & vacuum super-sanitize center console.
Not shown- Two other cubby areas & cupholders built into console. They looked good.
Headliner cleaned up nicely with APC+ and a bit of lacquer thinner.
Seatbelts cleaned with APC+, a green Scotchbrite, and a pressure washer.
Fully extend seatbelts to outside of cab, shut door, clean.
Areas that cannot be pulled outside of cab surround with towels and vacuum excess water.
Wipe aggressively with towels, and leave fully extended to air-dry.
Under-seat areas were dialed in by hand. Yellow wiring means airbag!
Doorjambs cleaned just like the engine bay.
Rinse with deionized water, mist on APC+, & agitate with a brush & sponge.
Then, use Meguiar?s Detailer D130 Body Solvent to remove stuck-on tar & dirt-embedded grease.
These particular jambs had a lot of calcium deposits (as did the emblems).
An application of Meguiar?s Detailer D32 Wire Wheel Cleaner handled the situation.
Mist, agitate, & rinse. A soapy-water rinse negates acid remnants.
Meguiar?s Detailer D140 Wheel Brightener cleans the wheels.
Meguiar?s Detailer D130 Body Solvent removes tar speckles.
Meguiar?s M105 Ultra Cut Compound used to polish wheels.
I was able to use my Metabo SXE400 random-orbital with 3? foam pads to apply.
Meguiar?s Detailer D108 Super Degreaser cleans tires, fenderwells, & mudflaps.
Meguiar?s D170 Hyper Dressing diluted 50/50 with water used to dress tire tread & fenderwells.
Meguiar?s M40 Vinyl & Rubber Cleaner/Conditioner used to dress sidewalls & mudflaps.
Cowl area cleaned with APC+, than dressed with M40.
All exterior glass polished M105, applied with Metabo & a 3? foam pad.
Residue removed with D112 Super Soap and water. Pressure washer rinse.
Windshield edges carefully scraped with a razor blade.
Underhood looks fresh again.
Grill cleaned with APC+, then acid, then soap, and finally dressed with M40.
Radiator support- Sorry, no pic of the radiator & support... DOH!
Undercarraige looks respectable again.
Tailpipe cleaned with APC+, acid, Soap rinse.
Wish I?d seen the scratches on the tip- M105 would have removed them easily!
It?s these areas that really make a detail right- Time-consuming, but what a difference.
Emblems cleaned via APC+ & a toothbrush & ventsbrush.
After a soapy water rinse, acid is applied & agitated.
Water rinse again. After machine paint-polishing, M105 is applied by hand to and around
the emblem. Soapy water is applied via trigger bottle, agitated, & pressure washer rinsed.
This is the spot where that big scratch was- Look closely and you can still see it.
From most angles, and in most light situations, it?s hardly noticeable.
Pickup bed looks nice.
Side shot.
Doorhandles look clean and feel smooth. M105 & Ultimate Wipes did the trick.
Looks like a different truck.
Thanks!
imported_Luster
New member
I can see why Flash recommended this for re-post! Kevin, that is incredible!
Trash to treasure in just how many hours? (I know how much work that is; I've done vehicles that bad! But I'm not so sure they looked that good when I was finished!!!:devil::devil")
Nice work my friend! ancing Dot::clap:
Trash to treasure in just how many hours? (I know how much work that is; I've done vehicles that bad! But I'm not so sure they looked that good when I was finished!!!:devil::devil
Nice work my friend!
ancing Dot::clap:Street Dreams
New member
Very nice work indeed!
I have a question however, if you use the Kevin Brown method to correct a vehicle, does it just become... The Method? :tongue:
I have a question however, if you use the Kevin Brown method to correct a vehicle, does it just become... The Method? :tongue:
imported_juliom2
New member
I really like this post...a shot of the daily driver reality. Total overhaul.
Looks amazing. There was no more sing of the cookie. Awesome.
May the force be with you.(Lets understand the force as megs 105 and KBM)
:StarWars:
Julio
Puerto Rico
Looks amazing. There was no more sing of the cookie. Awesome.
May the force be with you.(Lets understand the force as megs 105 and KBM)
:StarWars:
Julio
Puerto Rico
Just put your 2 intials in front of the M.Very nice work indeed!
I have a question however, if you use the Kevin Brown method to correct a vehicle, does it just become... The Method? :tongue:
Todd@RUPES
Just a regular guy
Very nice work indeed!
I have a question however, if you use the Kevin Brown method to correct a vehicle, does it just become... The Method? :tongue:
I am sending Dave a bill for a wireless keyboard... It has short circuited do a certain amount of semi-digested burrito and Diet Dr. Pepper that was spit forth from my mouth (with out my control)...
I literally LOLed... awesome.
Kevin, this thread is amazing and there is nothing else I can say... (In awe).
imported_Pats300zx
New member
Amazing job Kevin....:clap: