imported_Dave KG
New member
I am currently revamping some detailing guides I wrote for a UK-based detailing forum which I am an active member of and as part of that I have been filming videos and writing snippets of different methods... I know there are very detailed guides already on this site but I thought this may be of use to some folk if they are interested to demonstrate some of the methods that I use ")
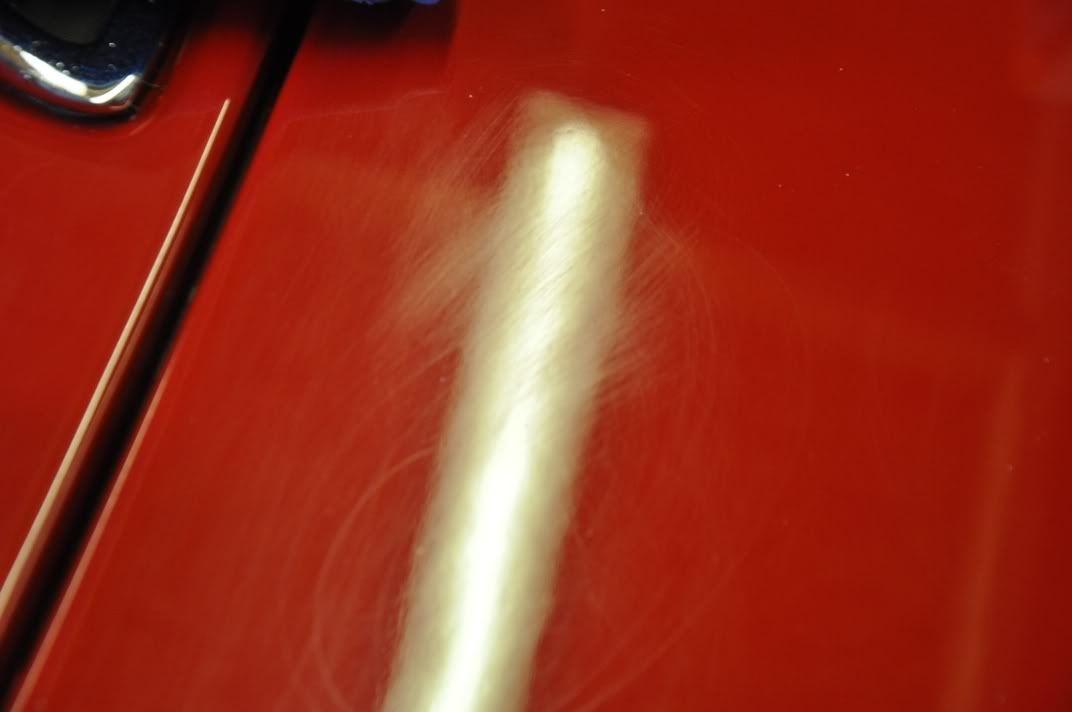
On many cars, you will find regions of deeper marks that are not consistent with the swirls on the rest of the car. An example of this is on this 1970 MGB's bonnet, where the general marring (viewed under 500W Halogens, Sun Gun and striplight) is moderate:


Note: for the striplight picture it is important to set the camera to manual focus so that it focusses on the paint surface and not the striplight itself, in order to accurately portray the finish.
There were also deeper marks in places:
and the correction procedure that was used to good success on the rest of the panel failed to make a significant impact on these marks, shown below after Intensive Polish:


So, in order to correct these regions requires a dedicated heavier compound that is used only in the smaller area where the defects are - this process is known as "spot correction". Before carrying out any correction with aggressive compounds it is important to assess the paint finish with the thickness gauage to check for thin spots that would prevent safe use of compounds:
DSC 0025 - YouTube
The region is thinner than its surroundings, pointing to the marks probably being inflicted by some form of previous correction, possibly ridging from wetsanding or T-cutting to remove a scratch or bird lime etching. In any case the thinner region is something that would cause caution, but given it is thicker than other thin spots there is more confidence that it is safe to proceed with a degree of spot correcting.
The video below shows the spot correction process with Menzerna S100 on a 3M orange compounding pad, 3" size. Typical rotary set for correction only, spreading slow and then working up the speeds to work the compound and finishing at high speed with no efforts made to refine the finish as there will be a dedicated refining stage used (two regions of deeper marks tackled by this set):
DSC 0026 - YouTube
Following the spot correction, the deeper marks are now significantly reduced:


It is again important with the camera to focus on the paint surface to accurately portray the correction achieved - you can still see the defects faintly, and you can see the peel in the finish. The striplight is out of focus because we are focussing on the paint surface here which is vital to show the true correction achieved - be wary of this with using cameras to picture defects before and after. The Sun Gun shot highlights that there is still marks to be removed in terms of machine compounding marks.
As part of this, a three stage process was used, the next stage being Intensive Polish over the spot corrected region and the surroundings to blend the correction:
DSC 0054 - YouTube
No refinement effort made here, as this was to be carried out with a dedicated finishing polish on a finishing pad, this set's purpose was the blend the corrected region to its surroundings and to ensure the removal of any slightly deeper compounding marks than risk being filled inadvertantly by just using a finishing polish straight away. This is a very short set of Intensive Polish, used purely for correction purposes, short-setting to minimise unnecessary paint removal:
DSC 0054 - YouTube
Final refinement was carried out using Final Finish on a finishing pad, using the Zenith Point technique - starting slow, working up to speed until residue goes clear and then working back down the speeds to burnish the finish:
DSC 0059 - YouTube
This is standard Zenith point method, as described in the video the pressure is lightened for the end sets by supporting the weight of the machine to burnish the finish. A separate thread on Zenith point technique will be posted.
Before finishing the paint thicknesses are checked after correction:
DSC 0031 - YouTube
Note that the panel is always allowed to cool before assessing the thickness or checking the level of correction achieved as the paint will swell when warm to give false correction assessment, and higher than accurate readings on the thickness gauge.
The finished result on the spot corrected region:

On many cars, you will find regions of deeper marks that are not consistent with the swirls on the rest of the car. An example of this is on this 1970 MGB's bonnet, where the general marring (viewed under 500W Halogens, Sun Gun and striplight) is moderate:
Note: for the striplight picture it is important to set the camera to manual focus so that it focusses on the paint surface and not the striplight itself, in order to accurately portray the finish.
There were also deeper marks in places:
and the correction procedure that was used to good success on the rest of the panel failed to make a significant impact on these marks, shown below after Intensive Polish:
So, in order to correct these regions requires a dedicated heavier compound that is used only in the smaller area where the defects are - this process is known as "spot correction". Before carrying out any correction with aggressive compounds it is important to assess the paint finish with the thickness gauage to check for thin spots that would prevent safe use of compounds:
DSC 0025 - YouTube
The region is thinner than its surroundings, pointing to the marks probably being inflicted by some form of previous correction, possibly ridging from wetsanding or T-cutting to remove a scratch or bird lime etching. In any case the thinner region is something that would cause caution, but given it is thicker than other thin spots there is more confidence that it is safe to proceed with a degree of spot correcting.
The video below shows the spot correction process with Menzerna S100 on a 3M orange compounding pad, 3" size. Typical rotary set for correction only, spreading slow and then working up the speeds to work the compound and finishing at high speed with no efforts made to refine the finish as there will be a dedicated refining stage used (two regions of deeper marks tackled by this set):
DSC 0026 - YouTube
Following the spot correction, the deeper marks are now significantly reduced:
It is again important with the camera to focus on the paint surface to accurately portray the correction achieved - you can still see the defects faintly, and you can see the peel in the finish. The striplight is out of focus because we are focussing on the paint surface here which is vital to show the true correction achieved - be wary of this with using cameras to picture defects before and after. The Sun Gun shot highlights that there is still marks to be removed in terms of machine compounding marks.
As part of this, a three stage process was used, the next stage being Intensive Polish over the spot corrected region and the surroundings to blend the correction:
DSC 0054 - YouTube
No refinement effort made here, as this was to be carried out with a dedicated finishing polish on a finishing pad, this set's purpose was the blend the corrected region to its surroundings and to ensure the removal of any slightly deeper compounding marks than risk being filled inadvertantly by just using a finishing polish straight away. This is a very short set of Intensive Polish, used purely for correction purposes, short-setting to minimise unnecessary paint removal:
DSC 0054 - YouTube
Final refinement was carried out using Final Finish on a finishing pad, using the Zenith Point technique - starting slow, working up to speed until residue goes clear and then working back down the speeds to burnish the finish:
DSC 0059 - YouTube
This is standard Zenith point method, as described in the video the pressure is lightened for the end sets by supporting the weight of the machine to burnish the finish. A separate thread on Zenith point technique will be posted.
Before finishing the paint thicknesses are checked after correction:
DSC 0031 - YouTube
Note that the panel is always allowed to cool before assessing the thickness or checking the level of correction achieved as the paint will swell when warm to give false correction assessment, and higher than accurate readings on the thickness gauge.
The finished result on the spot corrected region: