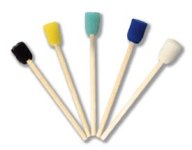
I've searched this forum for an answer but haven't found anything yet. The question is how do you polish those super tight spots where even a 4" pad is way too big? For example, the spots of paint between letters or emblems on a car or the spot under a lift up door handle. I then came across some q-tip style applicators called the The Edge FoamTips. What do you guys think about mounting these on a cordless drill? Of course it would have to be something that doesn't spin to fast. I know my cordless drill runs at 250rpm at low speed.
Navigation
Install the app
How to install the app on iOS
Follow along with the video below to see how to install our site as a web app on your home screen.
Note: This feature may not be available in some browsers.
More options
Style variation
You are using an out of date browser. It may not display this or other websites correctly.
You should upgrade or use an alternative browser.
You should upgrade or use an alternative browser.
Polishing super-tight areas
- Thread starter RayMan
- Start date
Accumulator
Well-known member
RAyMan- Welcome to Autopia!
Nah, I've never used any swab that'd both hold up under machine rotation and give enough user-feel for safe control. Some things just have to be done manually.
Nah, I've never used any swab that'd both hold up under machine rotation and give enough user-feel for safe control. Some things just have to be done manually.
imageautodetail
New member
anytime i have an area that is tight, I rub it out by hand by wet sanding lightly first then polish-most spots that are that tight do not need that much work unless they are oxidized, but you could look into the buffing kit that comes with most head light restoration kits, you can find those with a 2 inch surface
mikebai1990
New member
imageautodetail, with wetsanding, wouldn't it make it very hard to polish out afterwards using hand polishing?
RayMan said:What do you guys think about mounting these on a cordless drill? Of course it would have to be something that doesn't spin to fast. I know my cordless drill runs at 250rpm at low speed.
I think you are exposing yourself to too much risk of damaging the paint regardless of what are the RPMs. It is a pointed edge rotating object.
imageautodetail
New member
Lets use a door pillar for an example trim on both sides and only a inch strip of painted surface, but it has some scratches that just polish will not rub out, lightly hit with some 2500, then polish with a terry app, by handmikebai1990 said:imageautodetail, with wetsanding, wouldn't it make it very hard to polish out afterwards using hand polishing?
ZoranC said:I think you are exposing yourself to too much risk of damaging the paint regardless of what are the RPMs. It is a pointed edge rotating object.
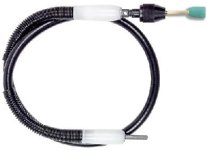
I was thinking about using the side (rather than the tip) of the foamtip. Also, I'd cut the stem short and probably mount it on a flexible drill extension.
Attached is a mock-up of what it would look like.
Attachments
imageautodetail
New member
RayMan said:I was thinking about using the side (rather than the tip) of the foamtip. Also, I'd cut the stem short and probably mount it on a flexible drill extension.
Attached is a mock-up of what it would look like.
looks like a disaster waiting to happen...elbow grease is all that is needed at times
Accumulator
Well-known member
Yeah, we've debated the wisdom of using a dremel-type approach before and, well, I sure wouldn't try it and I'm very familiar/comfortable with Dremels and flex-shaft tools (I've even used them in this manner on painted surfaces on the back sides of wheels). Remember, they're just tiny rotaries ") If you want to try it, use one of the newer-tech ones that has spot-on speed control; the older ones with rotary speed controls won't offer sufficient accuracy and consistency IMO.
If you want to try it, use one of the newer-tech ones that has spot-on speed control; the older ones with rotary speed controls won't offer sufficient accuracy and consistency IMO.
For very tight areas, you could use progressively finer sandpaper, down to some of the micro-grits that are available. But I dunno...if I care all that much I spend the required time to do it with compounds, swabs, or tufts of cotton wool (or MF) and tiny sticks.
Some area that's an inch or more wide, I'd just use the edge of a pad on a regular machine.
If you want to try it, use one of the newer-tech ones that has spot-on speed control; the older ones with rotary speed controls won't offer sufficient accuracy and consistency IMO.For very tight areas, you could use progressively finer sandpaper, down to some of the micro-grits that are available. But I dunno...if I care all that much I spend the required time to do it with compounds, swabs, or tufts of cotton wool (or MF) and tiny sticks.
Some area that's an inch or more wide, I'd just use the edge of a pad on a regular machine.
I was startled to notice how bad the indented area underneath my door handles looked the other day when the sun was hitting the side of the car just right. The door panels looked smooth and shiny, then the door handle areas looked like they'd been scratched with keys, rings, and who knows what else.
I was wondering the same thing: how do I polish this area with enough intensity to make the scratches go away when I can't get access with the PC, and my fingers may not reach all the edges. Or if they do reach the edges, will they be able to exert enough pressure to polish away the damage?
Sounds like there may not be an easy way to do this; just the long, tedious process of going over it and over it until it's smooth with varying polishes?
Thnx, Nick
mikebai1990
New member
ZeroDfx, cases like your, the best you can do is get an aggressive pad (terry, probably) and a good polish that works by hand (I've heard 1Z is great). It will definitely take a long time.. Can't get around that ")
Accumulator
Well-known member
ZeroDfx said:I was startled to notice how bad the indented area underneath my door handles looked .. how do I polish this area with enough intensity to make the scratches go away when I can't get access with the PC, and my fingers may not reach all the edges. Or if they do reach the edges, will they be able to exert enough pressure to polish away the damage?
Sounds like there may not be an easy way to do this; just the long, tedious process of going over it and over it until it's smooth with varying polishes..
Yep, just gotta go over it again and again and again.....
I've removed fingernail scratches from behind the door handles of the Audis by hand. It took a very long time and it was a real PIA. And I was dealing with very minor marring too.
There aren't all that many aggressive products that'll break down OK by hand..I'd say to start with 1Z Ultra/Extra and terry and use that until you're either satisfied or fed up, and then use something milder to remove the micromarring. Set aside well over a half hour of constant work for each such area and don't be surprised if that amount of work only gets things started. It's not like a dozen passes will do it (at least not unless your paint is very soft).
ZeroDfx said:I was startled to notice how bad the indented area underneath my door handles looked the other day when the sun was hitting the side of the car just right. The door panels looked smooth and shiny, then the door handle areas looked like they'd been scratched with keys, rings, and who knows what else.
I was wondering the same thing: how do I polish this area with enough intensity to make the scratches go away when I can't get access with the PC, and my fingers may not reach all the edges. Or if they do reach the edges, will they be able to exert enough pressure to polish away the damage?
Sounds like there may not be an easy way to do this; just the long, tedious process of going over it and over it until it's smooth with varying polishes?
Thnx, Nick
I think it's mostly fingernails that cause these scratches under the door handles. IMO, these scratches are deeper than moderate to heavy spider-webbing. If spider webbing is difficult to remove wit a DA polisher, then I have my reservations about hand polishing.
I guess I'll just have to be the guinea-pig and test my theory.
Accumulator
Well-known member
RayMan said:I think it's mostly fingernails that cause these scratches under the door handles..
Yeah, that was *exactly* what I was dealing with. I can sure imagine them being too deep for safe removal too. Heh heh, gotta...uhm, "educate" the people who might touch the vehicles...I've been very fortunate that in my case this education has been effective.
Accumulator
Well-known member
phamkl said:..It's hard enough to keep the car scratch free but the door indent area... I almost wish it were lined with textured plastic.
On my beater-Blazer they *are* lined with textured black plastic, which sure is handy in the winter when the vehicle is dirty and I'm wearing heavy gloves.
I had ebpcivicsi put some Paint Protection Film over the paint in those areas on our latest dog-hauler
 Oughta help a lot.
 I thought about doing it on the Audis but it's not recommended on repainted areas and anyhow, I seem to have the dealership people trained now (they were the only people who ever messed up).
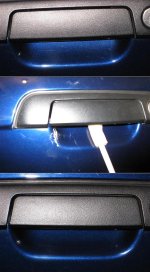
Well despite what many warned me against doing, I had to try it anyways. I used Wolfgang Swirl Remover with an edge detailing foam tip on the end of my cordless screwdriver. The tip was actually quite easy to control and I had no problems. The combo of tip and swirl remover was actually quite gentle and did not correct as much as I anticipated. I think I'll try a more aggressive foam tip next time around and maybe a slightly more abrasive polish. Attached are some pics but my camera sucks and these photos don't show the results accurately. The procedure did make a substantial difference but could still use a bit more.
Attachments
Accumulator
Well-known member
RAyMan- Glad to hear it didn't cause any problems! Heh heh, be a little careful as you dial up the aggressiveness; sometimes it's that "just a little more.." that really bites ya