Paint correction on Single Stage Paint `86 4Runner. Any advice or thoughts on approach or LSP welcome!

RaydiantDetail

New member
Hi Folks,

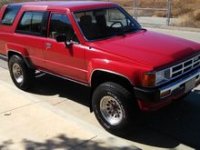
So this weekend I am working on a `86 Toyota 4 Runner. This will be the largest vehicle I will have corrected to date and the first time I am correcting a single stage paint. The SUV was repainted by the previous owner and was never really taken care of. The new owner occasionally takes it through the car wash but hes never waxed it before.

The customer really just wants some life brought back into the paint. It is actually used for its purpose for a ton of off roading on the weekends. The paint is nowhere near perfect by any means: heavy oxidation, some rust spots, overspray, paint chipped on the fenders etc. but he just wants the shine back.

The trim is in terrible shape and faded.

When I went out this past weekend I did a test spot on the vehicle to show what could be done to bring back the paint or to see what I could do. I seemed to get a good level of correction and remove oxidation with the BOSS G15, yellow pad, and BOSS perfecting cream, seemed to clear the oxidation and he was very happy with the test spot results. Again customer isnt looking to spend a ton of money on it and just looking to remove the oxidation and revitalize the paint.

I have also read a lot about the Megs #7 rub down which looks amazing but since its just me working on this and this SUV is huge I`d rather not lol.


My approach is to correct the paint with Perfecting Cream and yellow pads. I ordered some more yellow pads during this last sale since its single stage paint I wanted to work as clean as possible. I have about 12 yellow pads plus I have the LC 3000 pad washer. I am going to do another test spot with Correcting cream and orange pads to see if I can refine the paint even more with that combo but as said he was more than happy with the results for perfecting cream/ yellow pad. I also have s20 black, m205, HD Adapt etc. too many polishes so I may do multiple spots or would that be over kill?

For the trim - Solution finish + CarPro DLUX for protection

My question around LSP. Would any LSP work that you would use on clear coated paint?
Outside of a coating (no budget for that) I wanted to provide some great protection and was thinking BFWD topped with 2 coats BFMS for the wow factor.

Any better options for LSP? I have Collinite 845, HD Poxy, WGDS 3.0, BOSS finishing sealant, Jescar Sealant, PBs EX-P with Carnauba and an assortment of waxes.

Any input or advice is always greatly appreciated and thank you!
 
Re: Single Stage Paint Correction on `86 4Runner. Any advice or thoughts on approach or LSP welcome!

Just realized the title should probably read "Paint correction on Single Stage Paint".
 
Re: Single Stage Paint Correction on `86 4Runner. Any advice or thoughts on approach or LSP welcome!

OVERKILL (if orange pad and Correction Creme)

I did a 4th gen 4Runner that is also an off-roader. Made that thing look sweet. Black even. The 4Runner still shines today, and the owner likes that. However, seeing how it goes off road, it`s been scratched, chipped, and door was recently pushed in when he "dropped it`s side onto a boulder." - Knowing there`s only so much paint to work with, and knowing he will continue to take it off road, I`d only hit it with light polishing, glaze, and LSP.

I wouldn`t get too crazy with the correction, and would even stay away from the compounding step.

I have another 4x4 I will be working on. My own `96 Jeep Cherokee (XJ). At this point, I believe it`s single stage white. My plans, at least for now, are to clean off some oxidation, bring back some shine to it. Then, I`ll hit it with Poorboy`s White Diamond to smooth it out some, and top it with an LSP. Might be Poorboys Liquid Blue, but haven`t confirmed it.

EDIT: I also like the Megs #7 rub down...but damn that`s a lot of work. I put in 40 or so hours on a VW. Can`t imaging how long that rig would take! And the VW really needed it, as it was really dried out paint.
 
Being an owner of an `86 4Runner (and being red), I thought I would chime in...

I agree with resisting the temptation to use a product with a heavier cut. Being a 30 year old vehicle, it`s condition, a repaint and a questionable past would make me cautious personally. Heck, I know the complete history of mine (used to be my father`s who owned it since new) and I still refuse to do any real correction on it. All I do to it now is light correction with something like Optimum Polish or even just an LSP that contains solvents to help remove any oxidation. It creates a good shine. ....enough to get looks, comments and offers when I take it out 3-4 times a month.

They are not really good shots but below are a couple of pics. IIRC, this was after just using some CG Pete`s `53 I had sitting in my cabinet. The plastics were a bit shinier than I like but I was using 303 AP in this case and didn`t buff it down (usually use C4). You can notice some of the oxidation on the removable top. The stock finish was satin-like and these things oxidize horribly. If the top had nothing on it, it would look very washed out and chalky. 303 AP really helps bring back the color although it only lasts about 3 washes. ...easy enough to apply though and buff down.

IMG_20141019_111127_429_zps3frotz4k.jpg

IMG_20141019_111139_769_zpsjnzqux5q.jpg


A couple of other notes that might help....

- On my truck, the white TOYOTA letters on the black piece above license plate will rub off with abrasion or even an LSP. I tend to take a little care there while trying to polishing the surrounding plastic. From the pic of the customer`s truck, it appears that may not be a problem since it looks to be already worn.

- Most of the plastic tends to react well to restoration. The exception being the bumper guards on top of the bumper and the front of the rear wheel wells. The products I have used on those areas just don`t last. I have been intending to try some Solution Finish I have on those bits. ...also may not be a problem in your case.

- The black window frame on the removable top is known for rust. The bottom part is simply painted metal. The paint on these pieces really didn`t take well to polishing and if I hadn`t repainted them, I would have likely just continued to dress those areas. The black b-pillar pieces are just black plastic although the face of it is textured.

Anyhow, I wish you luck on it.
 

Attachments

  • 80-img_20141019_111127_429_zps3frotz4k_aaea9e94af195d4b4d01f875afee9d55093417bd.jpg
    80-img_20141019_111127_429_zps3frotz4k_aaea9e94af195d4b4d01f875afee9d55093417bd.jpg
    9.5 KB · Views: 7
Re: Single Stage Paint Correction on `86 4Runner. Any advice or thoughts on approach or LSP welcome!

OVERKILL (if orange pad and Correction Creme)

I did a 4th gen 4Runner that is also an off-roader. Made that thing look sweet. Black even. The 4Runner still shines today, and the owner likes that. However, seeing how it goes off road, it`s been scratched, chipped, and door was recently pushed in when he "dropped it`s side onto a boulder." - Knowing there`s only so much paint to work with, and knowing he will continue to take it off road, I`d only hit it with light polishing, glaze, and LSP.

I wouldn`t get too crazy with the correction, and would even stay away from the compounding step.

I have another 4x4 I will be working on. My own `96 Jeep Cherokee (XJ). At this point, I believe it`s single stage white. My plans, at least for now, are to clean off some oxidation, bring back some shine to it. Then, I`ll hit it with Poorboy`s White Diamond to smooth it out some, and top it with an LSP. Might be Poorboys Liquid Blue, but haven`t confirmed it.

EDIT: I also like the Megs #7 rub down...but damn that`s a lot of work. I put in 40 or so hours on a VW. Can`t imaging how long that rig would take! And the VW really needed it, as it was really dried out paint.

Thanks JustJesus. Ill stick with the perfecting cream and probably follow up with a glaze and LSP.
I have PB Black Hole? Would that work well?
 
Being an owner of an `86 4Runner (and being red), I thought I would chime in...

I agree with resisting the temptation to use a product with a heavier cut. Being a 30 year old vehicle, it`s condition, a repaint and a questionable past would make me cautious personally. Heck, I know the complete history of mine (used to be my father`s who owned it since new) and I still refuse to do any real correction on it. All I do to it now is light correction with something like Optimum Polish or even just an LSP that contains solvents to help remove any oxidation. It creates a good shine. ....enough to get looks, comments and offers when I take it out 3-4 times a month.

They are not really good shots but below are a couple of pics. IIRC, this was after just using some CG Pete`s `53 I had sitting in my cabinet. The plastics were a bit shinier than I like but I was using 303 AP in this case and didn`t buff it down (usually use C4). You can notice some of the oxidation on the removable top. The stock finish was satin-like and these things oxidize horribly. If the top had nothing on it, it would look very washed out and chalky. 303 AP really helps bring back the color although it only lasts about 3 washes. ...easy enough to apply though and buff down.

IMG_20141019_111127_429_zps3frotz4k.jpg

IMG_20141019_111139_769_zpsjnzqux5q.jpg


A couple of other notes that might help....

- On my truck, the white TOYOTA letters on the black piece above license plate will rub off with abrasion or even an LSP. I tend to take a little care there while trying to polishing the surrounding plastic. From the pic of the customer`s truck, it appears that may not be a problem since it looks to be already worn.

- Most of the plastic tends to react well to restoration. The exception being the bumper guards on top of the bumper and the front of the rear wheel wells. The products I have used on those areas just don`t last. I have been intending to try some Solution Finish I have on those bits. ...also may not be a problem in your case.

- The black window frame on the removable top is known for rust. The bottom part is simply painted metal. The paint on these pieces really didn`t take well to polishing and if I hadn`t repainted them, I would have likely just continued to dress those areas. The black b-pillar pieces are just black plastic although the face of it is textured.

Anyhow, I wish you luck on it.


EDIT: Your 4runner looks amazing. I hope I can get his looking close to that.
Thanks Kean, these are great tips! Ill tape off the surrounding plastic so I don`t cause any damage when polishing. Id hate to cause more damage than I am trying to fix.
 
EDIT: Your 4runner looks amazing. I hope I can get his looking close to that.
Thanks Kean, these are great tips! Ill tape off the surrounding plastic so I don`t cause any damage when polishing. Id hate to cause more damage than I am trying to fix.

Thanks. The original paint looks absolutely amazing when it is polished but it is already thin enough on this one and I just don`t want to do more harm than good. If the repaint in your example is anything like the original, I think it will turn out looking nice. Judging from what you have shared about the owner`s expectations and situation, I think he would be more than happy with the result.
 
Re: Single Stage Paint Correction on `86 4Runner. Any advice or thoughts on approach or LSP welcome!

Thanks JustJesus. Ill stick with the perfecting cream and probably follow up with a glaze and LSP.
I have PB Black Hole? Would that work well?

Black Hole is still one of my all around favorite products. Just taking a whiff of it last night, too! Love the stuff, and the scent!

Here`s the 4Runner I did. Process involved M105 on an orange HexLogic pad, on the PC. Skipped the M205 step, and went to the Black Hole on a Blue HexLogic pad, on the PC with speed at either 3, or 4. Likely 3. Worked it in good. Followed it up with Liquid Natty`s Blue. The results? Fabulous. Have a look for yourself.. Scroll down to post #186.

I went with M105 on this one due to the deeper scratches. Not just swirls on this thing!

nihkon's 4Runner - Page 13 - Toyota 4Runner Forum - Largest 4Runner Forum
 
Re: Single Stage Paint Correction on `86 4Runner. Any advice or thoughts on approach or LSP welcome!

Black Hole is still one of my all around favorite products. Just taking a whiff of it last night, too! Love the stuff, and the scent!

Here`s the 4Runner I did. Process involved M105 on an orange HexLogic pad, on the PC. Skipped the M205 step, and went to the Black Hole on a Blue HexLogic pad, on the PC with speed at either 3, or 4. Likely 3. Worked it in good. Followed it up with Liquid Natty`s Blue. The results? Fabulous. Have a look for yourself.. Scroll down to post #186.

I went with M105 on this one due to the deeper scratches. Not just swirls on this thing!

nihkon`s 4Runner - Page 13 - Toyota 4Runner Forum - Largest 4Runner Forum

Holy ```` that turn around is insane! Amazing finish and gloss! B)
Im pretty thankfully I dont have to deal with those level of scratches on this one.

Looks like I will finish up with PB Black Hole and LSP with PB Ex Sealant plus Carnauba, then maybe top it off with one of my waxes. I don`t have any of the PB Natty waxes yet. I am planning on getting some next on my list.
 
Thanks. The original paint looks absolutely amazing when it is polished but it is already thin enough on this one and I just don`t want to do more harm than good. If the repaint in your example is anything like the original, I think it will turn out looking nice. Judging from what you have shared about the owner`s expectations and situation, I think he would be more than happy with the result.

Yeah I have a reaction video of just the test spot and his buddies reaction when he stepped outside to see the difference..."OH MY GOD"...I couldnt stop laughing...he showed 4 people at his work the difference...Hopefully it gets me more business as he works for a pretty well known Rim and Tire place in ATL.
 
Great job on that truck JustJesus- I couldn`t help but laugh when I read this..." Did he clay bar first? Brand of wax? Any special tips or tricks this guy did? Rotation/rotary wax wheel with polishing pad? " .

 
Re: Single Stage Paint Correction on `86 4Runner. Any advice or thoughts on approach or LSP welcome!

[QUOTE
EDIT: I also like the Megs #7 rub down...but damn that`s a lot of work. I put in 40 or so hours on a VW. Can`t imaging how long that rig would take! And the VW really needed it, as it was really dried out paint.[/QUOTE]

I`m with you on how long the #7 takes. FWIW they also make a #3 Glaze that is meant to be applied by machine.

"Until now, polishes were manufactured to be applied by hand. Machine application rendered flat, lack-luster results because the product was not designed to take advantage of the unique conditions generated by a polisher. Traditional polishes contain no oils to nourish the paint so, while a decent shine can be achieved, it takes a lot of elbow grease. All that is about to change with the introduction of Meguiar’s #3 Professional Machine Glaze."
 
Re: Single Stage Paint Correction on `86 4Runner. Any advice or thoughts on approach or LSP welcome!

Great job on that truck JustJesus- I couldn`t help but laugh when I read this..." Did he clay bar first? Brand of wax? Any special tips or tricks this guy did? Rotation/rotary wax wheel with polishing pad? " .


Thanks man! Oh, that IS funny. I don`t think I had seen that.

Some good info on "restoring" single stage


That was one of his threads I read and eventually put into practice.


I`m with you on how long the #7 takes. FWIW they also make a #3 Glaze that is meant to be applied by machine.

"...All that is about to change with the introduction of Meguiar’s #3 Professional Machine Glaze."

Hmm. If it`s similar, but for machine use, it`s caught MY attention! Thanks :)
 
Re: Single Stage Paint Correction on `86 4Runner. Any advice or thoughts on approach or LSP welcome!

Thanks man! Oh, that IS funny. I don`t think I had seen that.


That was one of his threads I read and eventually put into practice.


Hmm. If it`s similar, but for machine use, it`s caught MY attention! Thanks :)

Thinking about ordering the #3 since there is the 25% off sale on AGO right now :)

From the description "This is a true polish. It will improve the texture and appearance of your paint, but it will not remove oxidation or swirls. For that you need Meguiar’s #9 Swirl Remover. Follow up with #3 Machine Glazeand then a premium wax."

I am wondering if that is more for a base/ clear type of paint that it would not remove oxidation on since it only has a cut level of 1 and would work for oxidation on single stage super soft pain?. Maybe with a MF finishing pad? Anyway its worth a shot to try it out either way looks like a nice glaze to add to the arsenal.

Thanks for the recommendation Knozzmoeking
 
Re: Single Stage Paint Correction on `86 4Runner. Any advice or thoughts on approach or LSP welcome!

Huh. It pretty much tells you M3 will *not* remove oxidation, although it`s safe to use on all paint types.

My best guess, it`s not anywhere near aggressive enough. But on soft single stage? Yeah, I wonder.

Keep in mind, Autopia price matches! Even the sales over on the other side.

DOH! And my connect is good till December end too! Shoot well Ill have to keep that in mind for next time. I already placed the order over on AGO like 5 min ago.
Still, for everything I ordered I got a good deal but extra 10% off on top would have been better lol.
 
I kick myself in the butt way too much for not getting Connect. It was being done at a time when I wasn`t really buying, so that`s maybe why I didn`t. Who knows.

Yeah, that`s a really, really, crazy sale. Like insanely crazy.

Well, try out that M03 and let us know how it works out :)
 
Back
Top