Newb here I need wash clay POLISH WAX PC advice please

The Count

New member
Ok so ever since I was little my dad obviously taught me all wrong, he used sponges and chamios. Not until I found this sight did I relize we were doing it all wrong. So I just went to O'rieleys and bought a microfiber wash mit and microfiber towels, I hope there good quality but Im a newb so I don't know.


Last year I clayed my truck, its a ranger, four times and then I put rejex on it, its a synthetic wax I believe, my dad bought it at the harley shop and they say its better than the other stuff. Well 20 hours later I had it done, I got it really good thats why it took so long, a ranger, by hand.


My buddies keep asking me how I keep my cars so shiny, LoL, so now I wanna even improve on that.


I have a 85 5.0 Mustang GT grey and my 2008 Ranger torch red they are both 5 speeds hehe. My truck is full of swirl marks which sux so I need a 2 step polish...right?


So I plan on buying a PC from lowes cuz thats what you guys said is that the best bet? Then I'm clueless on pads. Then I would like to know the process specifically. Wash, clay, use that chemical that takes the residue off I don't know what its called, polish with rough stuff, polish with fine stuff, glaze, wax, sealant.


Is a glaze really worth it? And should you wax and seal it?


I want something that will protect for at least 6 months and rejex says it does that. I've learnt a lot on this site, I've been reading like crazy. I want to get meguiars #62. I have no clue what kind of polish, glaze, wax, and sealent are the best and make it look the best, I would like your guys's opinion on that. Can I get the step by step? Please? Oh FMJ sounds like I need to buy some of that. Thank you guys so much. Help a newb get his vehicles even shinier than it is.
 
The Count said:
..wrong. So I just went to O'rieleys and bought a microfiber wash mit and microfiber towels, I hope there good quality but Im a newb so I don't know...


Do the "CD-test"- rub the MFs on the data side of a CD and see if they mar it.


I wanna even improve on that.I have a 85 5.0 Mustang GT grey and my 2008 Ranger torch red they are both 5 speeds hehe. My truck is full of swirl marks which sux so I need a 2 step polish...right?


Ah, I love those early Fox-body Mustangs :D


You probably need something pretty aggressive to take out the swirls, but some aggressive products finish so well that they don't always require a milder follow up. But yeah...plan on two-stepping it.
So I plan on buying a PC from lowes cuz thats what you guys said is that the best bet?


I'd much rather spend more and get a better polisher; the PC is barely adequate IMO and I never really use mine any more. The Griot's Garage 6" Random Orbital is *MUCH* better, whole different ballgame, and well worth the $ IMO.
Then I'm clueless on pads. Then I would like to know the process specifically.


Sorry, but I can't really give you a decent reply as it'd take a LONG time, sorta like answering "how do I build a house?". Maybe somebody can point you towards some informative threads/links/something that'll provide good answers.
Wash, clay, use that chemical that takes the residue off I don't know what its called, polish with rough stuff, polish with fine stuff, glaze, wax, sealant.


That's the general idea, but I suggest you get a much better understanding before you tackle it. Here's a thumbnail sketch of the process...


Short version: the clay oughta remove any "residue" and if not the compound (that's the aggressive stuff) and/or polish (that's the fine stuff) oughta take care of it.


Then the glaze, but a) it might not be worth doing b) not all glazes work with sealants, and c) I wouldn't complicate this by adding unnecessary steps.


Speaking of unnecessary steps, I'd just pick a wax or a sealant and only use that one thing for your LSP ("Last Step Product").


Summary:


Wash vehicle, clay, maybe rewash to remove clay/lube residue.


Compound with polisher using something like Optimium Hyper (spray) Compound and maybe a Lake Country Cyan Hydrotech pad (you'll need at least four of those pads IMO).


Polish with polisher using something like Optimum (spray) and maybe a Lake Country Tangerine Hydrotech pad (you'll need maybe three of those pads IMO).


(There are other compound/polish combos you could try instead: Meguiar's M105 and M205 or Meguiar's Ultimate Compound/Scratch-X v2.0, or stuff from [wherever, lots of choices], or you could just do one step with 1Z brand Paint Polish and say "good enough".)


Wax with Collinite 845 Insulator Wax.


Oh, and Welcome to Autopia!
 
Accumulator said:


You probably need something pretty aggressive to take out the swirls, but some aggressive products finish so well that they don't always require a milder follow up.


I'd much rather spend more and get a better polisher; the PC is barely adequate IMO and I never really use mine any more. The Griot's Garage 6" Random Orbital is *MUCH* better, whole different ballgame, and well worth the $ IMO.


Wow Accum you lost a bit of respect from me for those two statements.


Any "pretty aggressive" product WILL require at least one more step to properly finish the job. Sure you can get decent results but not good enough in my book. Maybe your standards are just lower then mine? Don't get offended by that as I have no idea what kind of work you put out since you never posted any jobs that you have done.


The PC is more then adequate to do the job. I'm not sure how you can say that the Griots is much better when you can get the same results with a PC with no extra work. It has been proven over and over again by some of the best detailers out there. Its also a HELL of a lot more reliable then the Griots machine. FYI I sold my Griots and kept the PC ;)
 
CD test, duh, why didn't I think of that.


And the residue I was talking about was I was reading and its kinda like a chemical wipe to clean off the compound or something?


Pads I guess I need an orange, rough? And a white, polish?


And yeh everyone here must love optimum, I think I'll try that, I think that was on scottwax's youtube channel that he said he did it 8 months ago and it still beaded off like rain-x so that seems like good stuff.


845's the best stuff huh? How long does it last? I'd like a deep shine and everything LoL.
 
Dubbin1 said:
Wow Accum you lost a bit of respect from me for those two statements...


We're probably on the same page with the first one, and I guess the second is a "YMMV" sort of thing. Let's discuss it :D If it turns out that I've lost respect/credibility with you after all, then that's the way it goes.


Any "pretty aggressive" product WILL require at least one more step to properly finish the job. Sure you can get decent results but not good enough in my book. Maybe your standards are just lower then mine? Don't get offended by that as I have no idea what kind of work you put out since you never posted any jobs that you have done.


I myself have never stopped after an aggressive step. No, *never*, not even on work trucks that I did as a freebie ;) I'm often not even satisfied with the finish that M205 leaves and I follow that with a better-finishing product when I think it's justified.


I posted that because others here *have* been satisfied with how some aggressive products can finish (e.g., ask Barry Theal about finishing out with *M105* of all things :eek: ) and I don't know what The Count considers acceptable. IF he thinks that, say.... UC finishes out OK then I'm not gonna tell him he has to follow up with something just because I would. When so many people say UC finishes out ready-to-wax I'm willing to let people decide for themselves what does/doesn't need a follow up.


The PC is more then adequate to do the job. I'm not sure how you can say that the Griots is much better when you can get the same results with a PC with no extra work. It has been proven over and over again by some of the best detailers out there. Its also a HELL of a lot more reliable then the Griots machine. FYI I sold my Griots and kept the PC ;)


I've used PCs since the early '90s and mine have not been as reliable as yours nor have they done the work in what I consider a timely manner (correcting Audis via PC was an exercise in frustration). My first one had to be rebuilt after a year or so and the other has been making scary noises for years ever since its use at the St. Louis G-T-G. No lifetime warranty like the Griot's has, so when that noisy one dies I'll just toss it (even though the rebuilds are inexpensive).


My Griot's 6" does correction with a 6" pad that I can only duplicate via PC by using a 4" pad. This is in side-by-side tests with my Griot's and both my PCs. I finally just retired the PCs because of the difference, I was spending much more time with the same pads/products and the PCs vibrated a lot more.


The Griot's won't correct like a Flex 3401, let alone a rotary, but for less serious work it simply outperforms both my PCs and maybe even my beloved Cyclos.


FWIW, I only got the Griot's after Barry talked me into it and I wasn't expecting anything *nearly* as dramatic as the results I've experienced. Actually, my wife bought it as a gift as I didn't think the differences would be worth spending money on. No idea why our experiences differ so much, but as I said, I guess it's just another "YMMV" thing :nixweiss
 
The Count said:
And the residue I was talking about was I was reading and its kinda like a chemical wipe to clean off the compound or something?


You lost me...sorry, I don't know what you mean :confused:


Wash and clay. That oughta remove any "residue" that's now on the paint. IF not, the compound/polish oughta take care of it. Then abrasively polish and buff off that polish/compound's residue before it dries. All this talk of "residue" seems to make for confusion!


Pads I guess I need an orange, rough? And a white, polish?


That's the general idea (though some "orange pads" like the one from Griot's are different and "tangerine" is different from "orange" if you're looking at the Lake Country line).


845's the best stuff huh? How long does it last? I'd like a deep shine and everything LoL.


845 doesn't leave what I'd call a "deep" look, but that's just my impression and such talk is just splitting hairs anyhow. It lasts pretty long but YMMV since there are just soooo many factors that can influence it and some paints just don't seem to "like" 845 with regard to durability (no idea at all why that is, but fortunately it doesn't happen often).
 
Dubbin1 said:
..Any "pretty aggressive" product WILL require at least one more step to properly finish the job. Sure you can get decent results but not good enough in my book....


In another thread, I see that it's not just Barry Theal who advocates finishing with M105. Also Michakaveli, Tod Helme, and MikeNap. I couldn't get it to work out just right the one time I tried it (it looked OK except under the SunGun), but then I don't do enough correction to master certain techniques. Note that some of those guys are the same people who spend hours on end burnishing/jeweling certain jobs.
 
Ok the paint cleaner I was talking about is like this


http://www.autopia.org/forum/car-detailing/128078-advantage-branded-paint-cleaner-over-ipa.html


And I been reading on KSG, should I use that? But appparently we need like 5 layers.


Does Optimun have a compound and polish? If so I think I would wash, clay, optimum compound and polish then, clean, KSG 5x, then 845.


Hows that sound?


And if I wanna rewax in 3 or 6 months do I have to do all those steps again? Or what is your guys's process if you wanna say.
 
The Count said:


Heh heh, if you've checked out that thread then you know *my* opinion!

And I been reading on KSG, should I use that? But appparently we need like 5 layers.


Eh, IMO you should just get some Collinite 845. Keep it simple unless you have a very good reason to complicate things.

Does Optimun have a compound and polish? If so I think I would wash, clay, optimum compound and polish then, clean, KSG 5x, then 845.


Yes they do. Google 'em up and check out their offerings.


I wouldn't top KSG with 845, I use one or the other.


And if I wanna rewax in 3 or 6 months do I have to do all those steps again? Or what is your guys's process if you wanna say.


It depends how bad you let things get between rewaxing. IMO you oughta rewax before it really needs it, i.e., stay one step ahead of the deterioration. A gentle claying is usually a good idea (some would call it mandatory) but you don't want to be compounding/polishing your paint all the time because you'll thin the clear too much. If you wash properly it shouldn't need it anyhow (that's one mighty big "if" though).
 
Dubbin1 said:
Wow Accum you lost a bit of respect from me for those two statements.


Man Dwayne, that's a pretty offensive and uncalled for thing to post? Why so rude, especially to Accumulator who is probably one of, if not the, most helpful and respectable members of the on-line detailing community?


Dubbin1 said:
Any "pretty aggressive" product WILL require at least one more step to properly finish the job. Sure you can get decent results but not good enough in my book. Maybe your standards are just lower then mine? Don't get offended by that as I have no idea what kind of work you put out since you never posted any jobs that you have done.


The PC is more then adequate to do the job. I'm not sure how you can say that the Griots is much better when you can get the same results with a PC with no extra work. It has been proven over and over again by some of the best detailers out there. Its also a HELL of a lot more reliable then the Griots machine. FYI I sold my Griots and kept the PC ;)


Are we referring to the PC or the PC XP because the 1st mentioned doesn't compare to the Griots performance IMHO.


As far as M105 goes and it being able to finish perfectly on some paint it's true and I as well as many others that follow the KBM methodology do it all the time. Just because it's a compound doesn't mean it's abrasives aren't fine enough to create a perfect finish. Here's a snipit from another forum explaining how it works:


th0001 said:
Finishing with Meguiar’s M105 Ultra Cut Compound


The unique ability of Meguiar’s M105 Ultra Cut Compound to remove scratching and surface defects from paint and leave a remarkably nice finish (while working quickly) has been widely publicized, whether by use with a dual-action (orbital) polisher or with a direct drive rotary polisher. The versatility of this compound isn’t limited to its intended role however: The unique, micro-fine abrasives in M105 are so refined in fact that they are often finer (much) then the fully exhausted abrasives in a traditional diminishing abrasive polish!


This allows M105 to create a truly high gloss, micro scratch free surface that potentially rivals the highest gloss finishes created with other methods and finishing techniques. As an added benefit, the finishing techniques used to achieve that result can save time and help eliminate any chance of unwanted defect return.


Process Overview:


I will be focusing on using M105 with Meguiar’s Softbuff 2.0 pads as well using a dual-action (orbital) polisher. The process I use for finishing M105 consists of taking advantage of Meguiar’s unique abrasives by switching pads (or machines) half way through the process, as explained below. If the entire paint system has already been polished and only light machine marks remain then simply start with the finishing pad.


Step One:
Select the appropriate polishing and finishing pads. For the sake of simplicity I am going to use both Meguiar’s Softbuff 2.0 Foam Cutting pad as well as their Softbuff 2.0 Foam Finishing pad. When polishing with a dual-action polisher, I still prefer the more aggressive action from a smaller pad.


1.jpg


Step Two: Prime each pad with the M105 buffing liquid. This is particularly important for two reasons.


How to prime: Squirt a liberal (but not excessive) amount of product over the pad and immediately begin to work it with your fingers. The goal is coat the face of the pad with product evenly. Allow the polish to permeate the pad for several minutes then remove the excess polish by running the machine and pressing a towel into or using compressed air.


2.jpg


3.jpg


4.jpg


5.jpg


6.jpg


Why is priming important?


For two reasons:

1) When working with non-diminishing abrasives our cutting power limited to how many abrasives can contact the paint at one time (effective surface area). If only two of these fine abrasives are working at a given time we are losing a lot of potential cutting area vs. if two hundred thousand of these fine abrasives are working in unison


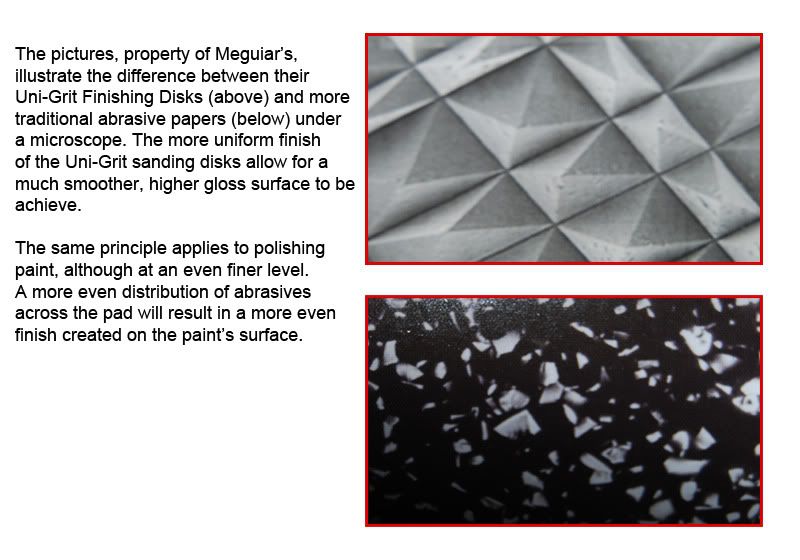
2) Perhaps more importantly for this write up, you want the most microscopically uniform surface available. If you have ever used Meguiar’s Uni-Grit sand paper vs. more traditional abrasive papers would will immediately understand. A more uniform polishing surface creates a more uniform (microscopically level) polished surface. The picture below (from Meguiar’s) illustrates the difference between traditional sanding papers and Meguiar’s Unigrit sanding disks. It is easy to see which will create a higher gloss surface at the microscopic level.


xx.jpg


By priming the finishing pad adequately you create a more uniform finishing surface which translates into a higher gloss, micro swirl free finish.


Step Three:
Use M105 and a DA in combination with a primed polishing/cutting pad to remove surface defects:


Work a small section, between 2’ x 2’ and 3’ x 3‘, depending on your goals, the contours of the body panel, and size of your polishing pad. If the paint requires more correction consider shrinking the working section to allow more focused polishing.


A lot has been written about various techniques and methods for defect removal with Meguiar’s M105 and a dual-action (orbital) polisher so I will offer the following guidelines.


Use enough downward pressure on the head of the machine to engage the pad evenly across the body panel and ensure that the orbital machine is transferred through the pad, to the paint’s surface. Larger and taller pads will require more pressure then a smaller, shorter pad because there is more area absorbing the motion. (Similar to a bowl of Jell-O giggling on itself).


Keep your arm speed constant through out the process and don‘t rush. Two inches per second is a great guideline to get started, but like pressure, this is going to be highly dependant on user preference. A little experimentation will so dial you in.


M105 is unique in the fact that it will continue to polish well, even when a product film is no longer present on the paint. However you should check the pad by touch to ensure it is still damp, and inspect the paint by sight to make sure you are still removing defects. If the pad becomes dry to the touch, or you notice that the either the finish quality is degrading or it is no longer effectively removing defects, add more M105. Once the pad is primed you do not need to add at lot. A couple of drops, smear it in with your thumb, and off you go.


Clean your cutting pad frequently, after each section if possible. You can use a brush or towel pressed into the pad (while the machine is running slowly) or compressed air if possible.


Why clean your pad frequently?


The main draw back in achieving a great finish from M105 is not from the polish but from the paint! Abraded paint (polished off the surface) will contaminate the solution and cause the ultra-fine abrasives in M105 to clump to together, creating an uneven polishing surface and degrading the quality of finish achieved. While this is not as important in the polishing/cutting stage as it would be in the finishing stage, I still like to bring the surface to the highest quality possible in each stage. This possibly reduces the work needed on subsequent steps (this is true for all faucets of detailing).


Step Four: Do not remove the residue from the paint when you are doing removing defects from the section unless there is excessive dried residue.


Step Five: Remove any micro marring and achieve a very high gloss finish with M105 in conjunction with a primed and clean finishing pad and a dual action (orbital) polisher. Only add more product to the finishing pad if it becomes dry, and only then a very small amount. However do keep the finishing pad clean! Buff right over the existing residue on the paint.


Because constantly swapping pads isn’t always fun it helps if you have two random orbital polishers. Alternatively you can polish a few sections before switching finishing. Just use common sense and don’t allow the polish to dry on the paint by waiting too long, such as on a very hot day.


Traditional finishing techniques on a dual action (orbital) polisher don’t lend themselves too well to finishing with M105, nor with final polishing in general, in my opinion. This would include reducing pressure and allowing the pad to rotate quickly over the paint.


Don’t reduce pressure and encourage a higher rotational pad speed to ‘jewel’ the paint with a DA and M105. In fact this can cause some unwanted side effects.


Reducing pressure will reduce the orbital motion transferred to the polishing surface from the machine, as the pad will absorb it. We want enough pressure to take up any slack in the pad.


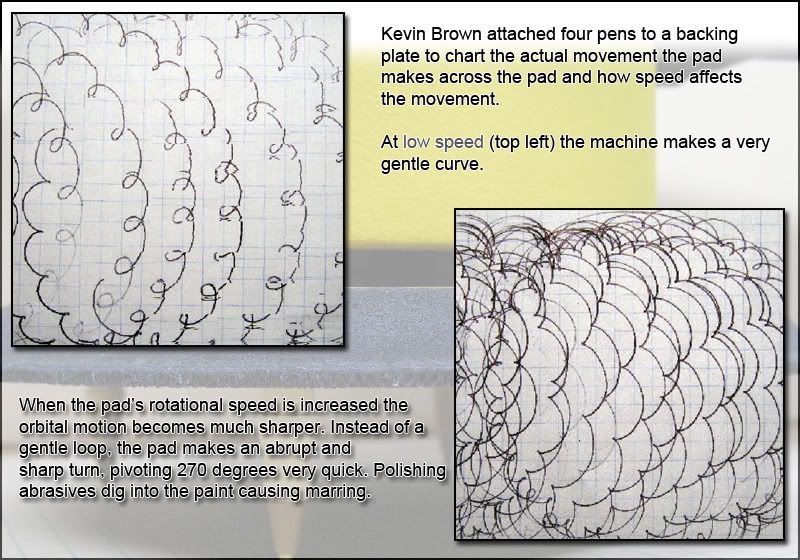
Secondly, when you reduce pressure you will increase the pad’s rotational speed. As the diagram below illustrates, a higher rotational speed in conjunction with the pushing and pulling action for the orbits will cause the pad’s actions to become more abrupt. Instead of a gentle curly-que you will have a more jagged V shape, similar to digging your heal in the ground and pivoting 270 degrees; only in the case of polishing paint it is an abrasive grain that has attached itself to the polishing pad and is being ground into the paint.


The difference in patterns between slow pad speed (top) and a higher rate of rotation (bottom).


polishspeed.jpg


Lastly, reducing pressure causes the pad to engage the apint unevenly. As the pad is forced in different directions by the quick, short orbital action and the long sweeping rotational action, different areas of the polishing surface are subjected to different amounts of pressure and cutting action. To create a high gloss, micro scratch free surface you need make the paint as even and as smooth as microscopically possible. Reducing pressure and encouraging more pad rotation is similar to wet sanding paint with your finger tips instead of using a foam block. A sanding block will engage all of the abrasive grains evenly and allow for a more uniform finish. Sanding with your finger tips will cause gouging and a very uneven surface.


Instead of reducing pressure, keep your pressure constant (enough to encourage the pad to evenly conform to the paint’s surface and body contours as well as transfer the orbital motion of the machine to the paint) but reduce speed!


Final polish on speed 3.5-4 using firm (not excessive pressure). Make two to three smooth passes over the area, over lapping each pass slightly, then remove. Continuing to make passes over the area will not increase the finish, but may contaminate the polish reducing the finish.


Wipe off the residue with a soft towel and move on.


Process in pictures:


Prime pads as illustrated in pictures above.


7.jpg


8.jpg


9.jpg


10.jpg


11.jpg


12.jpg


13.jpg


Cliff Notes:


1) Wash and prep vehicle as needed

2) Prime pads as needed. Always prime a pad prior to its first use.

3) Polish a small section, 2x2 or 3x3 using an aggressive pad appropriate for the level of defect removal.

4) Using the primed and clean finishing pad, polish over the remaining residue with out adding additional product (unless the pad is dry). Use slow arm movement, speed 3.5-4, and just enough pressure to engage the foam. Wipe off.


Common Questions and answers.


I don’t have two machines and it seems like a pain to switch pads frequently, can I polish the entire car with M105 then come back and finish with a softer pad?​


Yes. Polish the car as normal but make sure to remove the residue from the paint, like you normally would. Then prime a finishing pad and begin to finish using the guidelines above. The main difference is that you will need to add a small amount of additional product to the pad before each new working area. Make sure to clean you finishing pad often and switch to a clean (but primed) pad when you are no longer achieving the quality of finish.


Do I have to finish polish right after polishing each working section?


No. I would break the hood of my HHR into 4 or 5 polishing sections, and would complete most of those before coming back and final polishing the entire half of the hood. Of course dynamic conditions will effect how well this works. You don’t want to the residue to dry on the surface before final polishing over it.


I tried this technique but am not getting the quality of finish I am used to with other polishes and methods.


Don’t give up yet (if you don’t want to)! Sometimes it takes a little refinement to certain techniques to get the finish and some paint’s simply don’t respond well to certain techniques or products.


How long should it take me to final polish an area, say half of the hood of your HHR?


If you read the run-on sentence slowly and carefully it should take you about the same time as final polishing an area as large as half of the hood as it does to read this because it only takes two to three passes over the areas with light pressure, enough to engage the foam, using speed three point five to four to avoid any jagged edges, because the abrasives do not break down and are already refining the surface from the instant the machine is turned on. Or about 30 seconds.
 
Back
Top