Navigation
Install the app
How to install the app on iOS
Follow along with the video below to see how to install our site as a web app on your home screen.
Note: This feature may not be available in some browsers.
More options
Style variation
You are using an out of date browser. It may not display this or other websites correctly.
You should upgrade or use an alternative browser.
You should upgrade or use an alternative browser.
Need some help, please!!
- Thread starter maxshine
- Start date
RustyBumper
New member
I need some help, amigos. I can't seem to get rid of some marring and it's driving me nutts!! :hairpull I've been using a Flex/M105/Hydro Tech Cayan combo with great results. I have all of the LC pads with cutting power, in addition to M105,205, Menzerna Power Gloss, SIP and 85rd.
Thanks in advance for the help, everyone!!")

BTW, this is a truck that I'm detailing for a friend of mine. It hasn't had any attention in forever! You name the paint problem, this truck had it!! It was in such bad condition that I literally couldn't decide on a starting point. I finally decided to say the heck with it and wet sanded most of it. I'll post more pictures of it when I'm done.
Thanks in advance for the help, everyone!!
BTW, this is a truck that I'm detailing for a friend of mine. It hasn't had any attention in forever! You name the paint problem, this truck had it!! It was in such bad condition that I literally couldn't decide on a starting point. I finally decided to say the heck with it and wet sanded most of it. I'll post more pictures of it when I'm done.
imported_Luster
New member
That is a pretty good stumper! My only suggestion would be to wet-sand, but evidently you've tried that.
Keep us posted on progress.
Keep us posted on progress.
imported_Stokdgs
New member
Sorry for the problem - looks like the paintjob is also a big problem without any help at all.. 
What grit sandpaper did you use - and did you do it wet with a block?
I would hit it with a rotary, foam wool pad and Meguiars 105 and I can almosts guarantee it would clear the heck out of the panel, then go back and use the appropriate pad to finish down and bring out more gloss.
I also have a Flex VRG3401, and it I was going to try anything else, I would try the L/C Yellow foam or the Orange Foam flat classic pad.
I have about 8 of those Cyan Pads that shredded themselves to death using a Rotary and 105 - they appear to be of a somewhat delicate foam that cant stand hard work or something. They may work great on some paints but it appears they are junk on this paint.
Are you putting pressure on the machine at a high speed? You need to do that regardless of what pad you use if you want it to cut the junk off the paint.
I bought a side handle for my Flex from Auto Detailing Solutions in Arizona, so I can control it better when I put pressure on the machine.
But then, Im probably one of the last Rotary guys around here, so what do I know, right ??
Good luck, hope this all works out for you. Let us know how it's going..
Dan F
Todd@RUPES
Just a regular guy
It looks like there has been a lot of body work in that area (or really bad wetsanding) based on the texture of the paint. Can you feel the defects with your fingernails? Are you getting any reduction in the appearance?
RustyBumper
New member
Good morning, everyone. Thanks for all of your replies and suggestions.
This truck is a '97 Chevy P/U with lots of body work on it. When I got it, the paint was heavily oxidized and had every defect known to man and maybe even some new ones not yet discovered. Because of the bad condition it was in I decided to wet sand the whole truck. I used 3M 1500,2000 and Meg's 3000 in conjunction with a Meg's backing pad. In this particular area I only used 2000 and 3000 grit sandpaper with light to medium pressure and about two two passes in each direction (cross hatch pattern). I'm thinking about hitting it again with 3000 grit, using only vertical strokes.
I have a Makita, but I'm not confident in using it.
Man, this panel was a nightmare to work on. The rear half of it is mostly bondoe. It was making 105 dry super fast, which as we all know turns to concrete when it dries. I'm not kidding when I say I spent several hours trying to correct that one section alone!
Stokdgs, I agree with you when you say that the foam on the Cayan pads is delicate. The whole truck looks like it is covered in blue snow. lol They finish nicely, but don't hold up very well. I don't see these pads lasting more than a handful of cars. They're just too delicate.
I just took a look at the pictures again. I'm driving myself ut: over this. I'm having second thoughts about hitting it again. The bondo work in this area is really bad and I don't have a PTG to help me out. The last two hairs on my head are desperately clinging on for dear life..lol
This truck is a '97 Chevy P/U with lots of body work on it. When I got it, the paint was heavily oxidized and had every defect known to man and maybe even some new ones not yet discovered. Because of the bad condition it was in I decided to wet sand the whole truck. I used 3M 1500,2000 and Meg's 3000 in conjunction with a Meg's backing pad. In this particular area I only used 2000 and 3000 grit sandpaper with light to medium pressure and about two two passes in each direction (cross hatch pattern). I'm thinking about hitting it again with 3000 grit, using only vertical strokes.
I have a Makita, but I'm not confident in using it.
Man, this panel was a nightmare to work on. The rear half of it is mostly bondoe. It was making 105 dry super fast, which as we all know turns to concrete when it dries. I'm not kidding when I say I spent several hours trying to correct that one section alone!
Stokdgs, I agree with you when you say that the foam on the Cayan pads is delicate. The whole truck looks like it is covered in blue snow. lol They finish nicely, but don't hold up very well. I don't see these pads lasting more than a handful of cars. They're just too delicate.
I just took a look at the pictures again. I'm driving myself
ut: over this. I'm having second thoughts about hitting it again. The bondo work in this area is really bad and I don't have a PTG to help me out. The last two hairs on my head are desperately clinging on for dear life..lolimported_Stokdgs
New member
R/B, dont go over the edge over this, ok? We are here to help.
If the bodywork is sub-standard in that panel (and it appears that is is), I would try to make sure you have an idea how much paint is on there- ask the owner, see if the bodyshop painter can remember, anything to help you out with the next step.
Now I know this is going to sound silly to some, but when I painted, I always wet, block sanded the panel in primer with a guidecoat before painting, and depending on the paint and the rest of the vehicle's panels around this work, I might also wetsand with a block and guidecoat the final painted finish, and then compound it out to bring back the gloss.
This step allowed me to see what I was cutting (the guidecoat), make sure I was keeping the sanding straight, and always ended up looking perfect.
This will certainly help clean up but may also be dangerous if the bodywork was not done as described above, when it want to the painter, and the high spots may get sanded down faster and you may lose too much paint material.
Its a tough place to be, but if anything, it should help get those big scratches/marring/whatever appears to be in the paintwork itself out, and then the panel will polish down to your needs.
As you have already stated, use the highest grit paper, to minimize the amount of material removed quickly, dry the area, and inspect it frequently, and if it all works out, the highest grit will then allow you to NOT have to compound as heavily since hopefully, all the defects that appear to be IN the paintwork will be taken out.
Wish I was in Texas, would be happy to come by and help! Anyone else out there that wants to take a drive out to see this?
Good luck, keep the faith, know that a piece of metal with material on it can never be better than you !!!
Best, Dan F
imported_Stokdgs
New member
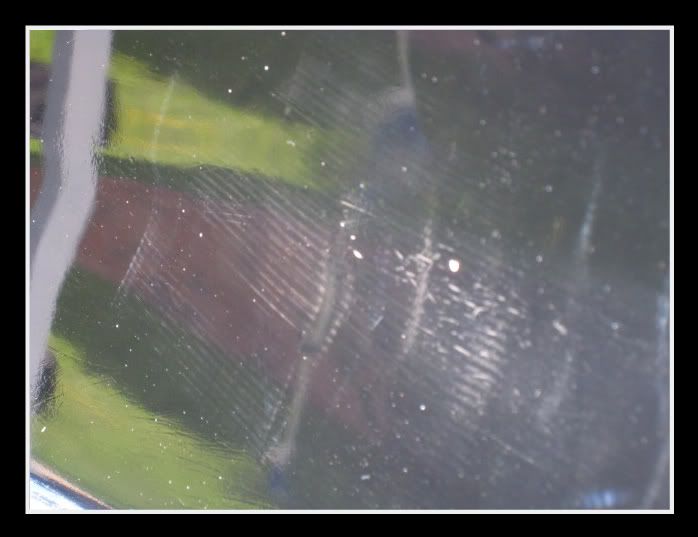
I just looked at your pics again; the one with the horizontal lines in it now reminds me of what bodyguys used on bondo to start cutting it down, while it was still damp. It was a tool called a cheese grater, and it left similar lines in the bondo, that were then supposed to be knocked down with #80 grit paper, and then the semi finished panel went to the paint shop, where it would be further sanded with a D/A and something like #220, then #360, then #400, then primed a few coats, then wet block sanded with a guidecoat to follow your sanding, then when perfectly straight, primed for the last time, sanded again, and wiped down and painted.
So perhaps the bodyguy cheesegrated this panel, no one did all the the above after, and then someone put a sub-standard paint job on the mess..
If this is the case, you may not be able to save it, because the horizontal cheese grater marks are in the bondo, and to get down to that level to remove them would require removing all the paint...
Look again at that panel and see if this isnt the case, ok?
You may not be able to save this anyway.. Bad bodyguy, bad bodyguy..
Dan F
imported_juliom2
New member
by the looks...our friend not so friend (the body filler) has gotten a chemical issue due to temperature or compounds. Most likely the repair on that area was contaminated and if the marks you see are not feel by the touch the "stain" is deep in the clear. If it comes from the inside out is sad story.
RustyBumper
New member
I was just outside looking at it again a few minutes ago. Upon closer inspection and looking at it from different angles I've come to the conclusion that it is definitely under the clear. I know very little about body work, but the cheese grater explanation certainly makes sense. At first I thought that it was 105 leaving these marks behind, but now it seems that the culprit was the person who did this bad body work. It looks like that whole section was poorly repaired and then painted. I'll post a picture later that will make you cringe.
On the upside, my buddy stopped by and he was stoked to see his truck! :hurray: He couldn't stop looking at his reflection in the paint. lol
Thanks again for all of your input, guys. I've said it before and I'll say it again..I love this site and the fact that everyone is always willing to help someone else out when they need it!