My Garage got a facelift

MRJB

New member
Greetings,

I'm relatively new at posting here but have been viewing things for a long time. I thought I'd share a few pictures of my garage project that just got a facelift. My house was built to my specifications and I have a 7 car (1285 sq ft) garage that is attached to the house (It is not a separate building). The ceiling is 12 1/2 feet tall which was just tall enough to put in a 4 post car lift and double stack cars or just work on them. I have radient (Ice Rink style) heating and a split airconditioner unit installed to make working on the cars comfortable. It also has a 25 inch color TV and surround sound system installed.


For flooring, I put down the black and white press-in-place floor tiles but it didn't take long when these tiles would start to come off due to brake fluid, transmission fluid, and such on the floor. In time, the floor just looked ugly. A few weeks ago, I started to strip the tiles off of the floor using a power tile stripper. This was a bigger job than I expected because some of the tiles just didn't want to come up. Next I removed the remainder of the adhesive via biodegradable chemicals and followed up with a degreaser.


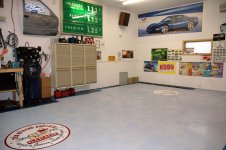
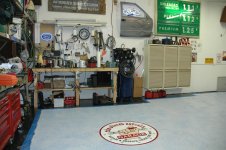
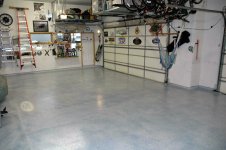
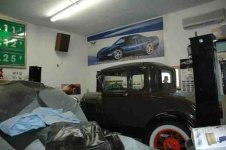
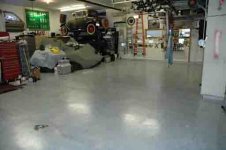
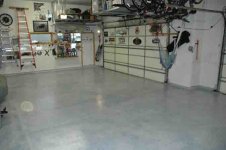
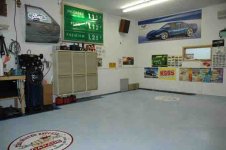
After doing a TON of research, I purchased a two part epoxy system from the Original Color Chips company. The kits included a clean and etch, epoxy, color chips, and clear coat. I put a black painted border around the edge of the garage and under the workbench area first. I also purchased some floor stickers like busted knuckle garage that are 40 inch in diameter, taped them off, and clearcoated over them with the remainder of the floor. The colors I chose was a light gray base, with white, bright blue, electric blue, navy blue, and metalic silver color chips. Because I am using a heavy sprinkle of color chips there is two coats of clearcoat overy everything. The cost for the new flooring worked out to be $1.35 per Sq Ft.


Here are some pictures of the final results.


View attachment 12975


View attachment 12976


View attachment 12977


View attachment 12978


View attachment 12979


View attachment 12980
 

Attachments

  • Picture 004-small.jpg
    Picture 004-small.jpg
    31.7 KB · Views: 734
  • 2007 Garage 002-Small.jpg
    2007 Garage 002-Small.jpg
    24 KB · Views: 678
  • 2007 Garage 001-small.jpg
    2007 Garage 001-small.jpg
    25.5 KB · Views: 844
  • 2007 Garage 000-small.jpg
    2007 Garage 000-small.jpg
    29 KB · Views: 812
  • Picture 012-small.jpg
    Picture 012-small.jpg
    31.8 KB · Views: 935
  • Picture 008-small.jpg
    Picture 008-small.jpg
    39.2 KB · Views: 603
Looks great. I would love to have a garage 1/2 that size. That's not a bad price for the new floor. Now get yourself a good digital camera -- to really show it off :)
 
I took the photos using my Nikon Digital D70S (It's a high end camera) but I really had to work to get the photo's small enough in size to put them on the system.
 
MRJB said:
I took the photos using my Nikon Digital D70S (It's a high end camera) but I really had to work to get the photo's small enough in size to put them on the system.


Oh -- sorry. I thought they looked like Cell Phone pics. I've never tried hosting the pics on here. I typically use Photobucket -- which also shrinks them down some.


I bet that size of garage took some time -- if you did it yourself?
 
where in MN are you from if you don't mind, I am down in rochester, you garage looks great. Kind of what I am hoping to do some day
 
attachment.php


attachment.php


attachment.php


attachment.php


Ahhh.... Thats Better!!!

Thanks for the great responses. It makes it worth the effort. I live in the northern part of the twin cities in Ham Lake, MN.


The garage took several stages: I rented the power stripper to take off the old tiles two separate 4 hour periods. I typically divided the front half of the garage from the back half in everything that I did. The reason is that I didn't want some of my cars parked outside overnight (1934 Ford street rod, 1936 Chevy Street Rod, 1929 Ford Model A restored).


I planned on using 1 gallon of black for the border and under the workbench and storage areas. This took 3 days (1 day to etch it, 1 day to paint it, 1 day to clear coat it). The back half of the garage was done next following the same method (1 day to etch it(took 4 hours), 1 day to paint it (took around 4 hours), and 1 day to clear coat it (took around 2 hours), then I let it cure for 7 days before putting any vehicles on it.


I followed the same process for the front half of the garage. All in all - I used 7 kits from Original Color Chips (1 black and 6 light gray), I also ordered 6 extra clear coats because I used a heavy paint chip sprinkle. The price I gave ($1.35 sq ft) was an inclusive cost that was for the kits, extra paint chips, and shipping costs.


Would I do it again??? Yes - I'm VERY pleased with the results but am hoping I never have to do it again on this floor. A friend of mine came over and said "since your an expert now, you can do my floor" I replied "I can supervise"


MR JB
 

Attachments

  • Picture 014-reduced.jpg
    Picture 014-reduced.jpg
    136.1 KB · Views: 2,889
  • Picture 013-Reduced.jpg
    Picture 013-Reduced.jpg
    155.5 KB · Views: 2,887
  • 2007 Garage 000-reduced.jpg
    2007 Garage 000-reduced.jpg
    136 KB · Views: 2,813
  • 2007 Garage 002-reduced.jpg
    2007 Garage 002-reduced.jpg
    122.5 KB · Views: 2,783
Once again -- looks very nice. Thanks for the big pics, and details. I hope to do something similar one day. Good idea on the border.
 
Excellent work! I have 1135 sq ft in my garage, we built last year and due to circumstances the garage didnt get finished before we moved in and the floor is tops on my list. How hard was your project? How long did it take you? How was the smell? Do you think it will hold up like the professional stuff at $6-10/ft or even U-Coat it? Do you have info for the company your got your product from?
 
'First, I'm not affiliated with the product. But I think it is a good product. As others have mentioned, everything about putting a lasting flooring down is about the Prep. This kit included a clean and etch product so that the cement and epoxy could bond. Also, there are two (and sometimes three) coats of clear coat on the floor. 1 coat of clear coat is included in the kit. lastly, I let it cure for 1 week before putting things back on the floor.


I do a lot of hard work on my garage floor and everyone is asking about holding up to welding and my car lifts. So far the car lifts are doing fine. I did a TON of research on floors. Price was not a factor as I wanted to do it only once. So finding this place that had all of everything that I wanted in one kit sounded nice but warrented more investigation.


Here is a link to their website. They also offer a high end clear coat but I didn't use it.

"www.originalcolorchips.com"


Check it out.
 
Mr. JB:

WOW what a fantastic job. Am I correct to assume that you took out a VCT tile floor and put in your new covering?


I was considering a VT floor but I may have to rethink VCT after looking at your floor.


Thank you for sharing your garage with us. :goodjob
 
You are correct. I pulled up the remaining "press in place" adhesive backed flooring to put down new flooring. This was the BIGGEST part of the job. The painting was much easier than stripping the old flooring.
 
I'm getting my second 4 post car lift for the garage and I'll post more pictures when it is put in. Unfortunately, it arrives in about a month... Bummer.


When it arrives I'll have the 1936 Chevrolet on the lift with the 2003 Corvette under it. On the other lift I already have the 1929 Model A Ford on the lift with the 1934 Ford under it. Hmmm... Come to think of it... I'll have a Chevy section and a Ford section. Too funny:chuckle:


The back half of the garage is for the classics and the work area. The front half of the garage is for our everyday vehicles: 2007 Ford F150 Supercrew, 2002 Chev Monte Carlo SS, 2004 Mustang convertable and 2002 VW Bug. The Mustang and VW are my twin daughters cars.


The floor is great already. Little spills like oil and trans fluid wipe up easily and don't soak in. I find myself picking up leaves that wander in just to keep the floor clean. I also was doing some small engine work on the floor and it held up pretty good. A friend of mine suggested a welding blanket for when we do welding on the floor so not to damage it. I think it would be a wise investment at this point. The car lift is working fine on the floor and it seems not to be lifting or damaging the floor in any way.


I guess the bottom line is... I continue to be happy with the floor and I'm hard on my floor so I expect a lot out of it. So far no issues.
 
Back
Top