imported_garyo
New member
As some of you may or may not know I finished my garage floor with the UCoat-it products in October of 2003. I discussed this process and my review of the product HERE
It has now been over a year since the application so I thought I would write an up date on the durability of the product in a new thread. I have had absolutely no pealing or lifting of any kind. The only blemishes remain to be the fine scratches on my wifeâ€â„¢s side of the garage that I mentioned in the other thread. During the summer these scratches did not get any worst. I have a repair kit but have not had a chance to use it. Since my last post I think I have determined what caused the scratches. I noticed the scratches only appeared after fitting the Dunlop M2â€â„¢s to my wifeâ€â„¢s car (btw fantastic snow tireâ€Â¦I highly recommend) and did not get any worse once the tires were removed in the summer high performance tires were used. I learned from a third party involved in the tire industry that Dunlop uses a special volcanic sand in their winter tires to provide that extra bite on icy surfaces (all manufacturers do somethingâ€Â¦i.e. Bridgestone uses a âہ“micro-poreâ€Â� compound for some of its blizzaks and Yokohoma uses nylon bristles embedded to obtain grip in the snow and ice). I am hypothesizing that the scratches resulted from this âہ“volcanic sandâ€Â� as it only appears in the areas where the tires roll and did not get any worse once the summer tires were used and only appears on her side of the garage. This winter will be a better test of this theory because my car will be driven all winter and will be equipped with a different snow tire that does not contain the volcanic sand (last year my car was a garage queen and was never driven in the snow, ice or rain).
I highly recommend the product and will use it again in the next house I have. The finished surface does show dirt more easily than bare concrete but the clean up much easier (including spilled oil). I am going to attach some pictures I took this past weekend. The garage is still a work in progress (i.e. I need a wall mounted hose real and a yard barn to store the tires and lawn equipment, some better lighting, a strip maybe (not sure of color), some more pics/art, etc.).
This first picture is the side of the garage where I park. The floor is dirty in the picture but there are no scratches. Autopia noteâ€Â¦the hose is running out to the drive where the car is parked for its weekly wash.

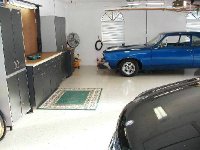
This is another angle

This is a close up of the floor. The big crack is an expansion joint that I filled with silicone after application of the covering. Dirt sticks easily to the silicone.

This is a close up of the scratches. They look worse because they are dirty right now. A quick mopping will reduce them dramatically. Also this is the worse place.

The last pic is taken shows the other side by the wheel of my car close up as a comparison of the scratches in the previous picture. The tire tread spot wipes off.

It has now been over a year since the application so I thought I would write an up date on the durability of the product in a new thread. I have had absolutely no pealing or lifting of any kind. The only blemishes remain to be the fine scratches on my wifeâ€â„¢s side of the garage that I mentioned in the other thread. During the summer these scratches did not get any worst. I have a repair kit but have not had a chance to use it. Since my last post I think I have determined what caused the scratches. I noticed the scratches only appeared after fitting the Dunlop M2â€â„¢s to my wifeâ€â„¢s car (btw fantastic snow tireâ€Â¦I highly recommend) and did not get any worse once the tires were removed in the summer high performance tires were used. I learned from a third party involved in the tire industry that Dunlop uses a special volcanic sand in their winter tires to provide that extra bite on icy surfaces (all manufacturers do somethingâ€Â¦i.e. Bridgestone uses a âہ“micro-poreâ€Â� compound for some of its blizzaks and Yokohoma uses nylon bristles embedded to obtain grip in the snow and ice). I am hypothesizing that the scratches resulted from this âہ“volcanic sandâ€Â� as it only appears in the areas where the tires roll and did not get any worse once the summer tires were used and only appears on her side of the garage. This winter will be a better test of this theory because my car will be driven all winter and will be equipped with a different snow tire that does not contain the volcanic sand (last year my car was a garage queen and was never driven in the snow, ice or rain).
I highly recommend the product and will use it again in the next house I have. The finished surface does show dirt more easily than bare concrete but the clean up much easier (including spilled oil). I am going to attach some pictures I took this past weekend. The garage is still a work in progress (i.e. I need a wall mounted hose real and a yard barn to store the tires and lawn equipment, some better lighting, a strip maybe (not sure of color), some more pics/art, etc.).
This first picture is the side of the garage where I park. The floor is dirty in the picture but there are no scratches. Autopia noteâ€Â¦the hose is running out to the drive where the car is parked for its weekly wash.
This is another angle
This is a close up of the floor. The big crack is an expansion joint that I filled with silicone after application of the covering. Dirt sticks easily to the silicone.
This is a close up of the scratches. They look worse because they are dirty right now. A quick mopping will reduce them dramatically. Also this is the worse place.
The last pic is taken shows the other side by the wheel of my car close up as a comparison of the scratches in the previous picture. The tire tread spot wipes off.
")