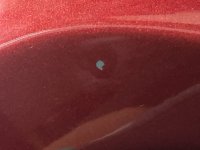
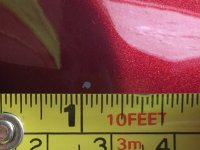
Hey All-- I have another beginner question for feedback please ... My 2015 Subaru Crosstrek has its first rock chip. This happened when I was still driving somewhat "normally," zipping along the highway in the left lane. I heard a sharp ping and didn't think much of it until going through its evening rinseless wash. I saw the shiny spot, felt the tiny indentation, and put it together.
I thought I read up enough to know what I was doing. But I've had to start over twice. My steps have been as follows ... lightly sanded with tiny discs made of 2000 grit wet/dry sandpaper glued onto pencil erasers to smooth edges, cleaned with IPA -> applied thin layer of primer with a tiny paint brush -> let dry 24 hours, wiped with IPA then painted on a thin layer of matching paint from the dealer -> waited another 24 hours then cleaned with IPA and applied a second thin coat of paint -> 24 hours after that I sanded lightly, cleaned with IPA, then applied some clear coat with the same tiny brush -> waited about 12 hours and applied a second coat of clear coat. Because I am trying to overfill the divot a tad (so I can wet sand --hypothetically-- to even out the area at the end) I decided to add a bit more clear after waiting about 8 hours. I was working on blending out the edges of the clear coat when I noticed that the color in the chip had been pulled out into the clear coat. Sigh. The first fail was after using Meg's Ultimate Compound to smooth the color out before applying clear coat. After cleaning up with some IPA, the color was gone. Lesson learned. Both times I wiped down the area with lacquer thinner before starting again.
So can anyone please let me know where I'm going wrong? I live in muggy Florida so ... do I need to wait longer between coats? Maybe I am overworking the clear coat steps? In reading up about how to fix paint chips, I learned that Crosstreks are notorious for their "soft" paint. Yay. So I realize that I will be touching up lots of chips from here on out and want to learn how to do it correctly. BTW that slow driver trying to keep back from the car in front and staying in the center of the middle lane? That's the new me!
Thanks!!!
I thought I read up enough to know what I was doing. But I've had to start over twice. My steps have been as follows ... lightly sanded with tiny discs made of 2000 grit wet/dry sandpaper glued onto pencil erasers to smooth edges, cleaned with IPA -> applied thin layer of primer with a tiny paint brush -> let dry 24 hours, wiped with IPA then painted on a thin layer of matching paint from the dealer -> waited another 24 hours then cleaned with IPA and applied a second thin coat of paint -> 24 hours after that I sanded lightly, cleaned with IPA, then applied some clear coat with the same tiny brush -> waited about 12 hours and applied a second coat of clear coat. Because I am trying to overfill the divot a tad (so I can wet sand --hypothetically-- to even out the area at the end) I decided to add a bit more clear after waiting about 8 hours. I was working on blending out the edges of the clear coat when I noticed that the color in the chip had been pulled out into the clear coat. Sigh. The first fail was after using Meg's Ultimate Compound to smooth the color out before applying clear coat. After cleaning up with some IPA, the color was gone.
Lesson learned. Both times I wiped down the area with lacquer thinner before starting again. So can anyone please let me know where I'm going wrong? I live in muggy Florida so ... do I need to wait longer between coats? Maybe I am overworking the clear coat steps? In reading up about how to fix paint chips, I learned that Crosstreks are notorious for their "soft" paint. Yay. So I realize that I will be touching up lots of chips from here on out and want to learn how to do it correctly. BTW that slow driver trying to keep back from the car in front and staying in the center of the middle lane? That's the new me!
Thanks!!!
") I am considering mixing equal parts of paint and clear coat, an idea I saw on a paint chip fix video. I think I do want the protection of the clear coat since the paint is so soft.
I am considering mixing equal parts of paint and clear coat, an idea I saw on a paint chip fix video. I think I do want the protection of the clear coat since the paint is so soft. ") and research "Langka Blob Eliminator)
and research "Langka Blob Eliminator)