volvie!
New member
Hi Everyone,
I hope you are all well!
I'm an exterior detailing newbie and posted a question back in June 2008 asking for product recommendations to correct my (original) thin single-stage paint by hand:
http://www.autopia.org/forum/car-de...n-hand-thin-single-coat-1980-brown-volvo.html
Thanks again to everyone who responded! :bigups
And, after viewing numerous paint correction threads, I finally worked up the courage to actually try to tackle my own paint. :laugh:
So, I set up my shade tent on a nice cool day and got all my supplies ready.
Process and Products:
Wash- Meg's Gold Class Car Wash Shampoo and Conditioner
Clay- Meg's Smooth Surface Clay Kit
Wash- as above
Clean- Meg's Deep Crystal System Paint Cleaner #1
Polish- 1Z Einszett Metallic PolishWax
Wash- as above
Wax- Collinite 476S
Additionally, I polished and waxed the beauty rims as they tend to spot rust:
Polish- TurtleWax Chrome Polish (and rust remover)
Wax- Collinite 476S

Before (sun photos):
Most of the oxidation was on the hood and trunk. After washing and drying the paint, the oxidation was more dramatic in person than in the photos, but hopefully you can see it (I've also included the links to the larger images below each photo).
Hood:

http://farm4.static.flickr.com/3215/3085179221_3438f9c5db_b.jpg

http://farm4.static.flickr.com/3143/3086018678_8dcca12baa_b.jpg

http://farm4.static.flickr.com/3028/3086020280_a7f86dbd3d_b.jpg
Roof:

http://farm4.static.flickr.com/3290/3086020046_fd44977930_b.jpg
Trunk:

http://farm4.static.flickr.com/3092/3085180029_a519fb9f86_b.jpg

http://farm4.static.flickr.com/3250/3086019566_36a7e08585_b.jpg

http://farm4.static.flickr.com/3156/3086019840_b248f8859d_b.jpg
In addition to the oxidation, my paint also has some other issues...
A tree I parked under sneezed tons of little sap droplets which ate through some of the paint (hood only):

http://farm4.static.flickr.com/3143/3086020802_664a318d72_b.jpg
And, some bird poo etchings (also on hood):
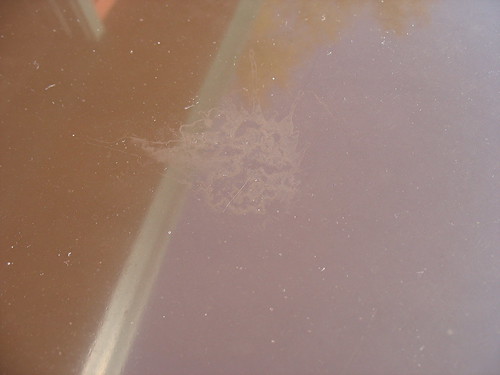
http://farm4.static.flickr.com/3238/3085182449_16696910ec_b.jpg
But the main order of the day was to remove as much oxidation as I could while still preserving what is left of the "good" original paint.
Since the hood had the most "issues," I spent the most time working here.
I started at 10:30A and didn't finish until the sun was setting (around 5:00P), so I had to wait until the next morning to get some after-detail sun shots.
I intended to take photos of the process as I went along, but it didn't quite work out that way so the pictures are a little out of order.
The Mess:
Clay:

Cleaning:

Polishing:

The Results:
As the sun was setting:
Hood:

http://farm4.static.flickr.com/3281/3086030210_a477533fe8_b.jpg

http://farm4.static.flickr.com/3052/3086031262_44870cd87a_b.jpg
Roof:

http://farm4.static.flickr.com/3188/3085194111_653a82c2dc_b.jpg
Trunk:

http://farm4.static.flickr.com/3252/3085190591_66125bf147_b.jpg
Sap spots:

http://farm4.static.flickr.com/3113/3086030648_0da06c12a1_b.jpg
Bird Poo:

http://farm4.static.flickr.com/3064/3085192919_3443838c2c_b.jpg
The next morning (sun photos):
Hood:

http://farm4.static.flickr.com/3072/3085200625_5bd4cec168_b.jpg
Trunk:

http://farm4.static.flickr.com/3182/3086038888_6b46e5c4b4_b.jpg
And, last but not least, the polished and waxed beauty rims:

http://farm4.static.flickr.com/3234/3086040088_131bc22f26_b.jpg
While not perfect, the paint is about 70% better than it was when I started. There is still more work to be done, but, in the meantime, I am very pleased with the results! :dance
Thanks again to everyone for their advice and recommendations! :hifive:
I hope you are all well!
I'm an exterior detailing newbie and posted a question back in June 2008 asking for product recommendations to correct my (original) thin single-stage paint by hand:
http://www.autopia.org/forum/car-de...n-hand-thin-single-coat-1980-brown-volvo.html
Thanks again to everyone who responded! :bigups
And, after viewing numerous paint correction threads, I finally worked up the courage to actually try to tackle my own paint. :laugh:
So, I set up my shade tent on a nice cool day and got all my supplies ready.
Process and Products:
Wash- Meg's Gold Class Car Wash Shampoo and Conditioner
Clay- Meg's Smooth Surface Clay Kit
Wash- as above
Clean- Meg's Deep Crystal System Paint Cleaner #1
Polish- 1Z Einszett Metallic PolishWax
Wash- as above
Wax- Collinite 476S
Additionally, I polished and waxed the beauty rims as they tend to spot rust:
Polish- TurtleWax Chrome Polish (and rust remover)
Wax- Collinite 476S
Before (sun photos):
Most of the oxidation was on the hood and trunk. After washing and drying the paint, the oxidation was more dramatic in person than in the photos, but hopefully you can see it (I've also included the links to the larger images below each photo).
Hood:
http://farm4.static.flickr.com/3215/3085179221_3438f9c5db_b.jpg
http://farm4.static.flickr.com/3143/3086018678_8dcca12baa_b.jpg
http://farm4.static.flickr.com/3028/3086020280_a7f86dbd3d_b.jpg
Roof:
http://farm4.static.flickr.com/3290/3086020046_fd44977930_b.jpg
Trunk:
http://farm4.static.flickr.com/3092/3085180029_a519fb9f86_b.jpg
http://farm4.static.flickr.com/3250/3086019566_36a7e08585_b.jpg
http://farm4.static.flickr.com/3156/3086019840_b248f8859d_b.jpg
In addition to the oxidation, my paint also has some other issues...
A tree I parked under sneezed tons of little sap droplets which ate through some of the paint (hood only):
http://farm4.static.flickr.com/3143/3086020802_664a318d72_b.jpg
And, some bird poo etchings (also on hood):
http://farm4.static.flickr.com/3238/3085182449_16696910ec_b.jpg
But the main order of the day was to remove as much oxidation as I could while still preserving what is left of the "good" original paint.
Since the hood had the most "issues," I spent the most time working here.
I started at 10:30A and didn't finish until the sun was setting (around 5:00P), so I had to wait until the next morning to get some after-detail sun shots.
I intended to take photos of the process as I went along, but it didn't quite work out that way so the pictures are a little out of order.
The Mess:
Clay:
Cleaning:
Polishing:
The Results:
As the sun was setting:
Hood:
http://farm4.static.flickr.com/3281/3086030210_a477533fe8_b.jpg
http://farm4.static.flickr.com/3052/3086031262_44870cd87a_b.jpg
Roof:
http://farm4.static.flickr.com/3188/3085194111_653a82c2dc_b.jpg
Trunk:
http://farm4.static.flickr.com/3252/3085190591_66125bf147_b.jpg
Sap spots:
http://farm4.static.flickr.com/3113/3086030648_0da06c12a1_b.jpg
Bird Poo:
http://farm4.static.flickr.com/3064/3085192919_3443838c2c_b.jpg
The next morning (sun photos):
Hood:
http://farm4.static.flickr.com/3072/3085200625_5bd4cec168_b.jpg
Trunk:
http://farm4.static.flickr.com/3182/3086038888_6b46e5c4b4_b.jpg
And, last but not least, the polished and waxed beauty rims:
http://farm4.static.flickr.com/3234/3086040088_131bc22f26_b.jpg
While not perfect, the paint is about 70% better than it was when I started. There is still more work to be done, but, in the meantime, I am very pleased with the results!
:danceThanks again to everyone for their advice and recommendations! :hifive:


")

")
 most volvo 240 here in sweden is dead or on their way to die