Detailing and fixing chipped paint

GaryDG

New member
Pretty basic question but I am going to clean, polish then seal my car's paint but I have chips of paint I need to fill in. I will be using one of those small bottles of paint with the brush inside to dab on where the paint's been chipped off. I talking about 1/8" chips here and there.

Should I fix the paint before detailing or after detailing but before sealing or?

What's the suggested way to clean the chipped paint before applying the paint? Use the Langka product?

Thanks!
 
Clean the area then wipe with a paint prep...

Apply the paint thinly in several layers (do not do one thick blob). I like using a plastic tooth pick -you can let the paint drop roll down the pick right into the chip.

Apply enough thin coats that the filled in area slightly raises above the surrounding paint. Let dry for 2-3 days for the paint to out gas and shrink. Apply more touch up paint if needed.

Lightly sand the top of the bump smooth to the rest of the paint.

Polish to restore the shine.
 
I'd investigate Dr Colorchip. I think it is the best option for a DIY chip fix.

I've tried Langka years ago, and was not impressed by it. Trying to level a blob was a futile attempt. The system IMO is not as perfected as Dr Colorchip is.

Watch a Dr Colorchip Vid. It is actually that simple, and that fast.

Although I had a initial mismatch of paint hue, they worked with me and got it right the second time.

The other problem I had, was not adhering exactly to the vid's instructions, I thought 2-3 minutes dry time on the paint would not be enough time. I was wrong, the paint they mix for you does set this quickly, and then can be more easily leveled with the SealAct product included in their kit.

To wait a longer time after paint application, what I found was greater difficulty leveling the paint, and the need to use an excessive amount of the Leveling-smoothing solution.

After 2-3 minutes dry time, the paint levels much easier, and if follow-up applications are needed to level a crater, that is permissible with the product, to add more additional applications, and then again level with the SealAct product.

One 1oz bottle in the kit should be more than enough for most average vehicles, unless you've been tailing a gravel truck for 500 miles.

There's a litle bit of learning curve, but not too much. Just take my advice, and not to try to overthink their system as it does work extremely well.

You can order it right here, enter the paint code number of your vehicle, then AG has the products drop shipped direct from Dr Colorchip. Mark
 
i saw a commercial for that product that all you do is rub in and the scratch disappears. i was going to use that on my charger, but i'm afraid of it maybe dulling the paint around the scratch to make the paint stretch out. any help?

Are you referring to Todd's more conventional method of touch up, or the Dr Colorchip Kit?

I tried the conventional method on my beater 2001 Kia about 5 months back.

I had a slew of wet papers, the Meguiars UniGrit 2500 Sanding Block, and even a Nib Shaver. Honestly, I got very so so results, and in fact in a couple areas on the hood went through both the clear coat, and the color coat! LOL

I wasn't too upset though, but I will say this. Doing such takes a lot of patience, and some expertise-mastery. I will say I'm no expert, and hence one reason I didn't wish to go that route on my better vehicle, the Tahoe.

Hence, I went with the Dr Colorchip Kit, and I will say it will be impossible to hurt the factory paint with this system.

With the Dr Colorchip SealAct product, you could rub on the paint with it till the cows come home, you cannot hurt the paint with it. It doesn't in any way act upon the factory paint, only the touch up, and by overuse, all you'll succeed in doing, is fully removing the touch up paint.

I have found-discovered, that the Dr Colochip Sealact Solution will work-act upon standard touch up factory paints, or Duplicolor touch up paints, but with much more rubbing and use of the SealAct product involved. And again, with no damage incurred to the surrounding Factory Paint.

Thus, one can even correct, or fully remove old, and/or poorly done previous touch up work with this kit.

I was a bit skeptical when I first recieved this kit, thinking I might again not be impressed, but I was wrong. This product so far has performed to expectations, and feel the kit was worth every penny.
 
I already have a few "nicks" on my 2012 Caddy CTS-V. One chip is quite large. Gotta slow down, plus,..not follow Big Rigs? The Dr. Colorchip kit sounds enticing, but will any "chip-repair system" work on "Pearl-type" finishes? My car is an extremely sparkly Black Diamond Tri-Coat, which I am guessing, can not be repaired by a DIY paint touchup product? Don't want Black Holes of the Universe showing on the skin of my ride. That might look as bad, as the original nicks?
 
I already have a few "nicks" on my 2012 Caddy CTS-V. One chip is quite large. Gotta slow down, plus,..not follow Big Rigs? The Dr. Colorchip kit sounds enticing, but will any "chip-repair system" work on "Pearl-type" finishes? My car is an extremely sparkly Black Diamond Tri-Coat, which I am guessing, can not be repaired by a DIY paint touchup product? Don't want Black Holes of the Universe showing on the skin of my ride. That might look as bad, as the original nicks?

That will be almost impossible for anyone to answer at this point, whether Dr Colorchip will be the best match, versus another brand-type of touch up paint? Reckon there's only one way to find out?

I'd doubt any correct color paint, even if slightly off in hue looks worse than a crater in the paint finsh, as they usually have a tendency to hold wax-sealant products, and never look better, no matter how clean, shiny, and corrected the rest of the paint finish is.

I think all would agree to use whichever paint product gives the best match on your vehicle.

As I mentioned, I had discovered the Dr Colorchip SealAct smoothing-leveling product can work with both types of touch up paint.

One could use a combination of both the more conventional leveling methods with Wet Sanding papers first to knock down some of the paint blob, then finish with the Dr C SealAct product to finally smooth, and level without a further risk of harming surrounding paint.

By leveling either type of paint with the Dr C Sealact Solution, there will be no need of abrasive compounds-polishes to remove sanding marks.

About the only major difference in application techniques, is that one would have to wait a much longer time for a factory-type/duplicolor type paint to initially cure, and harden before the Dr C SealAct can be then used.

Probably a good few days to harden, versus Dr C, which only takes a few minute's time to cure enough for initial leveling-smoothing.

I hadn't mentioned it in this article, but some of the touch up on my 1997 Tahoe has been there for a good number of years, 5-10 years, or more, and the Dr C SealAct did come along and better correct my earlier attempts of touch up.

The SealAct solution can be ordered seperately if wished, direct from Dr Colorchip.
Mark
 
Thanks for the responses! I will check out the vids on the two products and think about the best approach for me.

In my case I have 30 yo original paint, 60% is oxidized. So I will be going through a fairly aggressive cleaning and polishing phase on this car. Years ago I bought a 1 oz paint applicator from the dealer and applied that to chips and scratches. Of course, not knowing about this site nor knowing how to properly apply paint to fix the chips and treat the area after, I end up with blobs, which I have today. So, it seems that I will need to apply Todds suggestion at least to the areas that I previously treated and then maybe use one of the products for the current chips.

I guess that, as you suggest, if I am satisfied with the results using Todds approach, which I have to do anyway, I may continue with that approach with current chips or as you suggest a combination of the two.

I'll checkout those vids and go from there.

Thanks for your excellent feedback and suggestions!

Gary
 
Clean the area then wipe with a paint prep...

Apply the paint thinly in several layers (do not do one thick blob). I like using a plastic tooth pick -you can let the paint drop roll down the pick right into the chip.

Apply enough thin coats that the filled in area slightly raises above the surrounding paint. Let dry for 2-3 days for the paint to out gas and shrink. Apply more touch up paint if needed.

Lightly sand the top of the bump smooth to the rest of the paint.

Polish to restore the shine.

I think this is the old school way, i was taught this later in my detail career. I prefer doing this way, I think the result is more smoother and IMO it gives a better overall look and feel to the affected area.
 
We have all seen the paint-correction Blobs. Yes, they look like the cheap Sci-fi movie with the same moniker? Ugh.

Also,...yes,...MarkD, the Craters left behind by a lack of attention to all these "dings" doesn't solve a thing. The finish/skin looks bad, in both scenarios? Another "Ugh".

Thanks, holland_patrick, for your willingness to report on using the product on "sparkly" paint. Call me still a skeptic at this point.

GaryDG, If you are dealing with a 30 year old skin, will the "underlying" paint (exposed via buffing) still reveal the REAL original color? I don't haven't a clue,... but won't there still be some form of color "oxidization" still present after the time span? If the car has been parked undercover for most of its life, then the original paint job would possibly be a piece of cake to match? Your older skin pre-dates the EPA's intrusion into our lives, and well could be a superior one? And, also possibly require a different approach as to the solution?

Interesting thread.
 
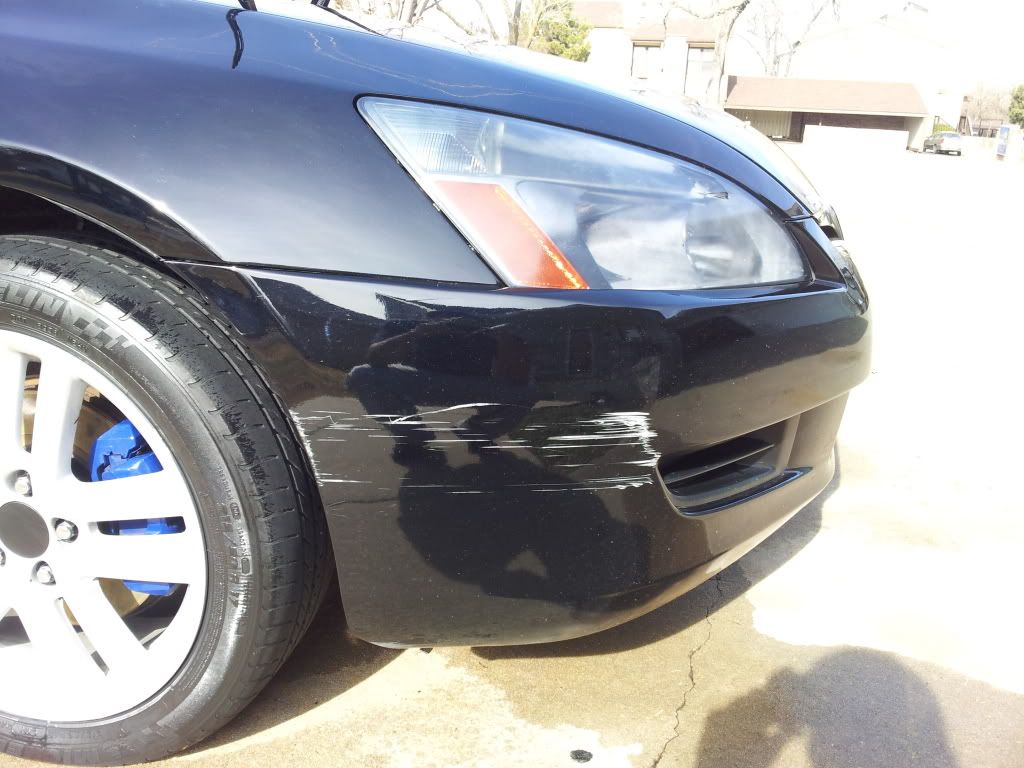
Would the dr Color chip work on scratches as well? I'm not looking to correct them, just trying to mask them a bit until I can either replace or respray the bumper.

20130128_131340.jpg
 
Custom Care,
I would assume the Dr C Kit would do no worse than any other form of simple touch up attempts, and might hold the one advantage of a faster cure time on this vertical panel, rather than running like conventional touch up paints would do with their slower set-cure times.

While I cannot personally witness the extent of this scrape damage, if the plastic material under the paint is as well damaged, then one cannot expect probably any touch up method to fully fill voids, and eradicate any deeper damage in the plastic.

I reckon it boils down to, is $60 for the Dr C Kit worth it to you to do a temporary fix, to better hide this damage until the proper repair can be done?

If the damage is only the surface paint, then the Dr C Kit might work admirably well, not perfect mind you, but from a distance the damage will be much harder to detect.

The Dr C kit is easy enough to use. About the only other thing that comes to mind about the Dr C Kit, is to have some more disposable gloves on hand. Mark
 
to open road; i owned the very same car as you and don't believe i would or could properly fill holes in black diamond tricoat. i have a system from applied color that works great on 99 percent of cars but the flake on the caddy is that one percent. in a pinch maybe dr colorchip would do, but call them and ask straight up if their product would work with that particular paint. and as for following gravel trucks that right pedal would take care of that quickly. i live across the street from a gravel quarry. ugh. good luck with your v
 
Thanks for the additional info!

OpenRoad:

I see the logic about the paint color I end up with after cleaning & polishing might be different than the color it was originally painted with.

Does that imply waiting to fix the chips until after the cleaning and polishing process? Then, test a spot to see if there is a difference and if there is, take the car to paint shop and have them use a spectromiter to determine the correct color, and have them make me a batch?

Is that the correct take away?

Txs.

Gary
 
+1000 on DR Colorchip! The instructions say to polish first, a preliminary polish. Then when completed do your final polish. I use a heat gun to speed up the process as I filled above paint level so I didn't have to go back and redo where not enough DrC was applied, never had a repair pop out. You can experiment and develop your own process without fear of harming the surrounding paint. Much better than factory touch-up and sanding in my opinion.
 
Clean the area then wipe with a paint prep...

Apply the paint thinly in several layers (do not do one thick blob). I like using a plastic tooth pick -you can let the paint drop roll down the pick right into the chip.

Apply enough thin coats that the filled in area slightly raises above the surrounding paint. Let dry for 2-3 days for the paint to out gas and shrink. Apply more touch up paint if needed.

Lightly sand the top of the bump smooth to the rest of the paint.

Polish to restore the shine.

I've got a similar problem--brand new scratch/chip on my otherwise pristine hood. Todd, do you offer paint chip repair as one of your services? If not, can you (or anyone) recommend someone in the Southwest Florida area who does? I've tried this in the past really don't feel that my skills are enough to get the results I'd like. Any help would be greatly appreciated.
 
I have had excellent results with Dr. CC. Nothing is perfect but DC is pretty darn good.
 
Back
Top