imported_Frugle
New member
Hello all,
Two weeks ago I detailed my mom's expedition and learned how to use my new PC/ Optimum Polish/Compound kit that I bought from autogeek.
I felt like I did an okay job on that car. But the main reason why I bought the PC was to get the swirl marks out from the previous owner. Aparently he was an old man, and I'm sure that they came from the swirl-o-matics. There wasn't a huge amount of swirls, but it seemed like they were pretty deep. The trunk lid was the worst, so that is where I spent most of my time.
Since buying the car, I have alwayed washed with the two-bucket system, lambskin mitts, and dried with microfiber towels... though I'm sure I did create some of the swirls, most of them werre from previous owners.
Up until this point, I have used liquid NXT as my LSP and have been very satisified. However I wanted to step it up a notch. I did decide to go with Zaino as my LSP.
Objects Learned
Because this was my car, I wanted to make it as near perfect as possible. Due the the fact I was scared to polish to much, I decided to be happy with about 90% of the swirls removed, which was a great feat for me.
I started on the hood using optimum Polish, and the 6.5 wolfgang orange pad, but it didn't touch anything... there was no improvment in the swirls on the hood.. So I moved to Optimum compound and the 6.5 and still really didn't do anything.. .After I started using the 5" orange wolfgang pad, I started noticing a difference with OC. But it still took me another hour until I figured out how to work it properly.
It took me 3 passes (three complete applications) before I got the hood to an acceptable level of unswirlyness.
But on the trunk lid, I worked out a method that I used on the rest of the car...
Conclusion
I suck at this... so much work, in so much time, and only getting it "acceptable." No-one but me will notice what was left behind so it doesn't really matter, but I will still notice.
I was also dissapointed that it took me freaking 11 and 1/2 hours AGAIN. I started at 9, and pulled into the garage at 9. (last buff out of z2 was at 1:30 )
Overall, I did okay. I enjoyed it... it's a camry so no-one gives a crap anyways.
Thank you autopia/autogeek for teaching me everything I know.
Now, on to the pictures.
More dirty than normal, I had just gone through a week in atlanta of 3 days of raining... so a lot of road kick up.


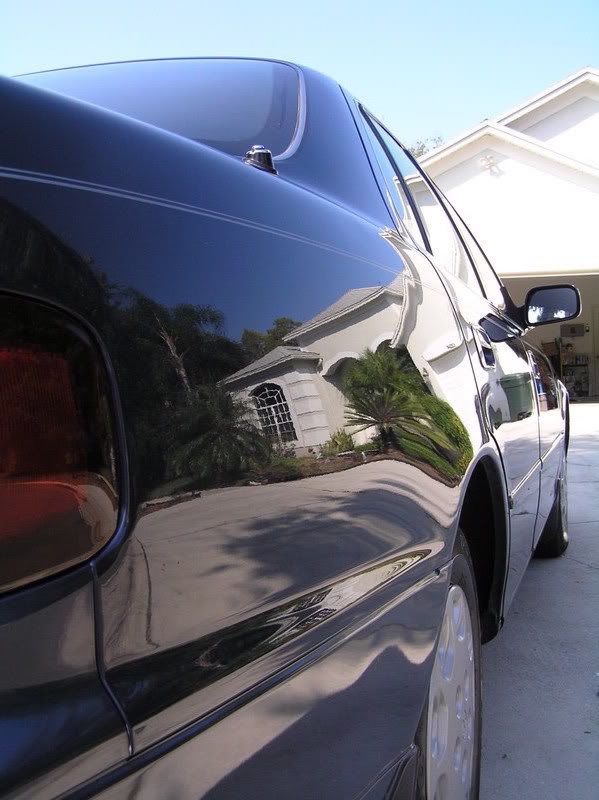
swirl marks


Interior


Two weeks ago I detailed my mom's expedition and learned how to use my new PC/ Optimum Polish/Compound kit that I bought from autogeek.
I felt like I did an okay job on that car. But the main reason why I bought the PC was to get the swirl marks out from the previous owner. Aparently he was an old man, and I'm sure that they came from the swirl-o-matics. There wasn't a huge amount of swirls, but it seemed like they were pretty deep. The trunk lid was the worst, so that is where I spent most of my time.
Since buying the car, I have alwayed washed with the two-bucket system, lambskin mitts, and dried with microfiber towels... though I'm sure I did create some of the swirls, most of them werre from previous owners.
Up until this point, I have used liquid NXT as my LSP and have been very satisified. However I wanted to step it up a notch. I did decide to go with Zaino as my LSP.
Products Used
Dawn wash
Zaino Z18 claybar
PC 7424
Optimum polish
Optimum Compound
Wolfgang orange cutting pad
Wolfgang small profile orange cutting pad
Zaino Z6
Zaino ZFX
Zaino Z5 pro
Zaino Z2 pro
Zaino Z8
Top Of The Line High temp tire cleaner
Amor all Extreme Tire shine Gel
Chemical guys VRT
Stoner invisible glass
The Mission
To get the swirls off of my trunk lid so that everytime I'm in the parking garage at school I'm not ebarrassed looking at the reflection of the bright halogens above
The Results
I suck at this.
Same as the Expedition, so this is basically a cut and paste.
The Process
Fill a main bucket with dawn and water
fill a secondary bucket with fresh water for rinsing
Wash the wheels using a designated microfiber(re) towel
Wash the tires using a tire brush, doused in the dawn water, and topped with Bon Ami (bars aid)
Empty said buckets and refill with same materials
Wash the car completely using a MF mit [for more bite than a lambswool]
While washing, before rinsing, clay the car with z18
Dry the car by first, blowing it with a leaf blower, and then using MF towels and the chase method.
After drying, spot check with clay, using a 16oz spray bottle filled with distiled water and 2/3 a cap full of Zaino Z7 car wash.
Examine the car for any abnomalties and break out the PC.
Apply Optimum polish or Compound in a circle around the wolfgang orange cutting pad.
Spread polish on panel while turned off
turn on PC on speed 3 to work the polish in.
Turn PC to speed 5.5 and start polishing.
Move PC in a switchback pattern moving at about 1/2 to 1 inch per second.
After worked in completely, examine. If saticfied, move on.
Continue this method, periodically moving the car in and out of the garage to see if I am doing anything. (looking at the sun through the finish.
When done polishing,
QD the car using Zaino Z6 spray.
Create my Z5 pro concoction using the provided 2 ounce bottles, fill botlle 2/3s full, put 6 drops of ZFX, and 1 spray of Z8.
Apply to car using vertical storkes on all panels, and horizontal strokes on hood.
Apply z5 to wheels.
Let dry for 30 minutes, and then buff.
again, QD the car using Z6 and prepare for a second coat.
Apply second coat, including wheels.
Again wait 30 minutes, and buff.
again, QD the truck using z6.
prepare Zaino Z2 pro concoction using the same method as for Z5p in a diferent bottle.
Apply using the same method as Z5p.
Wait 30-40 minutes, and buff using a PC with microfiber[re] cover.
Apply a final coat of Zaino Z8 show car seal and gawk at your work.
Apply Chemical Guys VRT to all Vinyl, rubber, and (optionally) tires (VRT).
Opt to apply Armor All Extreme Tire Shine Gel to tires.
Vacuum all interior carpets
gawk at your work and pat yourself on the back for suffering through the arm pains.
and I also applied the zaino to everything, including windows. (z5p x2, z2p x2)
Objects Learned
- I had a really difficult time getting rid of the swirls... It took me 2 hours on the hood before I found a method that would get rid of them effectively.
- this toyotas paint was really hard
- I again was really impressed with Chemical Guys VRT... I think that is the only product I am proud of... everything else seems like there are a billion others just like it.
- buying 2 black LC pads was a waste of money. It ate all the zaino I had porportioned for 2 coats and didn't even apply 1 coat... it was exremely uneven in applying. after it hazed and I buffed it out, (since it was the first coat) I could run the back of my hand across the paint and feel the lanes of wax, so there were waxed areas and unwaxed areas.. unacceptable. After one coat of trying with the PC I went back to a normal cotton applicator. Now I have two worthless black LC pads.
- More Optimum compound is better than to little OP when it comes to effectiveness.
Because this was my car, I wanted to make it as near perfect as possible. Due the the fact I was scared to polish to much, I decided to be happy with about 90% of the swirls removed, which was a great feat for me.
I started on the hood using optimum Polish, and the 6.5 wolfgang orange pad, but it didn't touch anything... there was no improvment in the swirls on the hood.. So I moved to Optimum compound and the 6.5 and still really didn't do anything.. .After I started using the 5" orange wolfgang pad, I started noticing a difference with OC. But it still took me another hour until I figured out how to work it properly.
It took me 3 passes (three complete applications) before I got the hood to an acceptable level of unswirlyness.
But on the trunk lid, I worked out a method that I used on the rest of the car...
- Apply about a half dollar size amount of OC to the pad.
- spread compound on section with the PC off
- Turn the PC on 3 and spread fairly evenly
- turn the PC on 6 and go over it fairly quickly (2 inchs a second or so)
- Turn the PC down to 4 and work very slowly with a lot of pressure. (.5 to 1 inch a second)
- After doing 4 for about 3-4 minutes, turn the PC up to 5 and repeat.
- Finish off using 6 and again fairly quickly, but still working it in
- buff
Conclusion
I suck at this... so much work, in so much time, and only getting it "acceptable." No-one but me will notice what was left behind so it doesn't really matter, but I will still notice.
I was also dissapointed that it took me freaking 11 and 1/2 hours AGAIN. I started at 9, and pulled into the garage at 9. (last buff out of z2 was at 1:30 )
Overall, I did okay. I enjoyed it... it's a camry so no-one gives a crap anyways.
Thank you autopia/autogeek for teaching me everything I know.
Now, on to the pictures.
More dirty than normal, I had just gone through a week in atlanta of 3 days of raining... so a lot of road kick up.
swirl marks
Interior
")