95 Dodge Neon midway success (nxt/rotary)

qwik

New member
Well this is my 95 dodge neon, as you can see from the pics the paint is in pretty bad condition. I don't have alot of chips or anything but alot of swirls/scratches/orange peel. I decided to test out some methods on this car because i will be doing these same methods on my 02 firebird. Learning to use the rotary better and wet sanding. The first few pics show the horrible paint swirls and scratches the last show my methods as i go along. Now my question is what else will really go deep down and get rid of all of my really bad scratches? Below is what i used


Vector 7'' grinder/polisher with wool pad from properautocare.com

Meguiars:

Heavy cut compound with wool pad

Medium cut compound with meguiars maroon pad

Fine cut compound with maroon pad.

3M hand glaze

NXT wax


I didn't use my menzerna IP and FP because i didn't have a pad for the IP.


I decided today to start to wetsand the car to get rid of the orange peel and again in the same spot, on the trunk lid first. I didn't get to finish but i will post pics of my progress as i go along.


neonswirlssmaller.jpg


neonhoodsmaller8.jpg


This is with various pads and compounds

neonhoodsmaller7.jpg


This is what the other side that was not touched looked like:

neonhoodsmaller1.jpg


This is a side by side comparison, sorta.


neonhoodsmaller6.jpg


And this is the finished result with nxt


neonhoodsmaller2.jpg
neonhoodsmaller3.jpg
neonhoodsmaller4.jpg
 
At first the rotary was my enemy it would bounce all around controlling me. Especially with the yellow/maroon pads that were harder than the wool pad. I have learned how to control it better, when to bear down and let up. I wetsanded the one side of the trunk today and hit it with the wool pad looks really good w/o the orange peel. I only used 2000 grit because some of the other times i have used 1000 than 1500 i sanded through so i thought i would be safe, not that it mattered much since this is my test car. I got this car very cheap and i never cared for it but after seeing some of my results i think i am going to go through with doing the entire car. This way i can atleast be comfortable using the rotary on different curves and such before i wetsand my baby (firebird!) Thanks for the compliments.
 
The car apparently came from a school teacher. I got it wholesale real real cheap, its only got 71k and change on it. I haven't changed the oil or any fluids, belts or anything since i 've gotten it. I really really should though lol. Its my daily driver stick car. I know its not a real cool car like my f-body but hey if i get it blingin maybe it'll turn some heads. Below are some pics of the portion of the trunk i wet sanded with 2,000 grit. I didn't think the 2k grit cut enough and removed enough imperfections, i can still see more, so 1500 than 2k next time around. I was nearly raining out when i took the pics today, very foggy and no sun what so ever so the reflection isn't great.


This is after a few passes with the various pads and compounds and finished with 3M hand glaze:


neonwetsandsmaller2.jpg


neonwetsandsmaller3.jpg


neonwetsandsmaller4.jpg


And this is with NXT:


neonwetsandsmaller1.jpg


neonwetsandsmaller5.jpg
 
wow thanks guys i really appreciate the compliments, it makes doing all of it well worth it. It really wasn't that hard, i am starting to become alot more confident with wetsanding. The key is to stop every few strokes totally wipe the area down and check your work. When i inititally started on some misc peices i went too long w/o checking my progress and sanded to harshly and went right through some parts. I am starting to really like this stuff, all my hard work and effort is really coming along! Can't wait to do the whole car, thank goodness its a small one
 
Nice work. I'm assuming that wetsanding only works on single stage, or can you also do it for clearcoat?
 
I'd love to see the pics, but they seriously need to be compressed for those of us on dial up.
sad.gif


The free image optimizer can get those 600 x 450 250-335k pics down to about 65k each with excellent quality. I really want to see how your car is turning out!
 
Sorry for the high resolution, you should have seen them before i changed the image size in photoshop! I believe each one was bigger than 1024x768 :eek: When i get home i will make a gallery with thumbnails and i'll cut the size down here. I figured if i made them too small it wouldn't have shown the detail too well.
 
qwik, it's not just the large size - - you can also reduce your pixel density down to the lowest ("1") setting and it's fine for the internet. I find it reduces the file size by ~80%.
 
tom p. said:
qwik, it's not just the large size - - you can also reduce your pixel density down to the lowest ("1") setting and it's fine for the internet. I find it reduces the file size by ~80%.


Just FYI, that's not exactly how jpeg compression works. Pixel density has more to do with your monitor than anything else. A 640x480 image is 640 pixels by 480 pixels no matter what. However much space 307,200 pixels take up on your screen is how much they take up. You can't change that density. Jpeg compression changes how well the change between colors is defined (sort of). The smaller size, the less definition between color changes, and the more it sort of looks blocky or crappy. This is also why a very high quality jpg of a very solid color image will still result in a very small file. Anyway, just fyi, and some of it shooting from memory. ;)


As far as those pictures, holy crap they are amazing! The lack of orange peel is incredible! I wonder how much paint had to be removed though?


Question: You mentioned checking every couple of sanding strokes, but when it comes to not going through the clear, what are you checking for? I mean, if the scratches or orange peel haven't been removed when you stop and check, couldn't you still go through the clear trying to remove them?


Every time I see picts like that, it makes me want to wetsand something... But I think that would be a bad idea, especially for someone who has not mastered a rotary... :eek:
 
Thanks for the compliments again guys. There are still alot of imperfections in the test area which i feel if i had sanded deeper i may have been able to get rid of. Since you guys can see how bad the paint was before there are just some areas that cannot be totally perfect and brand new. In person it looks a bit differnt, its like a 98% improvement. Now i know why i didn't get black, i used a turtle wax yellow MF towel on the area and i already have some scratches, i need to go over it again with menzerna intensive, enough with this porter cable crap i'm gonna use the rotarty with the intensive polish. As for changing the size in PS i know how to, the compression size etc, just didn't think they were all that big but than again i am not using dial up, like i said i will correct it when i get home.


As for the wetsanding i am not quite sure if i am going through the clear or not. 2000 grit isn't all that bad, plus i am not seeing any removal of paint, the only real way to know how much paint i am removing or clear rather is to have a paint surface gauge which i don't have. I am new to this too guys but with practice i am getting better every time. You can tell if you've sanded through after you wipe the are clean, that is why its good if you stop often. 2k grit is pretty safe, when you start going from 1,000 to 1500 than 2000 u start to push the line. If you don't sand through you'll probably buff through if your not careful.


I don't know if this is single stage paint or if its got a few layers of clear or not, regardless i plan on doing 1500 than 2000 for the rest of the car.


To the person who asked about if its better to wetsand on single stage paint or clear i would say do it on paints that have a few coats, especially with clear. Most imperfections are in the clear anyway, aswell as the orange peel.


what pisses me off the most about all of this is the MF putting small scratches back in grrrr. Oh well i'll keep you guys posted.
 
Aurora40 said:
Just FYI, that's not exactly how jpeg compression works. Pixel density has more to do with your monitor than anything else. A 640x480 image is 640 pixels by 480 pixels no matter what. However much space 307,200 pixels take up on your screen is how much they take up. You can't change that density. Jpeg compression changes how well the change between colors is defined (sort of).


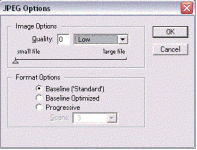
...perhaps my terminology is technically incorrect but Photoshop does permit you to alter "image quality" when you save a jpeg. Perhaps it has another name :nixweiss ...dunno.
 

Attachments

  • photoshop.gif
    photoshop.gif
    34.9 KB · Views: 242
lets stick to the topic if we can, thanks.


Scottwax: i would like your opinion and suggestions on what i should use to get this even better. In person you can see there are still some imperfections but i know i am not going to get it like new that paint was very neglected (or maybe i can get it like new)


Would claying do anything before wetsanding? Will the clay reach down deeper than i sand? Will using DACP do anything or is my heavy cut compound/medium/fine already more agressive? Thanks
 
Back
Top