CEE DOG
New member
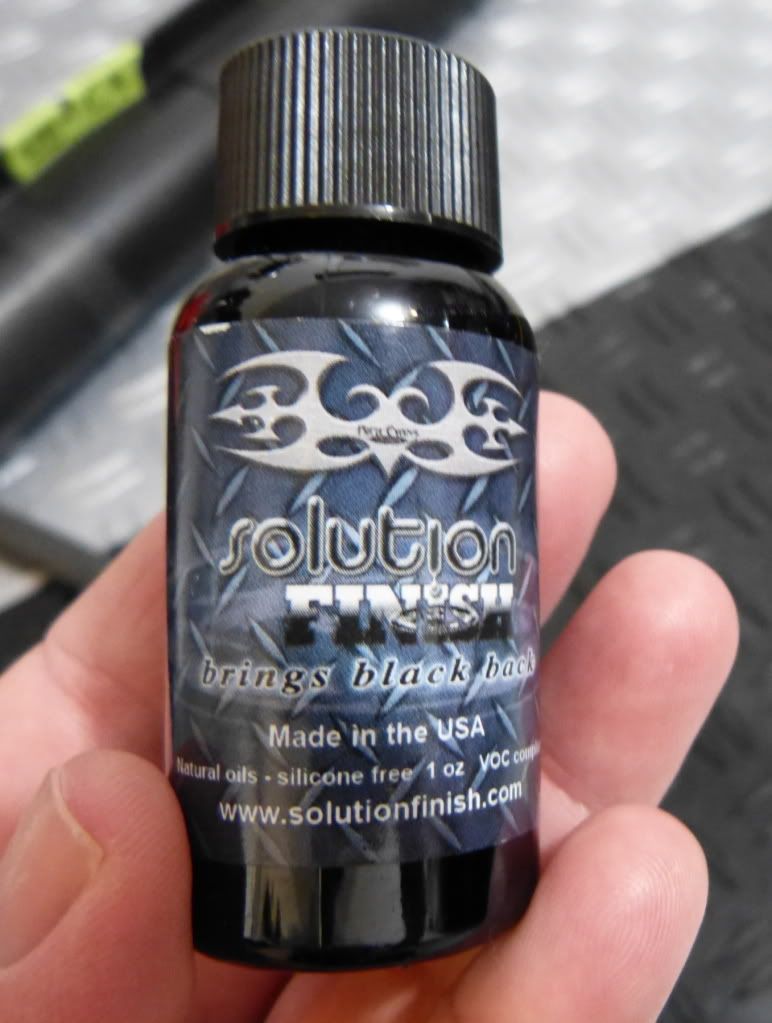
Review: Solution Finish “Brings Black Back” (Trim Restoration Product)
Product Claims:
Solution Finish is an incredible new product that restores originally black surfaces to a deep, rich black "wet look" shine that dries quickly with no greasy residue. This unique formula combines ancient ingredients with advanced polymer technology to provide a spectacular, long-lasting, black, protective finish. Formulated for professional use only, Solution Finish is a silicone-free solution that uses all natural oils and is VOC compliant.
Solution Finish was developed by professionals for professionals – you won't find this product on the wax walls in your local retail outlets. It is formulated using only the finest ingredients that you don't usually find in mass-produced, OTC products. Solution Finish is ideal for restoring, conditioning and protecting any originally black surfaces.
If it oxidizes, Solution Finish can restore it!
Introduction:
Ahhh, the age-old question of what to use for faded trim? There's a long history of evolution in plastic trim detailing products. From the dime a dozen "dressings" to a couple durable polymer sealants to the latest in nano tech coating technology there have been many attempts at addressing the problems associated with plastic trim. Let's review the (2) generalized issues with a quick op-ed on the current status of solutions and then delve into why we haven't yet seen a true solution to issue #2. Next we will move forward into the interesting science behind Solution Finish and how it seeks to overcome the obstacles others have faced when it comes to restoration of faded trim. And finally we will get into the application, function, and real world results of Solution Finish with pictures, video and analysis followed by regular durability updates.
1.- Protecting new trim
In recent years we have seen huge advances in solving this one. There are a few products available now that do a good job of protecting new trim, leaving a non-greasy finish, and boasting many months of durability. But do they stop the trim from oxidizing? More on that later.
2.- "Restoring" old trim
While there are many products out that "dress" (temporarily darken) old faded trim by leaving a layer of some type of dressing nothing I have used actually restores the plastic. Now the main reason that matters to most people is as follows. Many of these old school products fall short in at least one of the following ways.
A.- Rain partially or completely washes them off of the plastic trim and/or leaves rain spots.
B.- While some don't noticeably wash off in the first few rains they do fade with each rain. Some last a week or two and a couple may even make it a month but in challenging conditions I haven't personally seen any make it beyond a few weeks without being seriously compromised.
C.- Greasy to the touch
D.- Are made of compounds that actually aid in the oxidation of your plastic trim and reinforce the vicious cycle of needing more dressing.
The Exception:
I would be negligent to act as if there is nothing that seriously darkens faded trim and lasts for months while leaving a dry to the touch surface. There is a coating (C4) made for trim that claims 1-2 years and is a good product but in my testing it began to fade within 5 months on the horizontal surfaces. While it still beads a little and the vertical surfaces are decent the fading on horizontals was very disappointing for the price. At 2.3X to 9X the cost of Solution Finish it’s very pricey and does not work on extremely faded plastic.
Why does trim fade and eventually turn chalky white:
We are all familiar with the affect sun has on surfaces and just like me you probably assumed the bleaching affect was the only reason trim becomes faded. During my research and thanks in large part to the time Chris West spent explaining the oxidation process of plastic I now have a better understanding of the full story. I learned a ton but will try to summarize just a few points in the interest of moving forward.
Manufacturing uses cheap fillers when creating plastic trim in order to save on cost. These fillers begin to break down soon after and as they do they emit peroxide gases. These gases in turn cause the oxidation and further speed the process of breaking down yet more of the surface.
To "fix" the faded trim in the past people have applied some type of dressing. As I touched on previously, many of the dressings used contain silicones that also react with the cheap fillers in the plastic, which once again speeds the oxidation and causes further fading.
The Solution?:
Solution Finish attempts to address faded trim on many of these fronts simultaneously. First the product works on an extremely small scale to penetrate down into the pockets and crevices that exist and were further created during the emission of the peroxide gas. Once there, Solution Finish basically re-impregnates the plastic on a nano scale with the high quality ingredients that the plastic manufacturers should have used in the first place.
There are also ingredients in SF to stop the oxidation by not allowing peroxide gas to form or react with the oxygen and UV rays.
Details:
1.- Packaging: Plastic Bottle
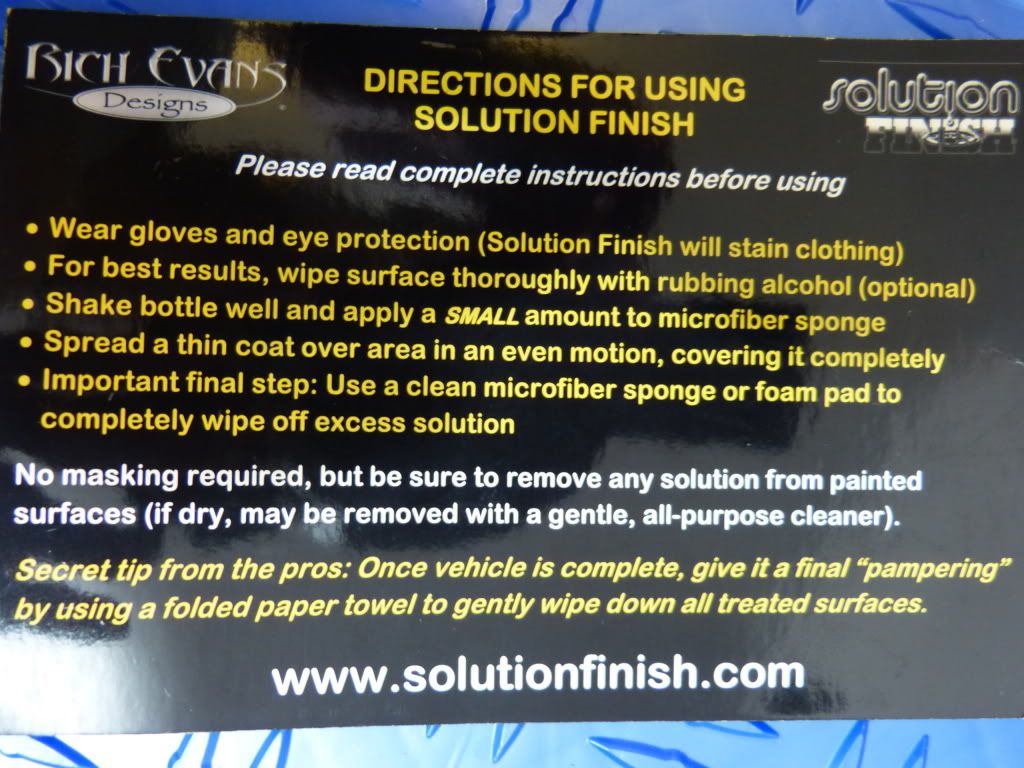
2.- Directions: Very simple
3.- Viscosity: Oily
4.- Color: Black
5.- Scent: Nuts? (Not very strong)
6.- Size: 1 oz. / 12 oz. / 32 oz. / Kits also available soon
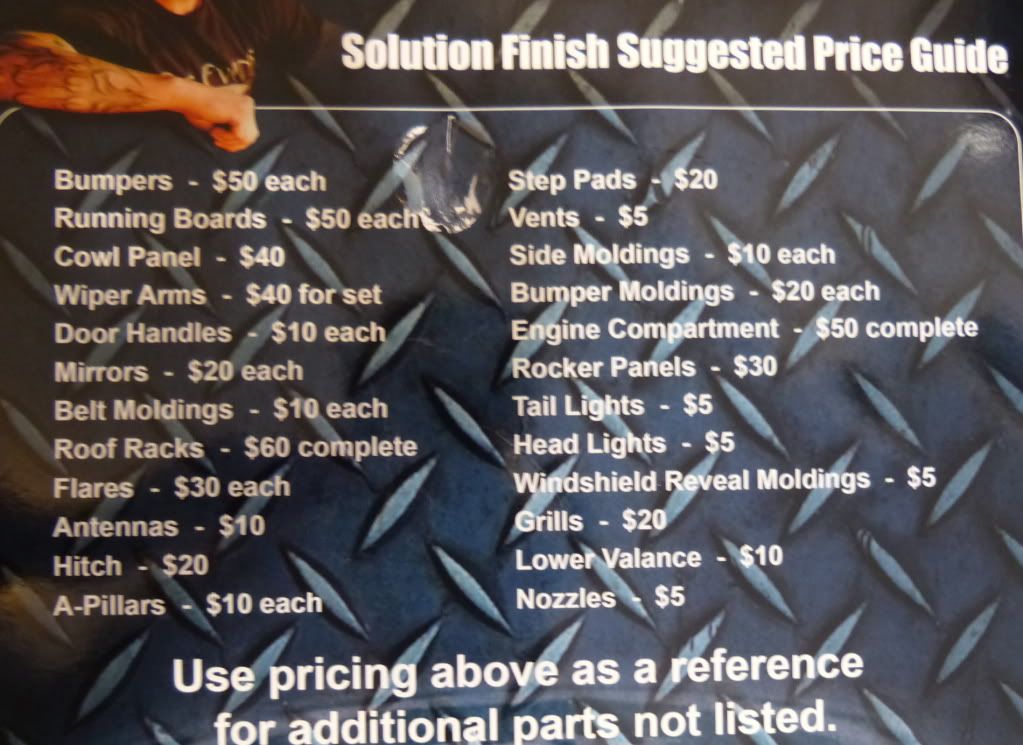
7.- Price: $29.95 / $125.00 / $250.00 /
8.- Manufacturer: Solution Finish
9.- Made in: USA

Products used for prep:
1.- 50% IPA
2.- MF towels
Products used for application:
1.- Solution Finish
2.- Microfiber applicator
3.- Microfiber towel
Conditions:
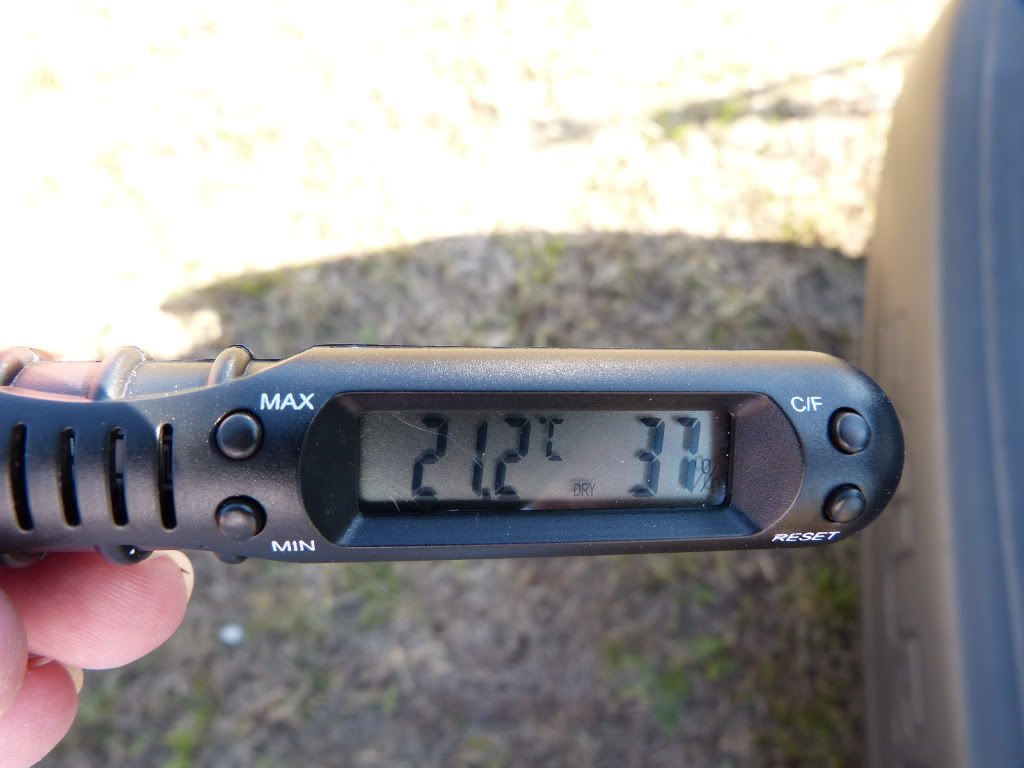
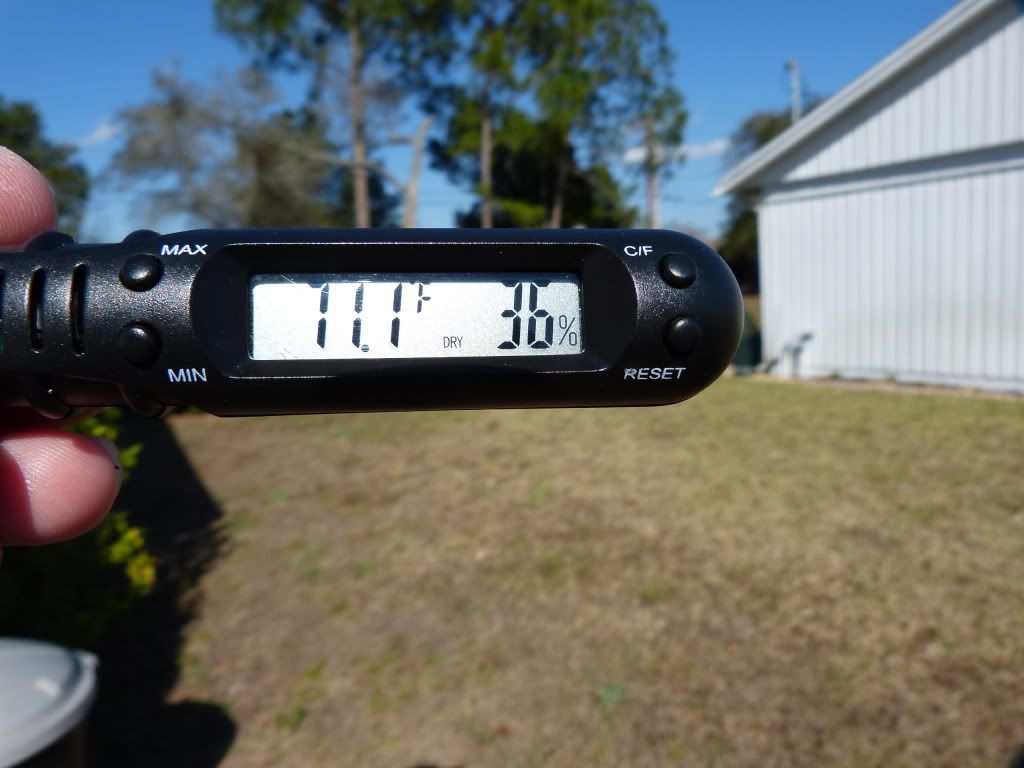
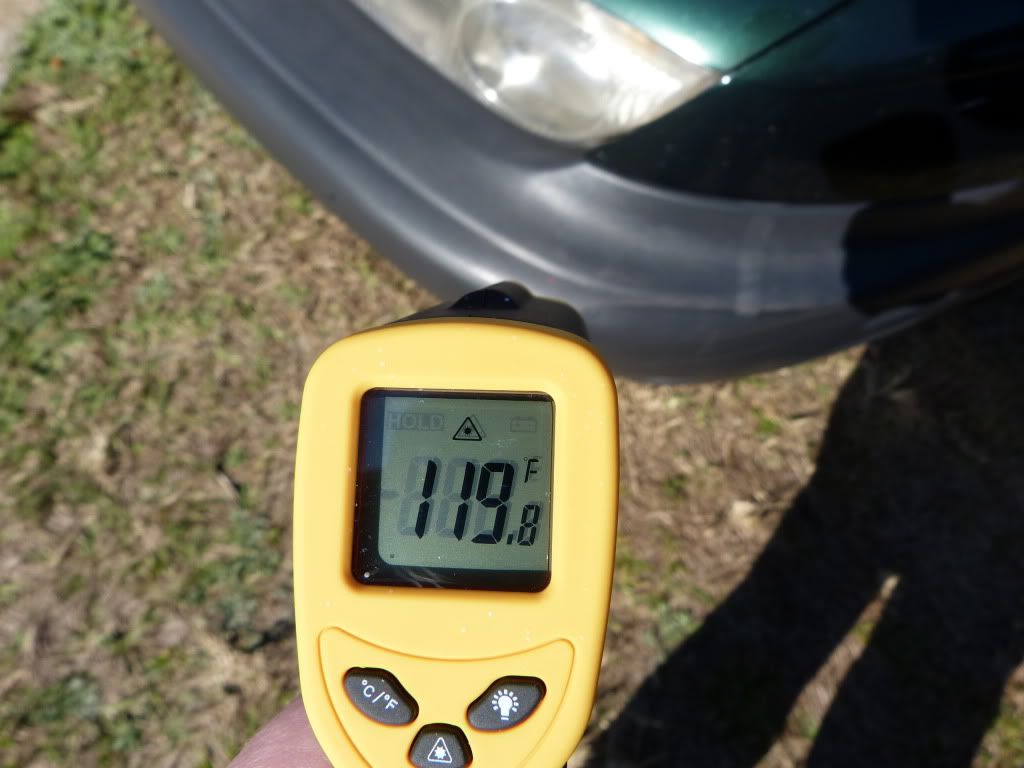
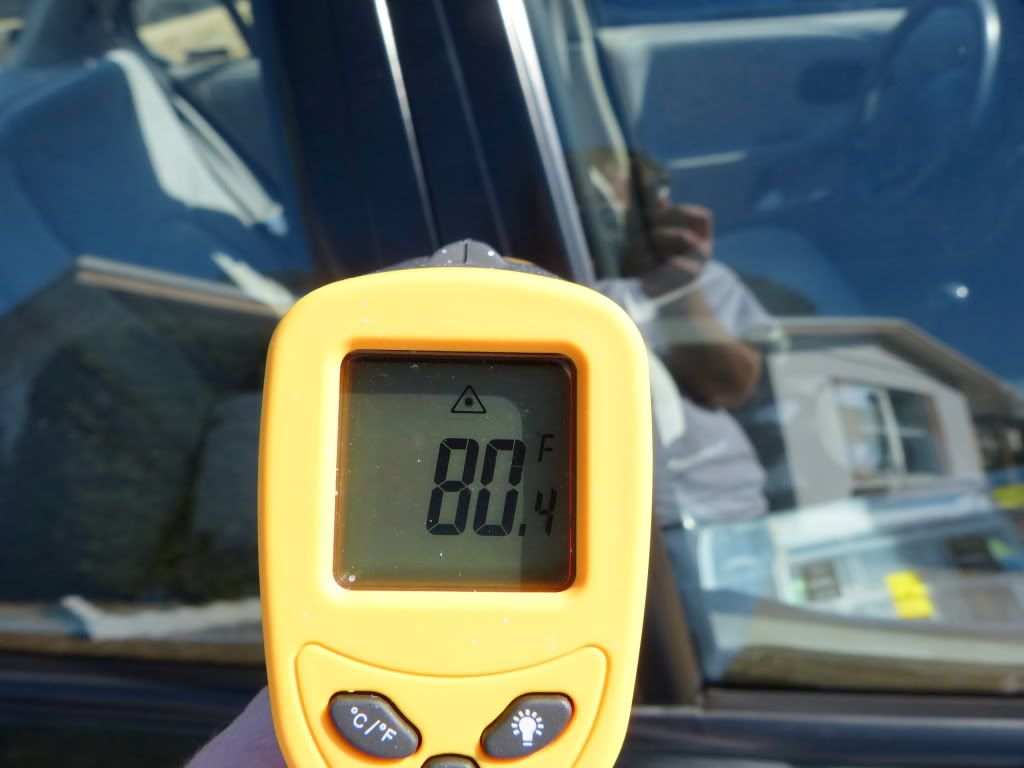
Surface Temperatures:
Preparation, Application, and Noted Observations:
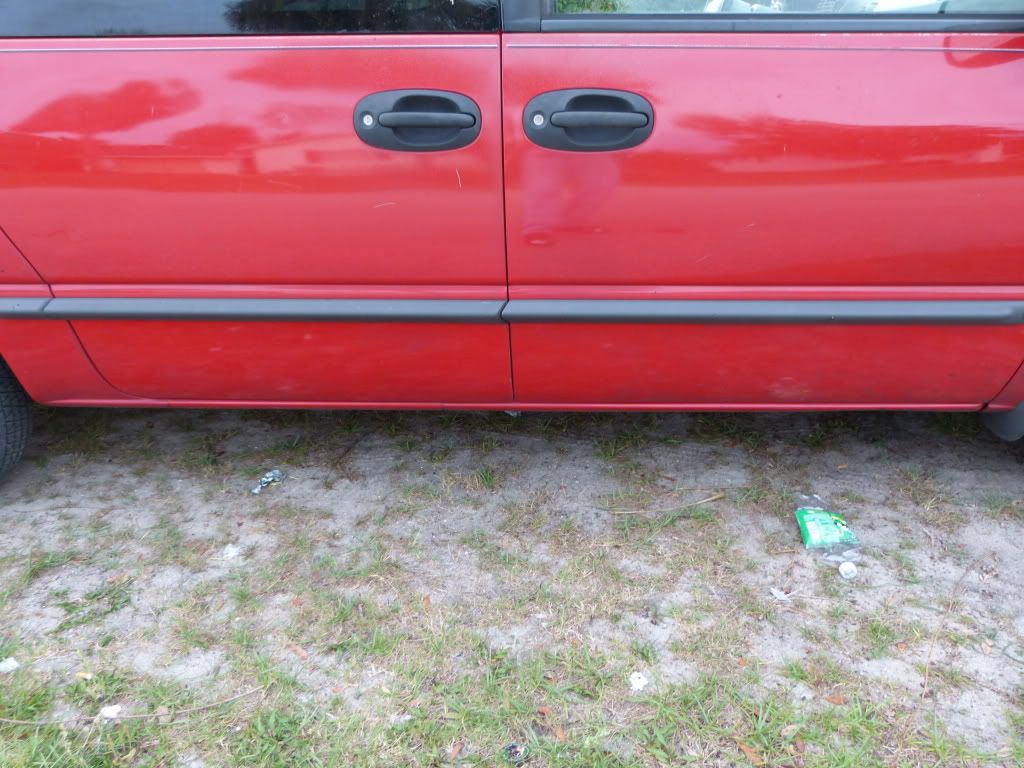
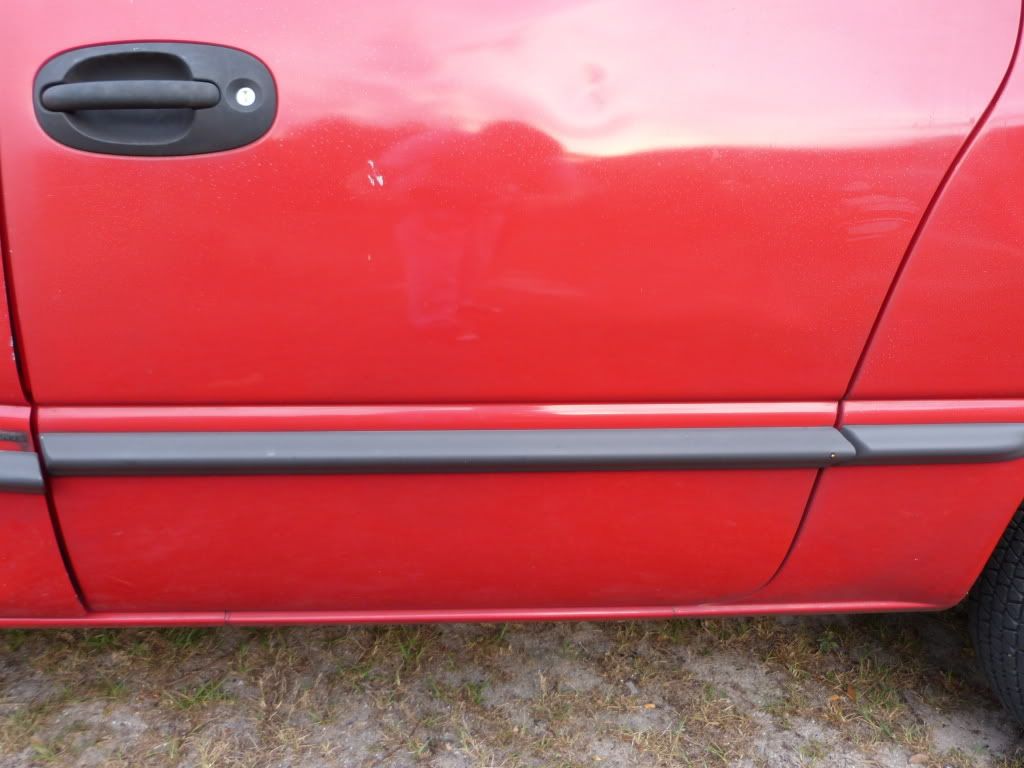
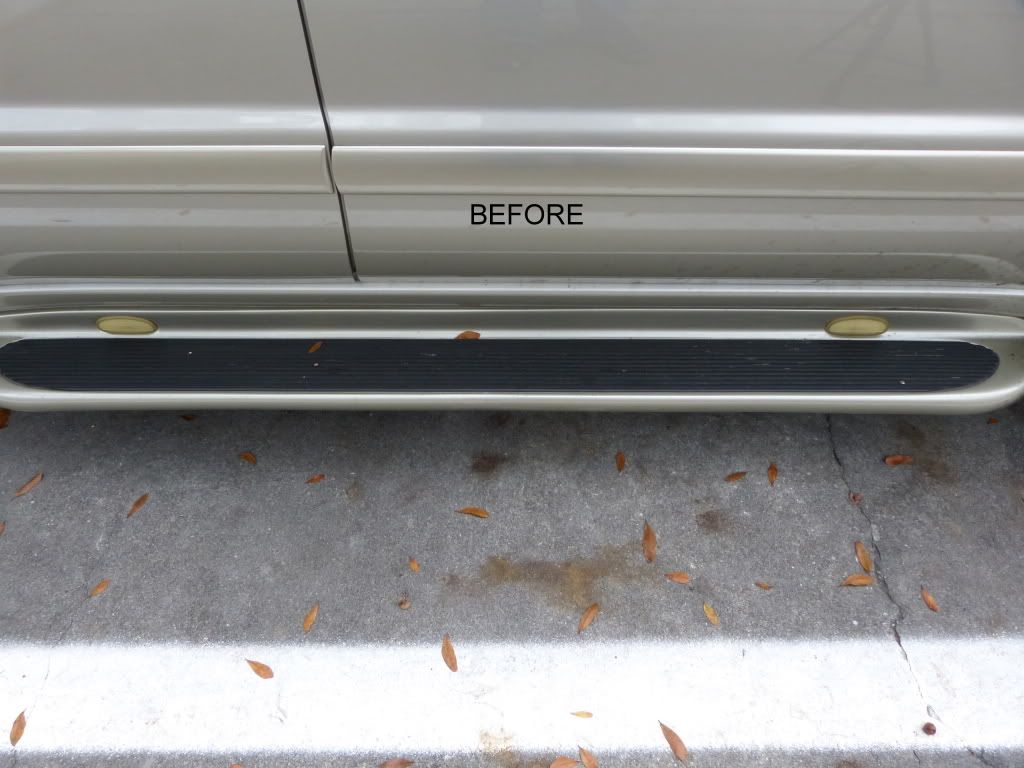
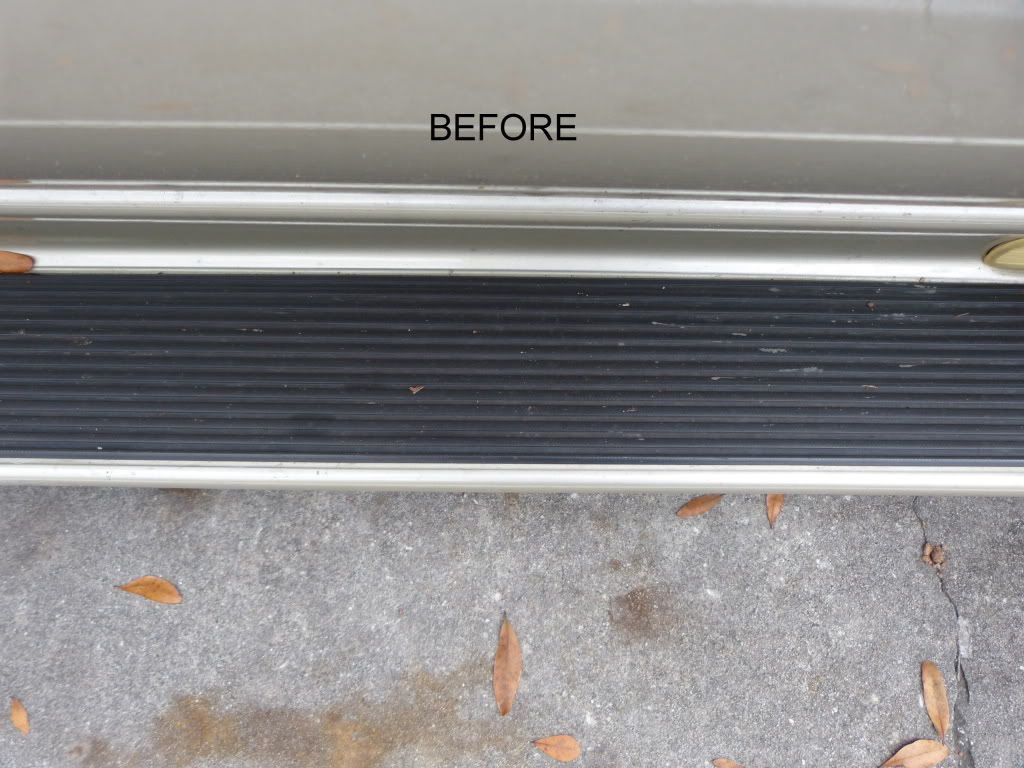
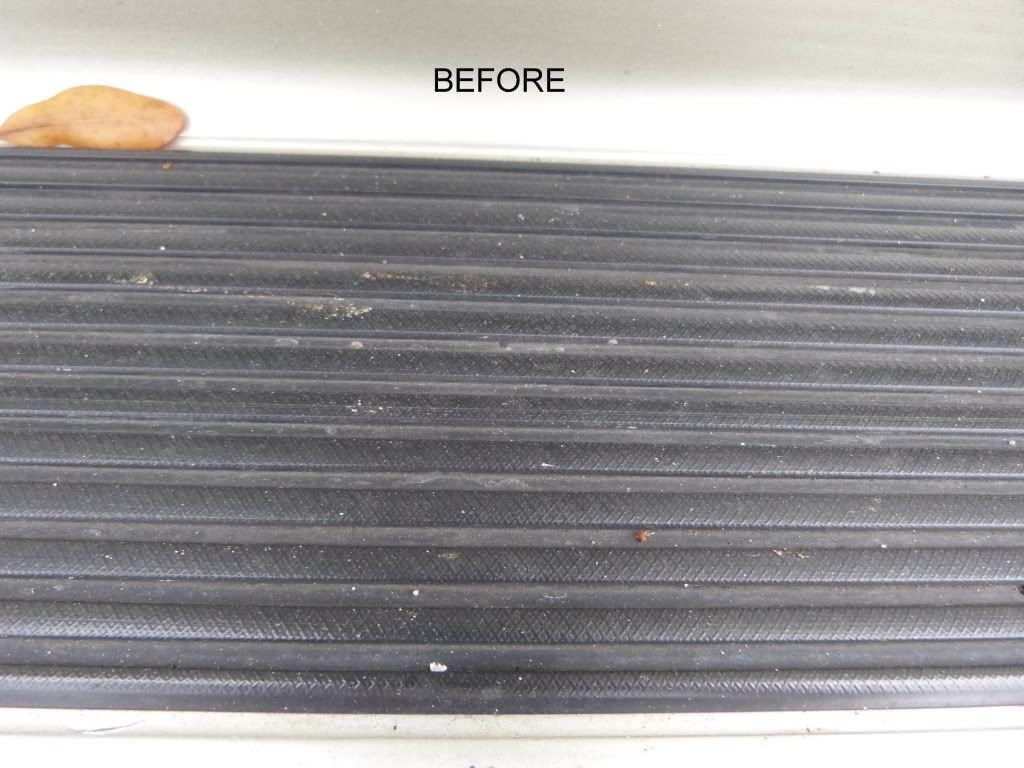
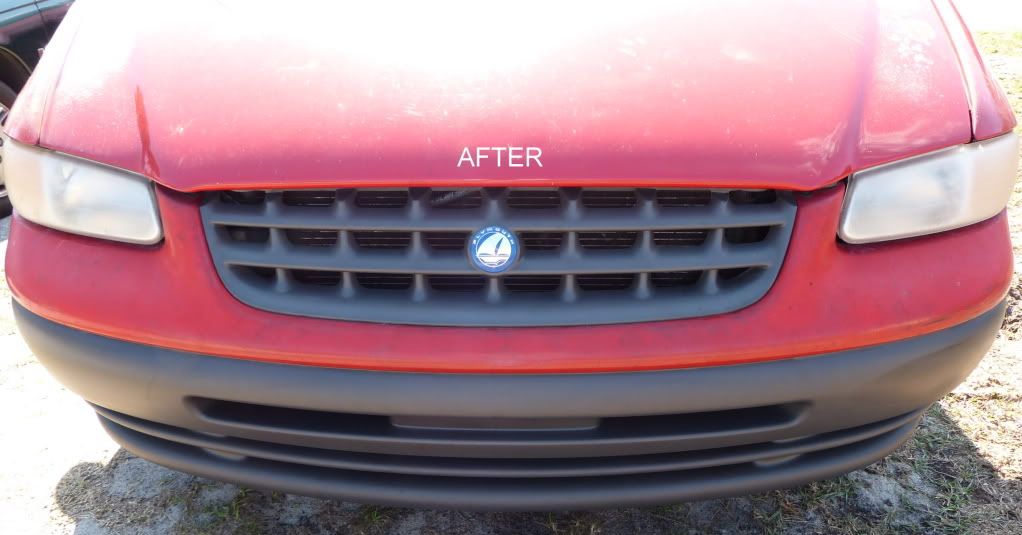
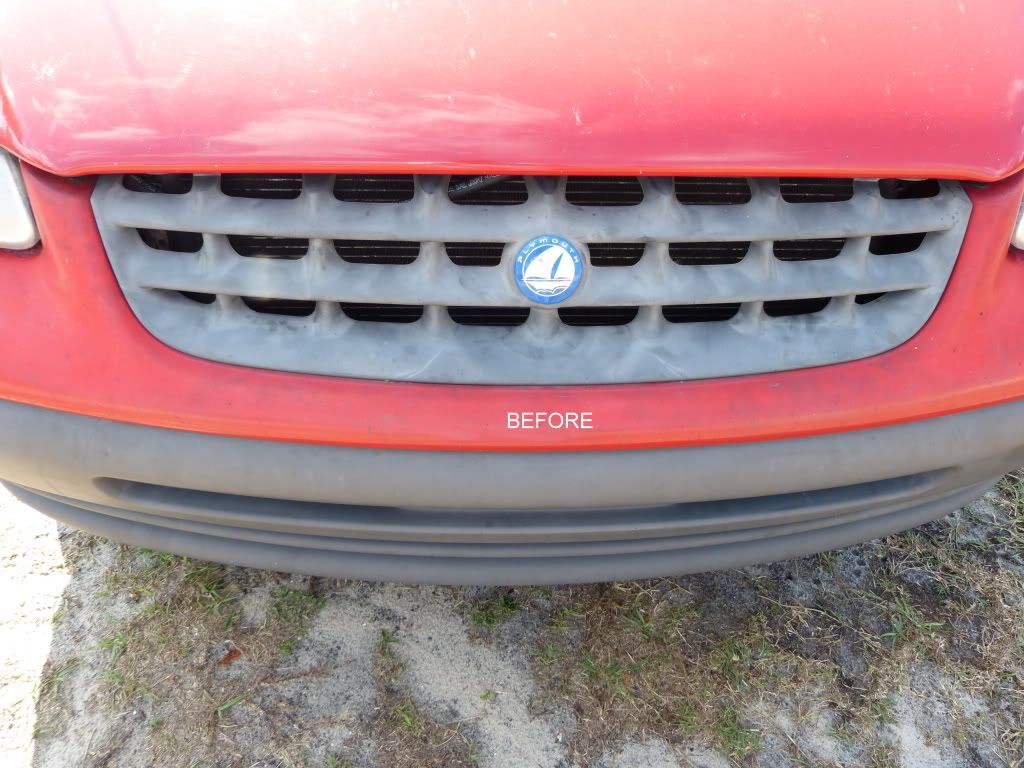
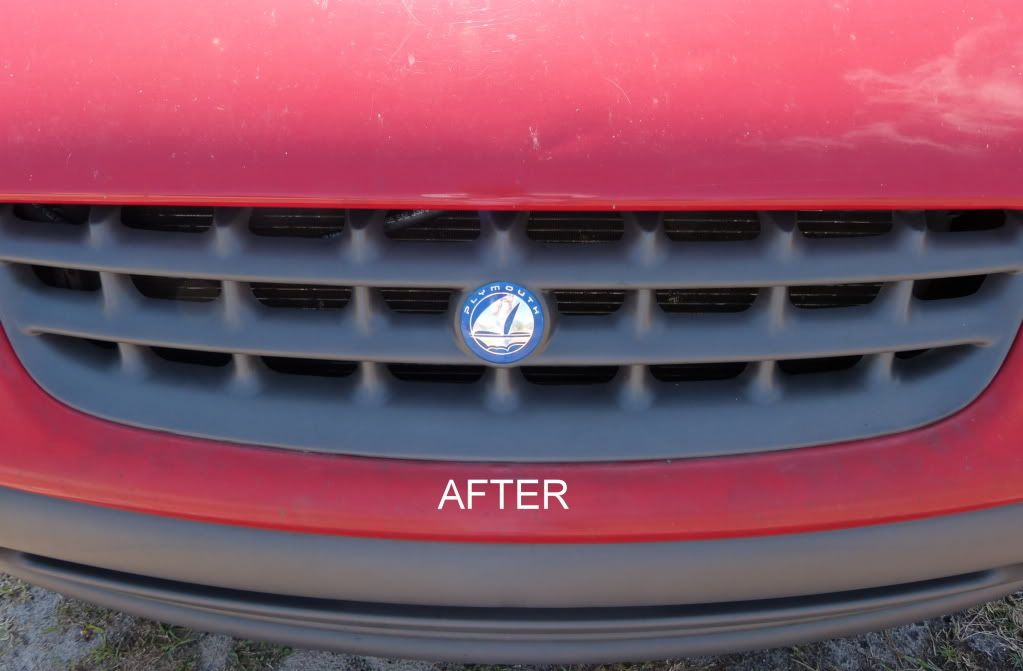
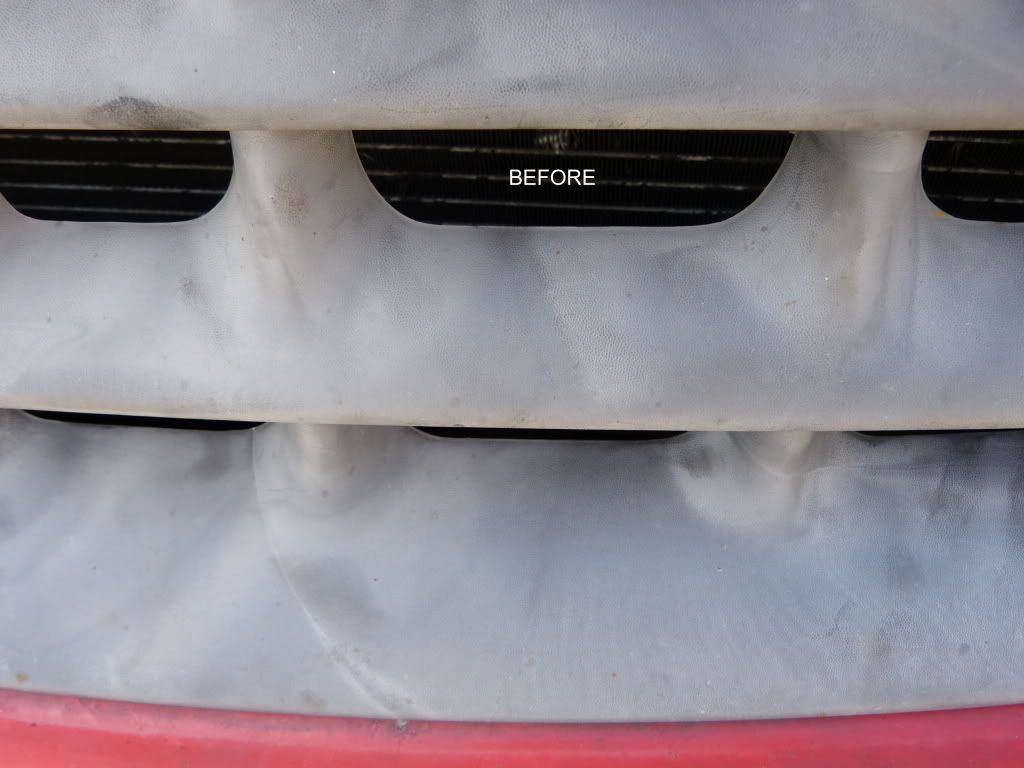
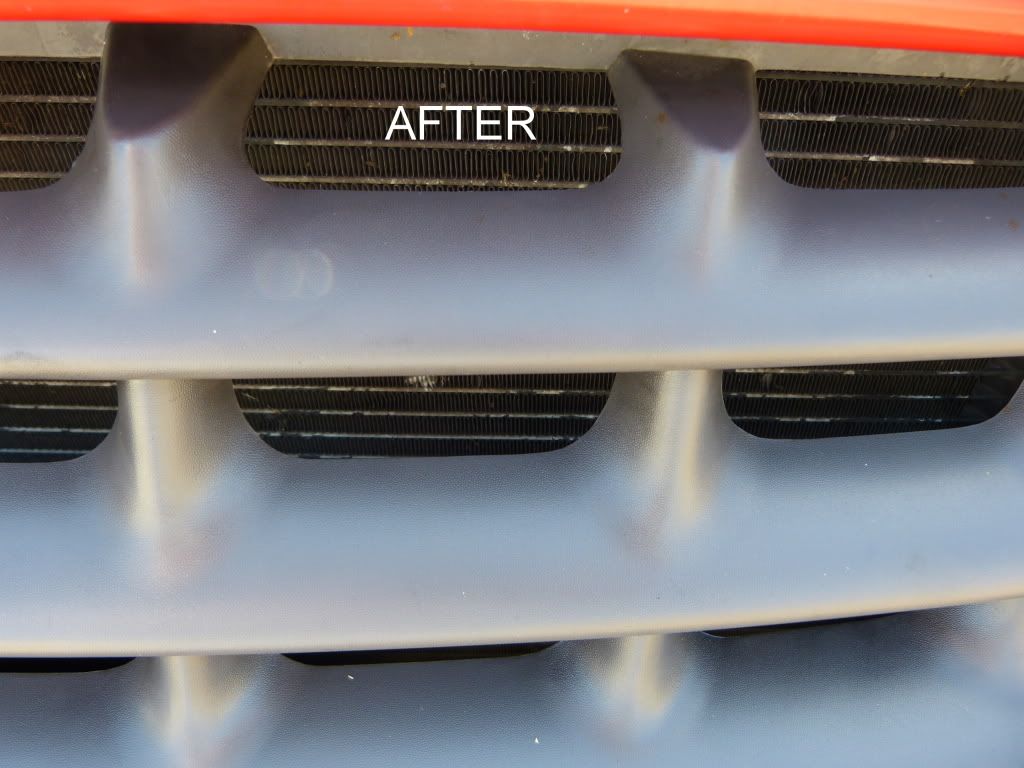
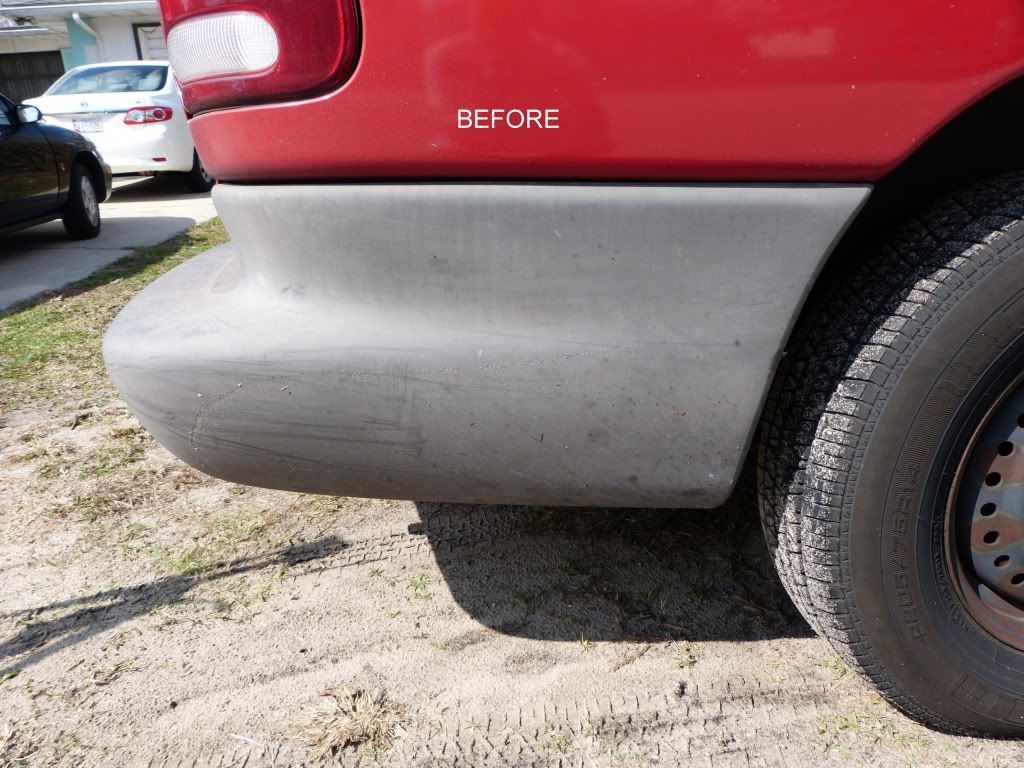
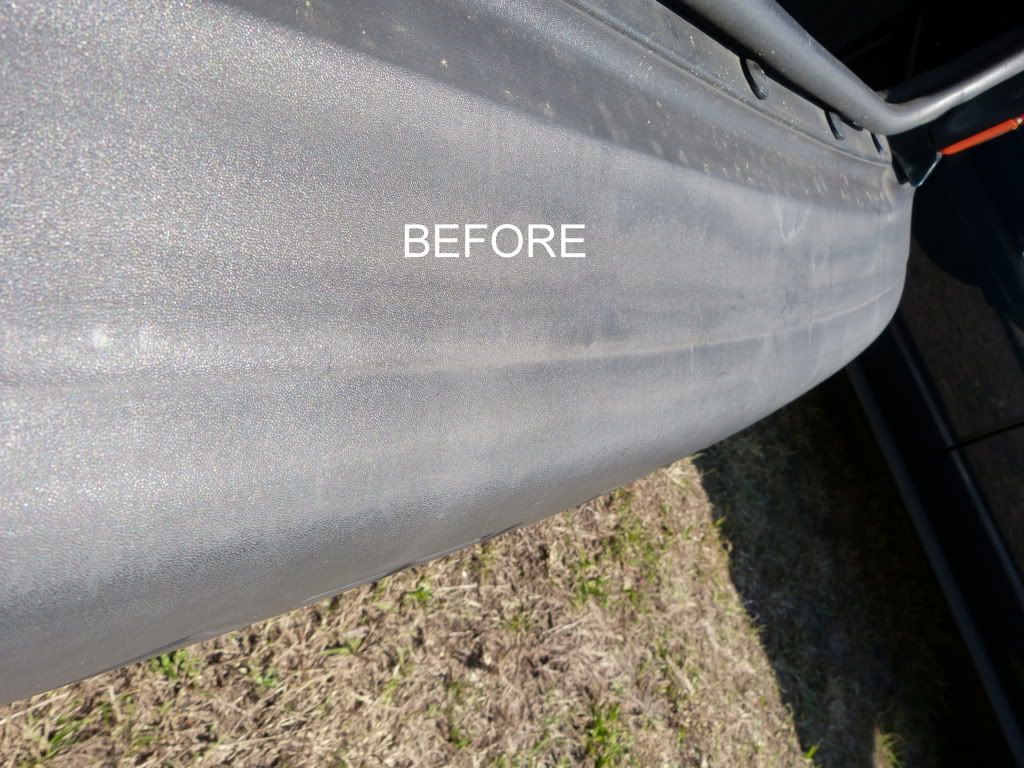
A.- Slightly Faded Trim
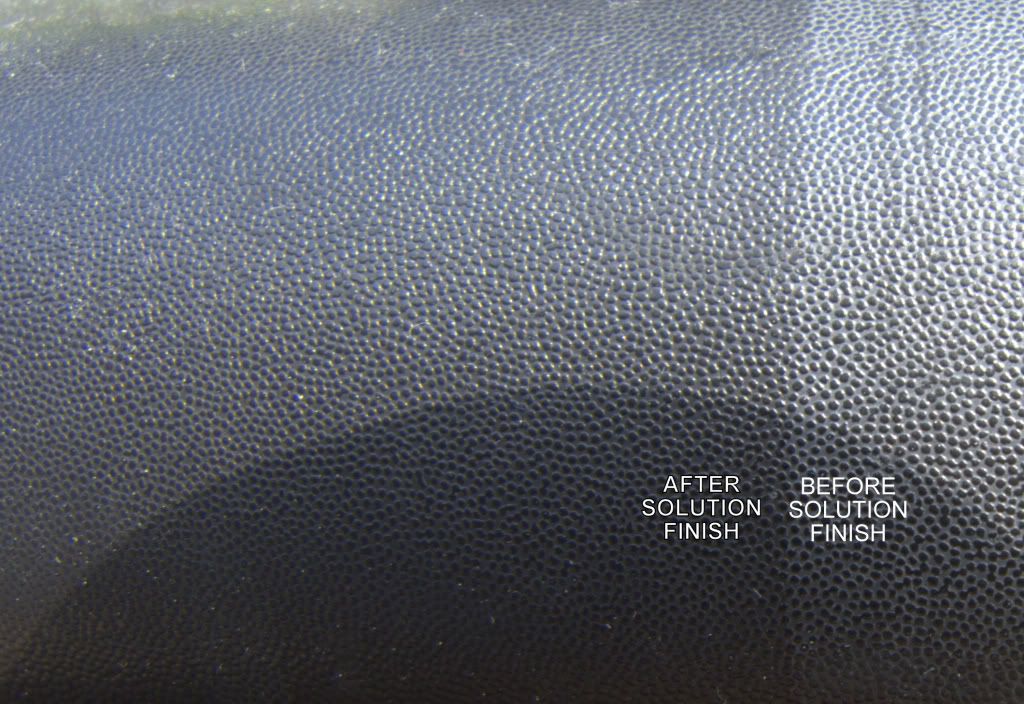
I wanted to really put SF to the test on completely whitened trim (more on that later) but my adventure and first application actually starts on the type of fading that you see on most vehicles.
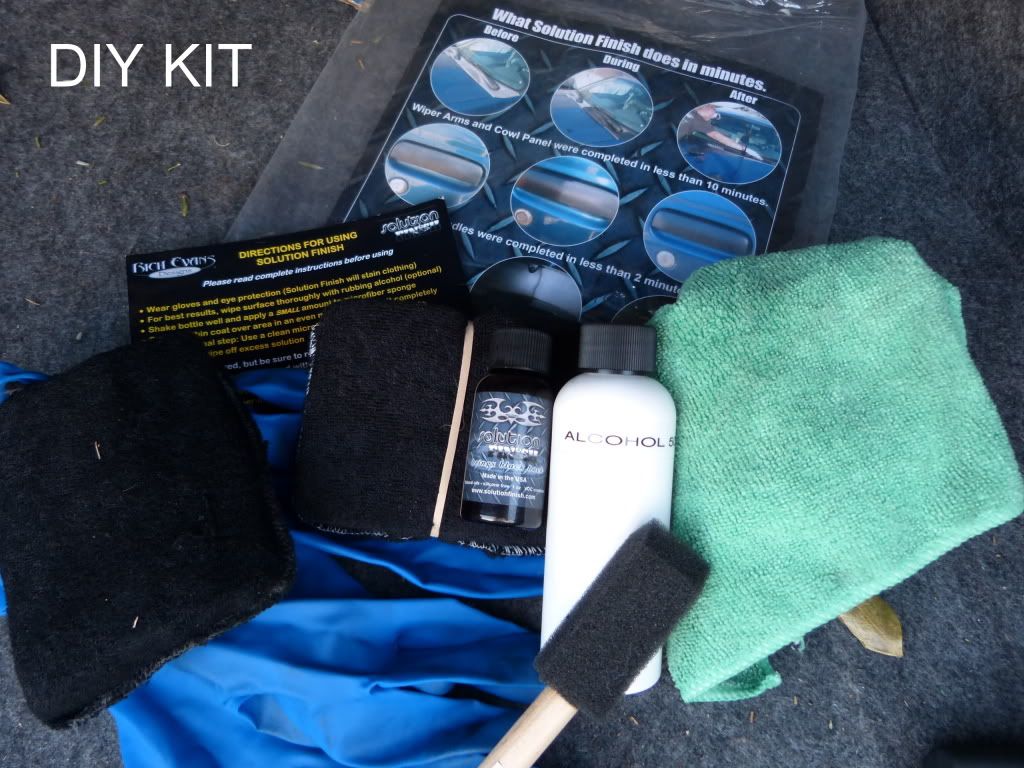
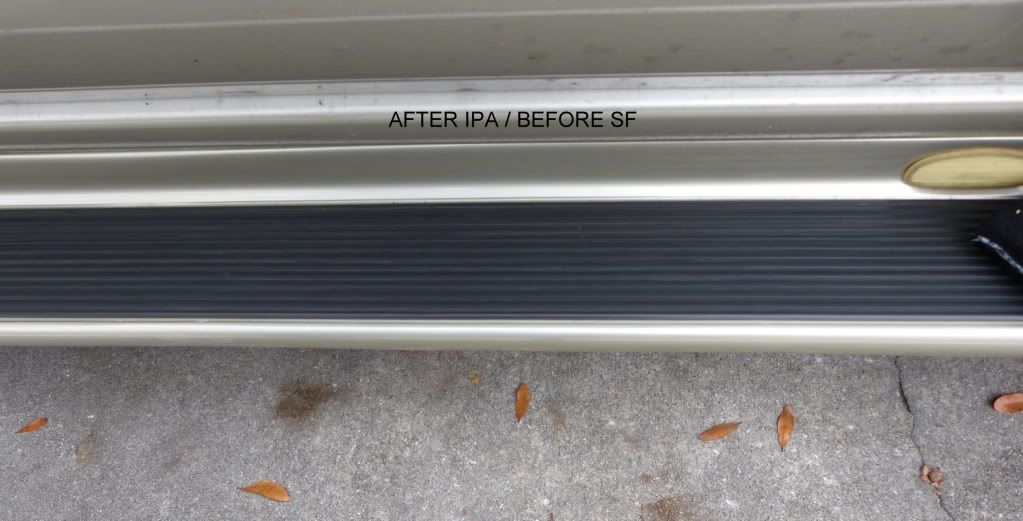
On my lunch break I decided to do a little testing on my buddies vehicle. The trim was dirty but without access to water or my master blaster dryer it was straight to the SF DIY Kit I went. I retrieved the bottle of 50% IPA solution and after 2 quick passes (using a microfiber towel) I was ready to either apply SF or tape off the surrounding area first.
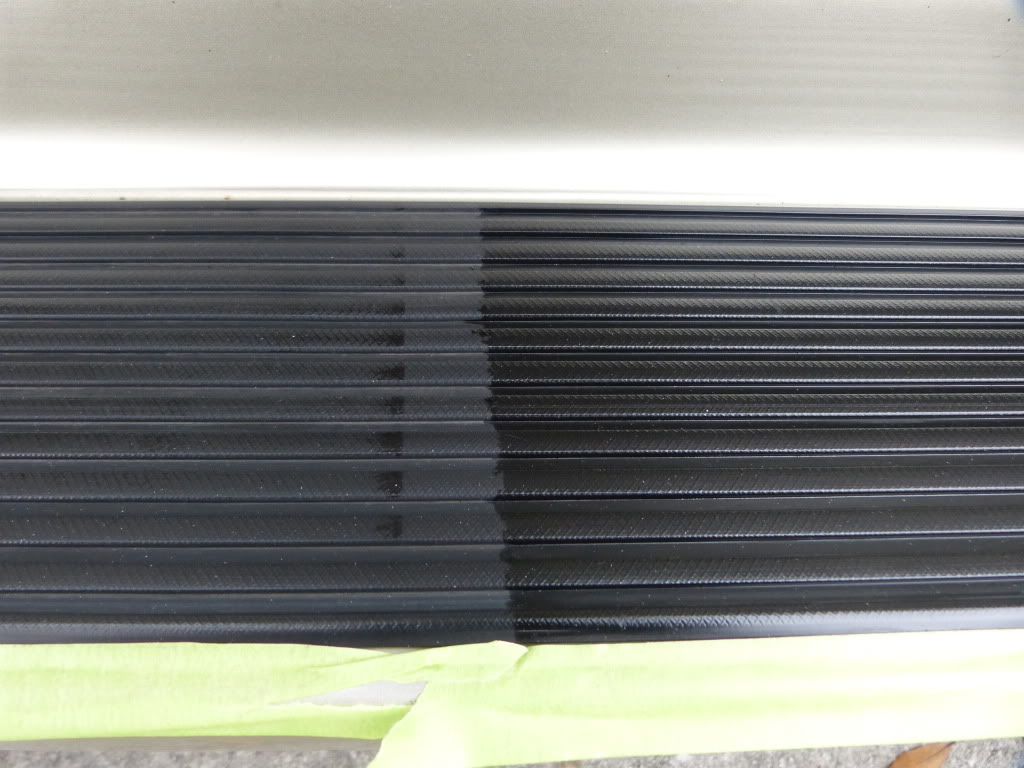
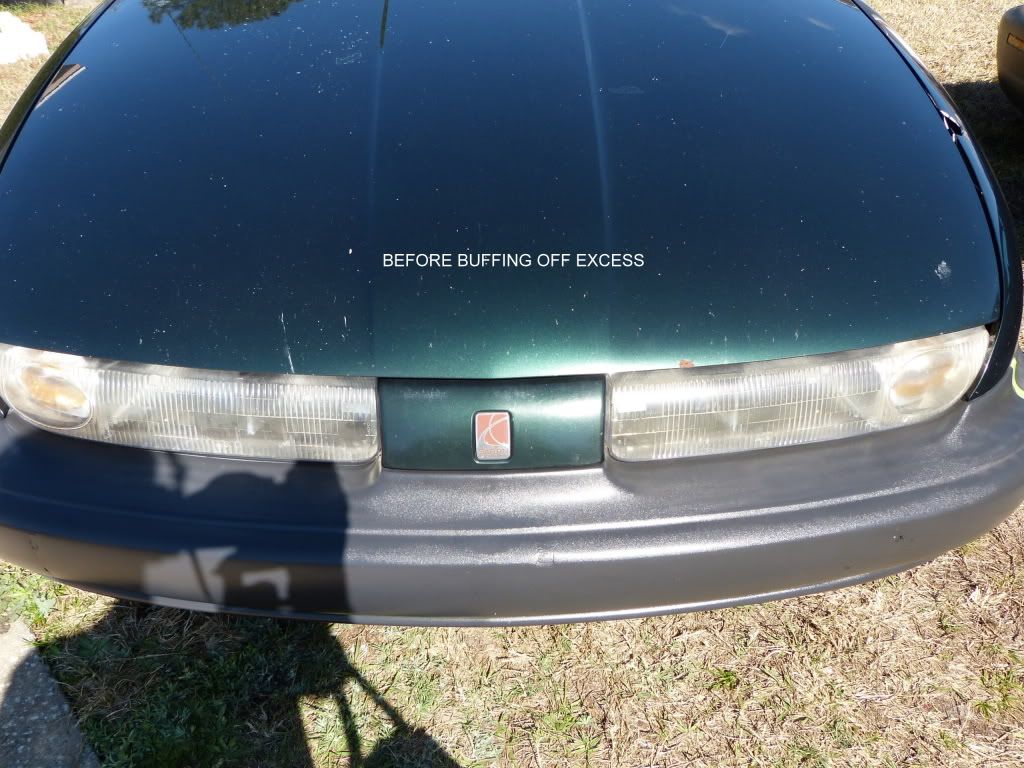
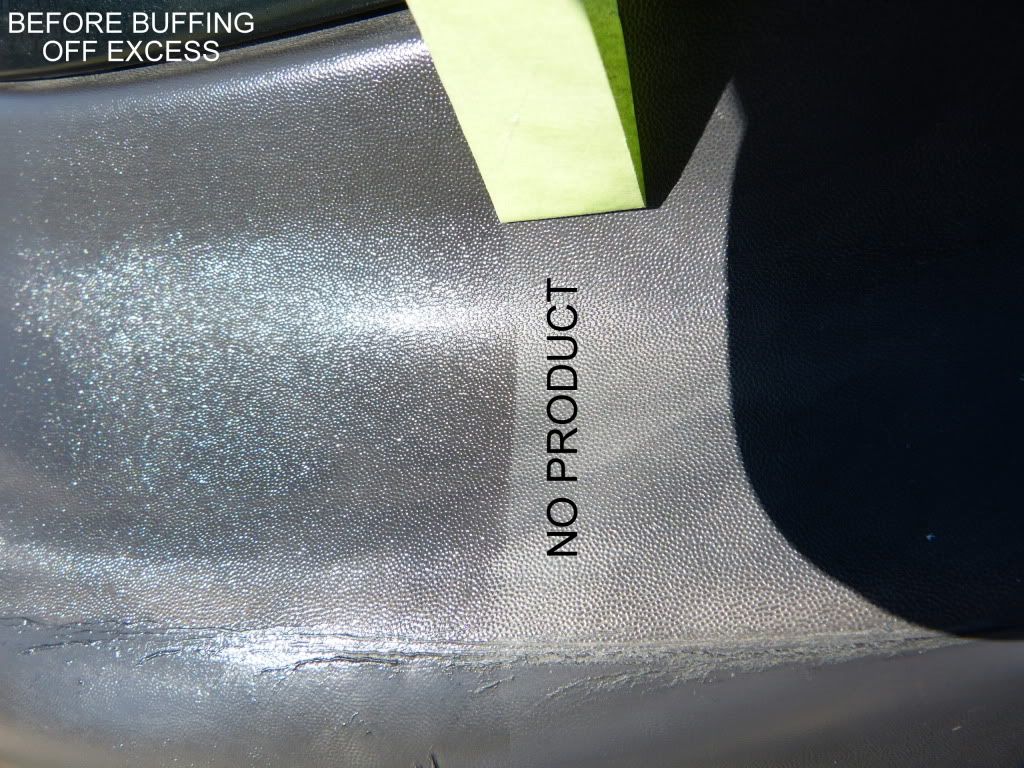
On the passenger side I masked one side of the trim. With a combination of the enclosed mf applicator and a foam swab I began to apply SF to the plastic running boards. My first observation was how far just a dab or two of product went. It goes on thin and spreads very easily. I had thought the trim was in decent condition and that SF wouldn't impress me much for this case but I was wrong. The difference was night and day!
On the drivers side I made the decision to get straight to it without taping. Once or twice I did overlap onto the paint but a quick wipe with IPA using an mf towel and I was once again moving forward.
After application I took a clean mf towel and completely buffed off the excess product. This is an important step. The excess buffs off easy and after finishing I flipped to a clean side to wipe once more just to be sure nothing else was coming off.
Total time spent on restoration was approximately 15 minutes per side.

Video: Application of Solution Finish
High Definition Option
Typical Trim.mp4 - YouTube
Standard Definition Option
Typical Trim.mp4 - YouTube
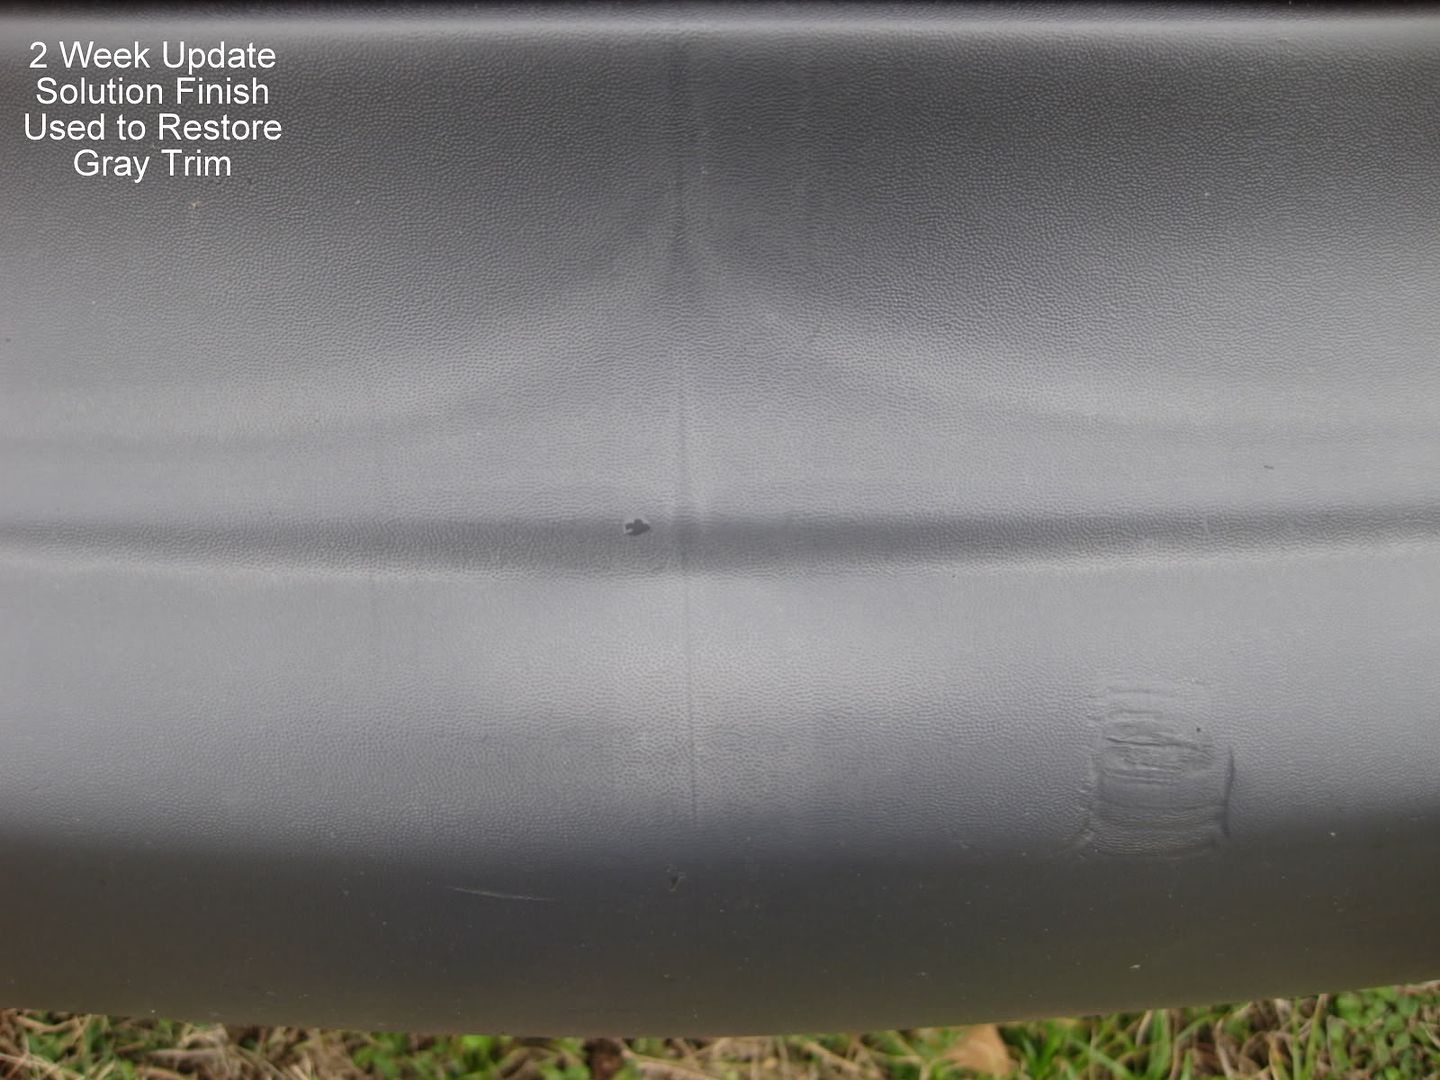
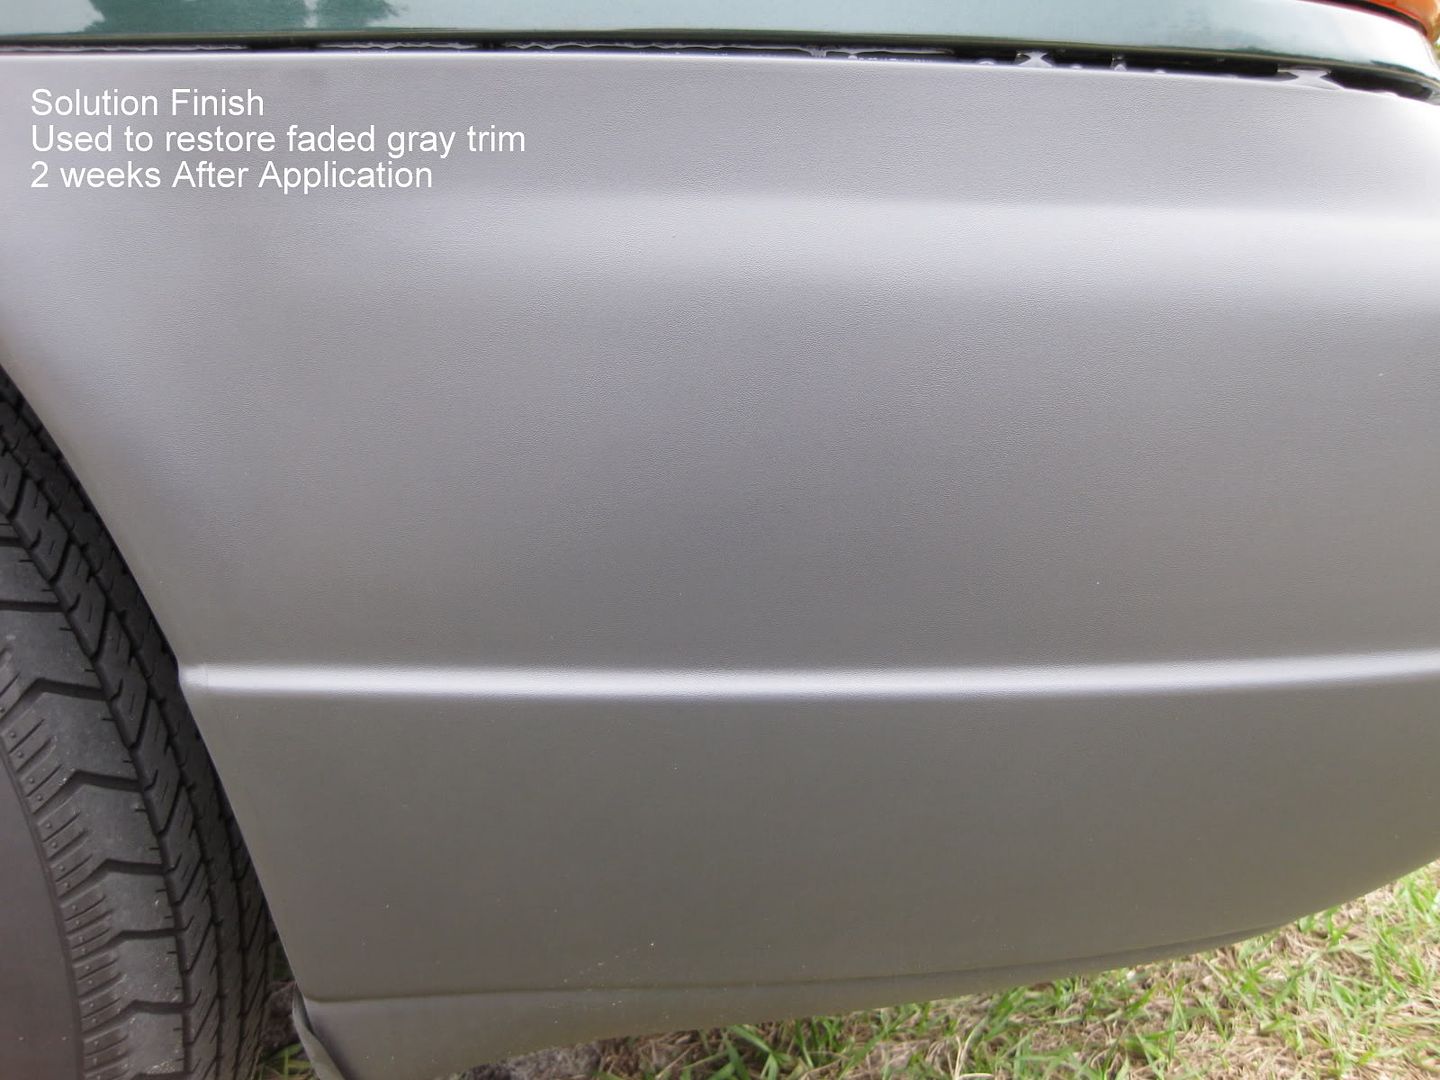
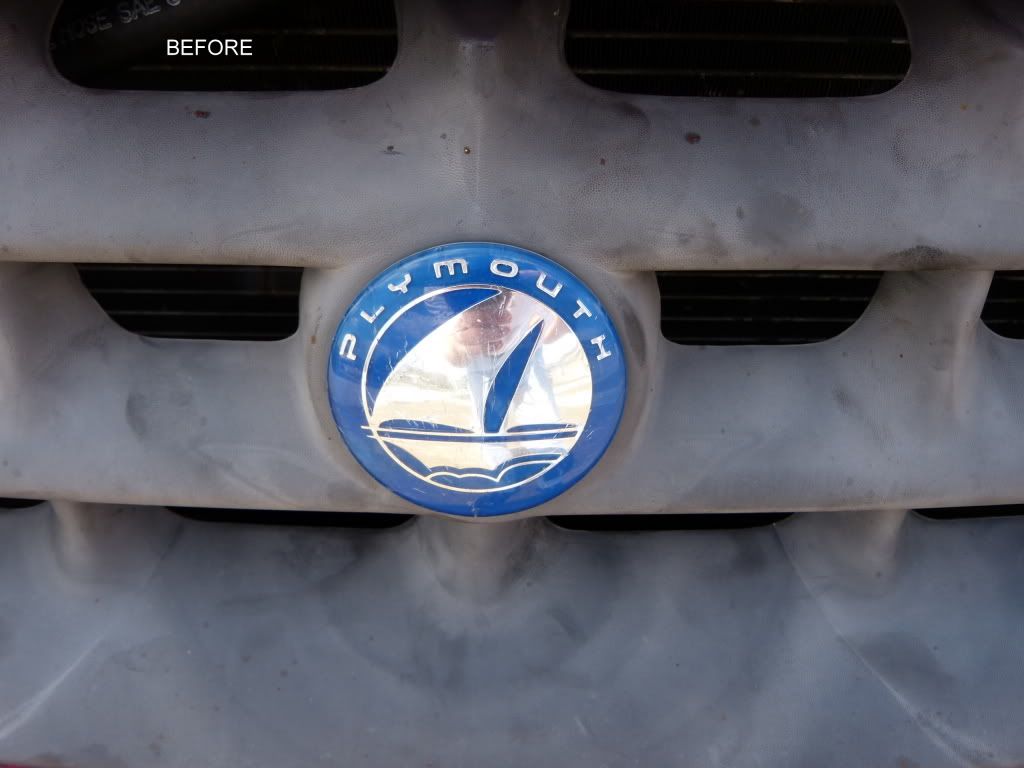
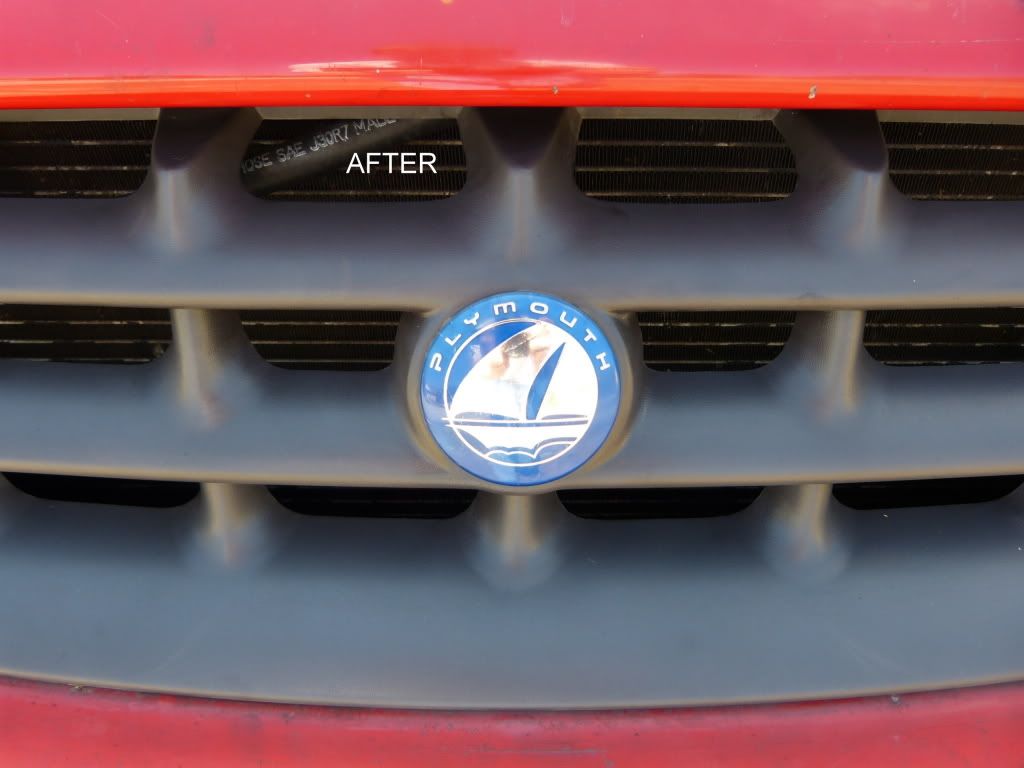
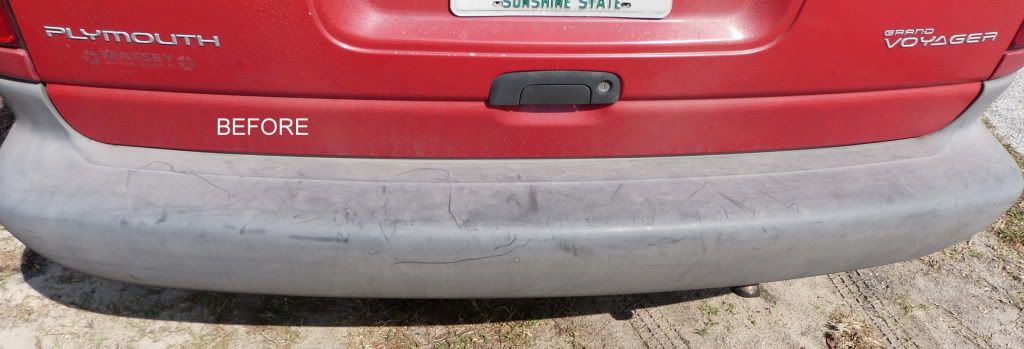
B.- Extremely Faded Trim
The next morning I was on a quest to find some seriously faded trim. I had no vehicles scheduled with the deplorable condition of trim I was looking for so after calling a scrap yard and considering other options I decided to scan the surrounding neighborhood. The first subject I found was a Jeep with severely faded trim but alas the owner would be leaving with his vehicle shortly.
The next house I went to would have been a great case but it was not to be. After explaining to the owner that this product would turn his trim back to his original black color he looked at me as if I was crazy. "Black!?" he said, "It's gray, not supposed to be black". Well, with no time and in no mood to educate or argue with him I moved onto the 3rd subject I had scouted.
Upon answering the door I told him I had noticed his severely faded trim and I showed him the Solution Finish brochure which shows before and after of the product in action. His lovely family had gathered at the door and was captivated by what I was offering.
After setting up my tripod and camera I set about the process of restoring his trim. It was so terrible nastified I would really have preferred to scrub it down with a strong cleaner and water before drying with my master blaster. However once again this was not an option and I would have to really on my SF kit for the full process. It was extremely windy and my tripod tipping over was a fear, but onwards I marched!
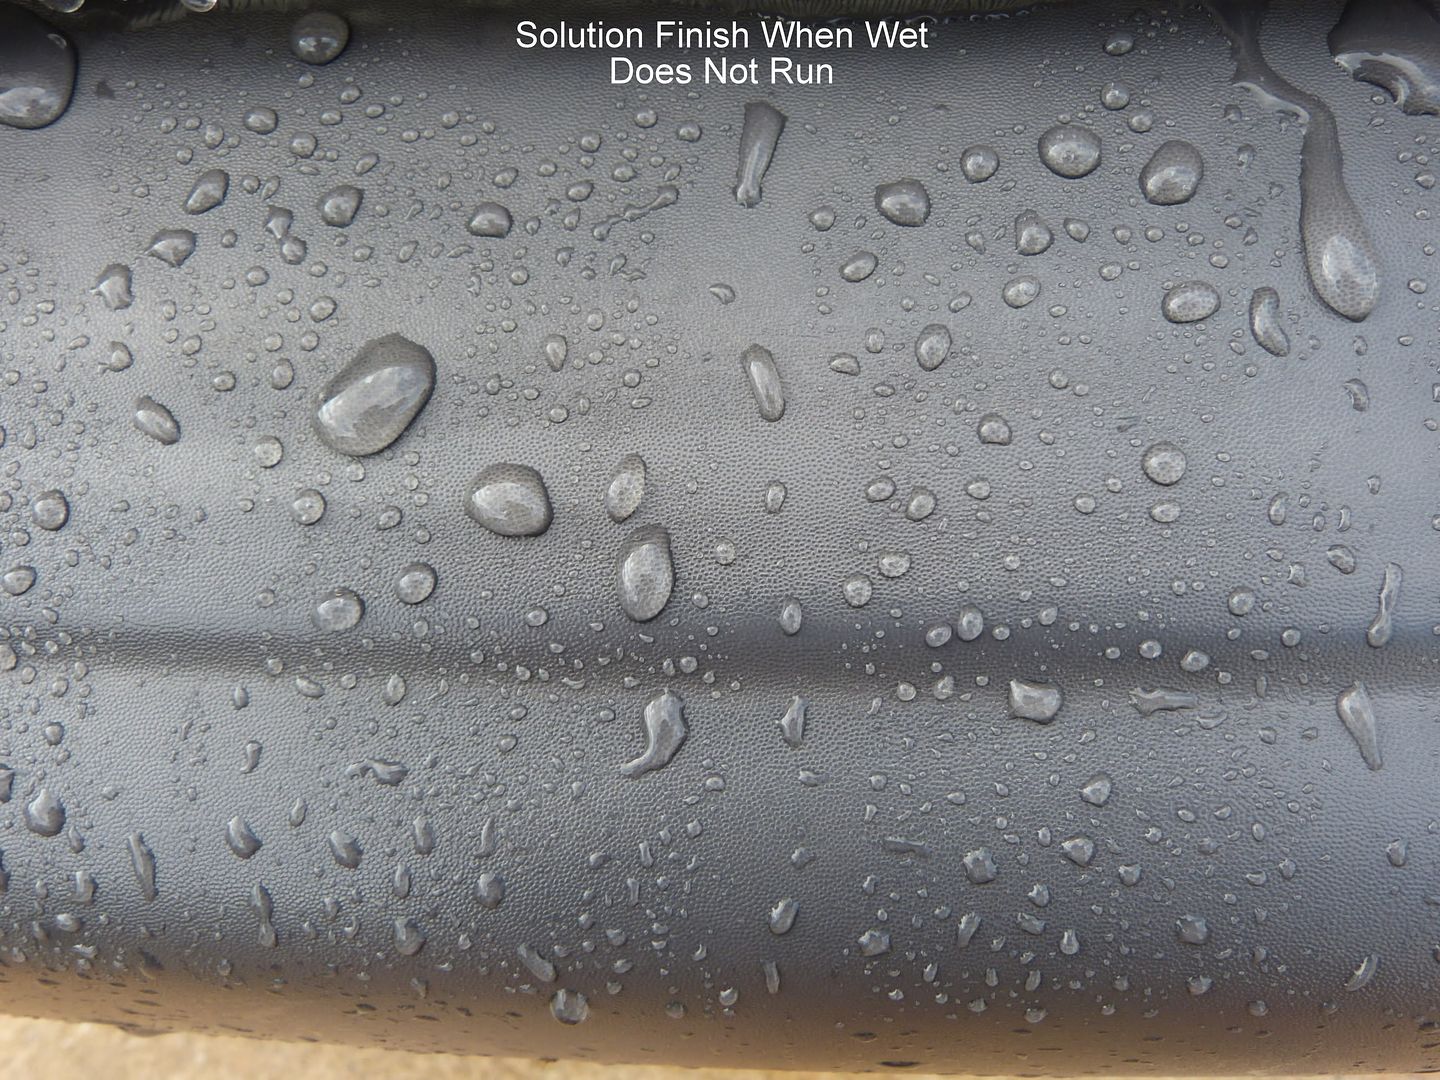
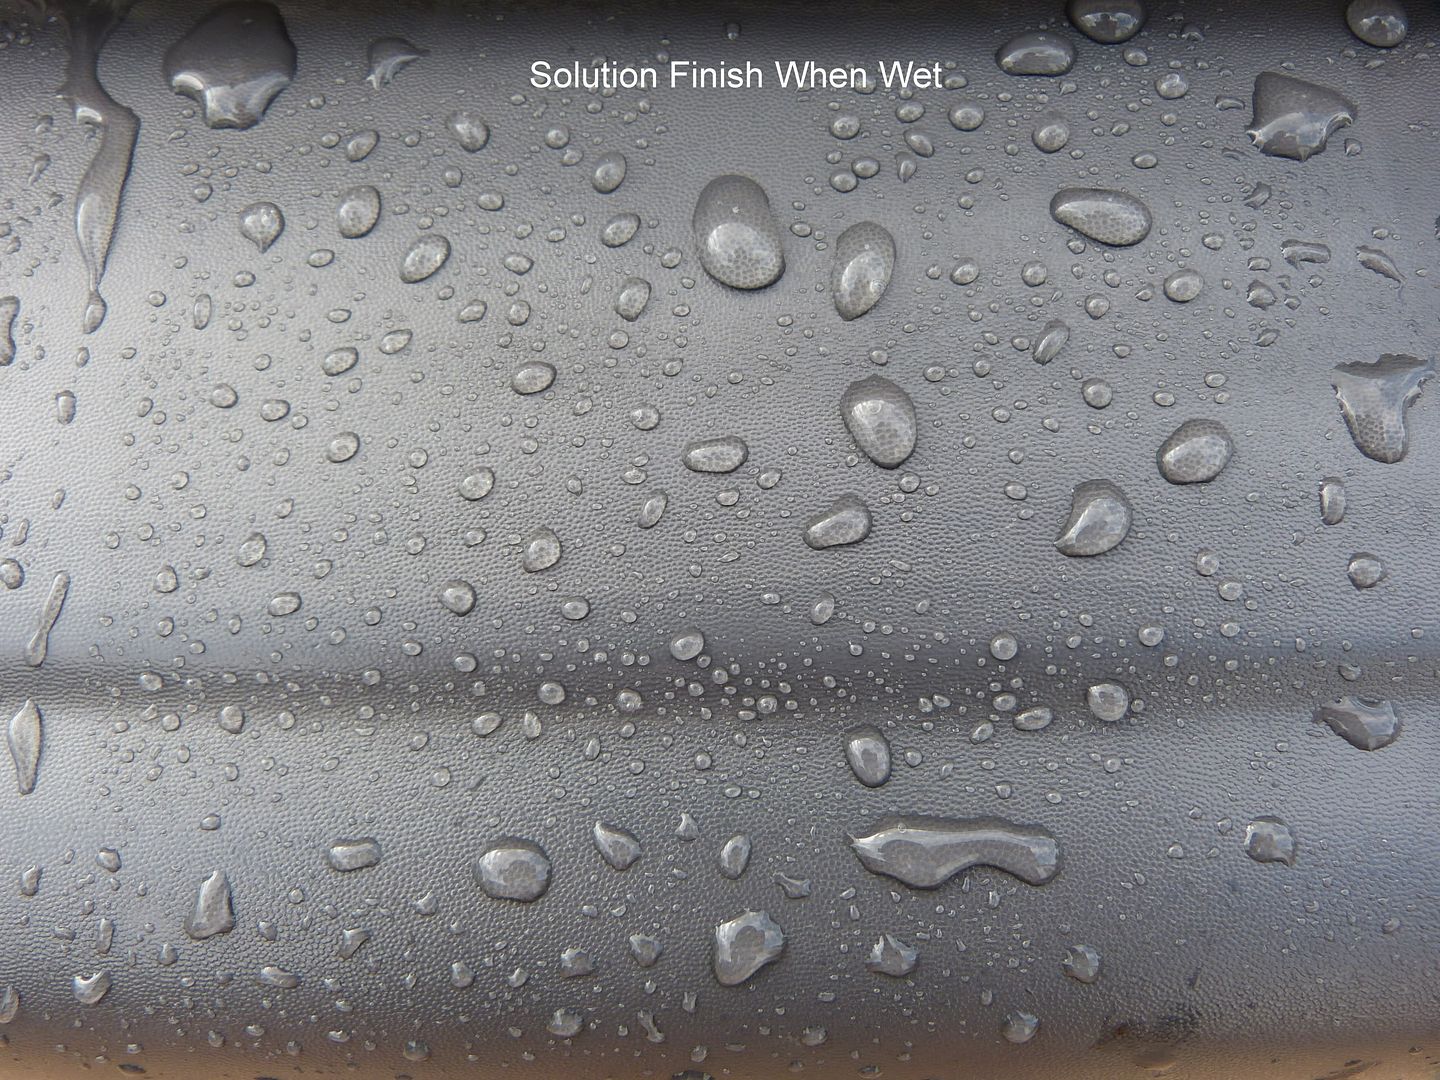
After a couple scrubbings of IPA no more dirt was coming off and I moved onto the application phase. The rear of the van was facing into the sun so I thought what better time to test application in direct sun. As I got started I wiped a thin layer across the surface working out from the center. I found that even if I applied a little too much and left it thick for a few minutes it still behaved the same when I came back to spread it in the other direction. In direct sun that observation was important to me and definitely considered a check mark in the plus column. Note: I would later find in my Q&A with Chris that using Solution Finish in the sun is actually recommended. Solution Finish is proving to be extremely simple to apply regardless of the conditions.
After the rear was completed I found I had not properly engaged my video. I moved onto the front and sides where I was sure to get some good video throughout the process. As I was working on the side the owner came out to tell me he had seen the difference from the window and just had to look closer. He asked if I could wipe that in the paint too or if there was anything I could do for his paint, which unfortunately was missing in many areas. When I said I could help the areas where there was still paint left we both had a good laugh! But I explained really it was in need of a new paint job and after that I could make it look a lot better than whatever the painters left him with.
After buffing off the excess I gave the whole van a look over and the difference in the trim was indeed impressive. I think for severely faded trim such as this a second layer (after allowing the first to cure) may achieve additional darkening properties. Unfortunately I had spent a little more time than what I had promised and I knew a second coat was not a possibility as they were waiting on my completion before they could leave.
They were so enthralled with the results they attempted to give me a handful of cash, which I refused. That was not part of the deal from the beginning and I'm sure they didn't really have it to handover. I told him that was really very cool of him and I really appreciated it but I wouldn't accept it in this case.
As I climbed into my car with my tripod they were getting into their van as I heard the little girl say, "Now were going to the party!". Oops, I didn't know I'd been holding up a little girl’s birthday party!
Eek!! No wonder she was casting me dirty looks") j/k
j/k
Total time spent was approximately 45 minutes.

Video: Solution Finish vs. Dead Trim
High Definition Option
Extremely Faded Trim.mp4 - YouTube
Standard Definition Option:
Extremely Faded Trim.mp4 - YouTube
C.- Application over the remnants of polymer sealants and Nano Coatings
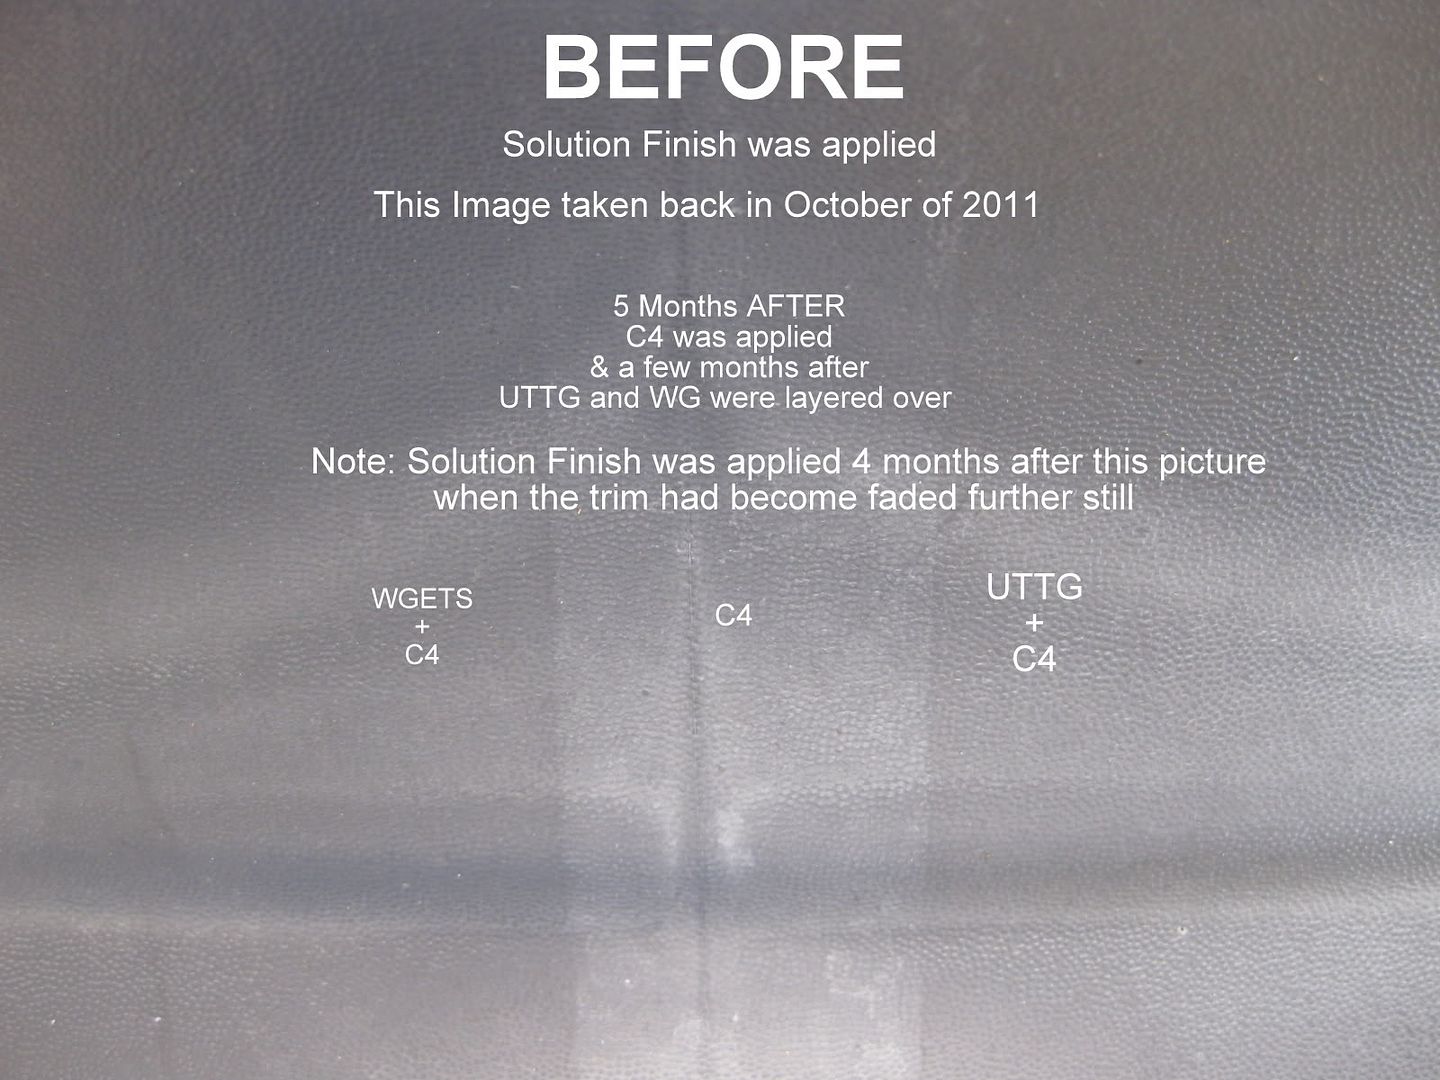
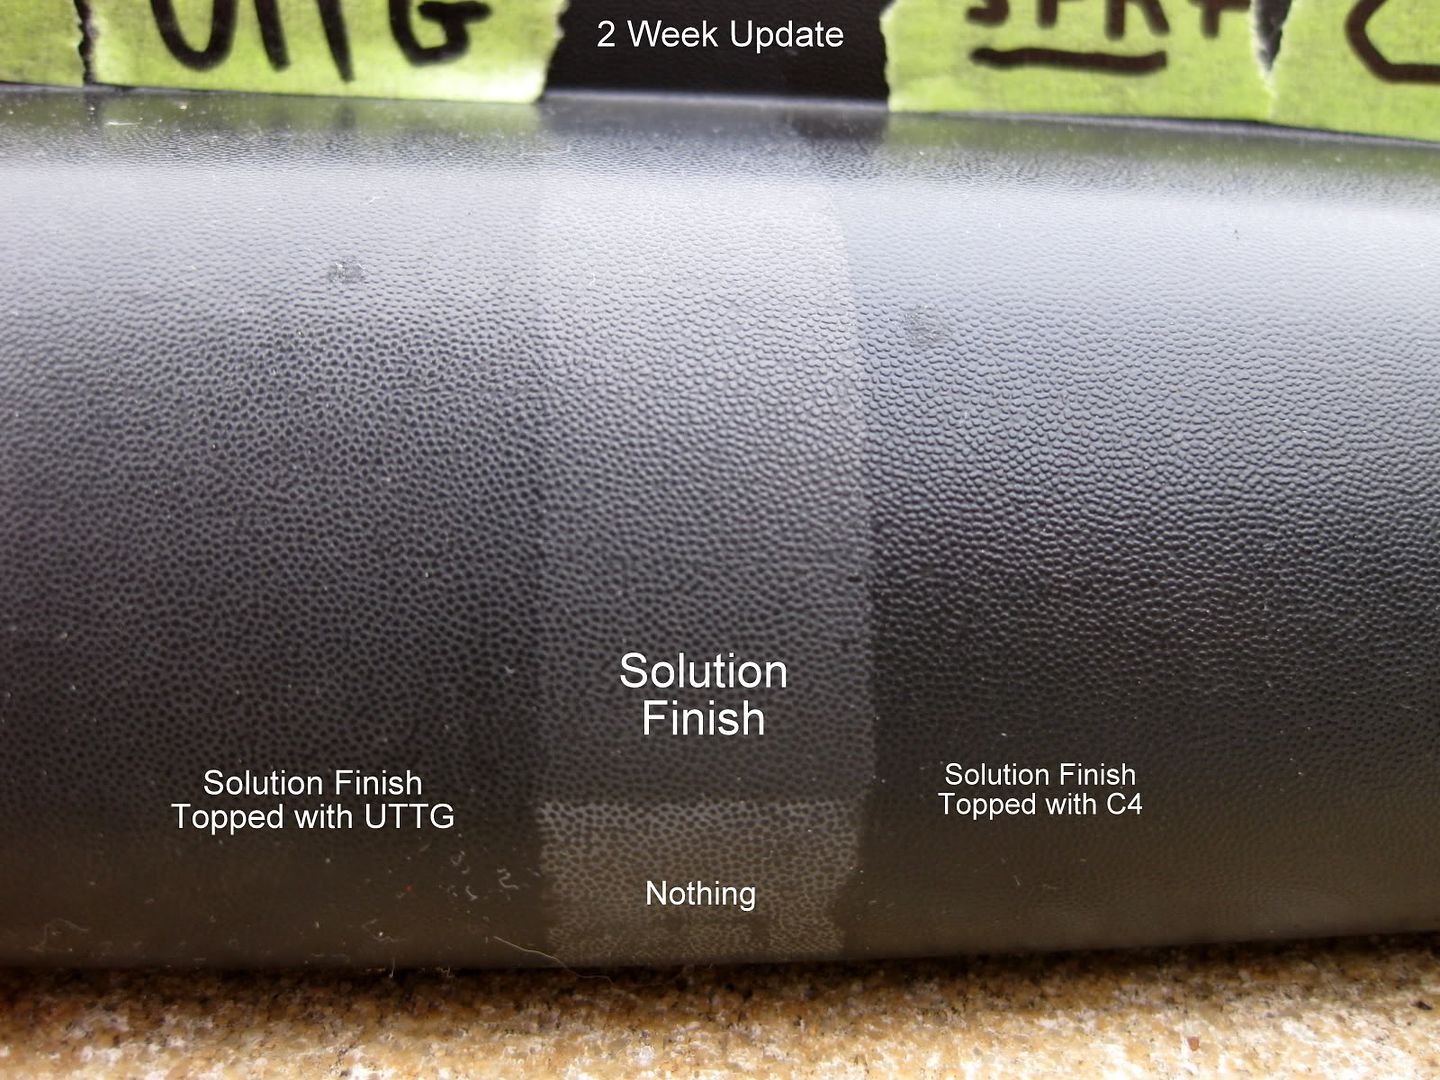
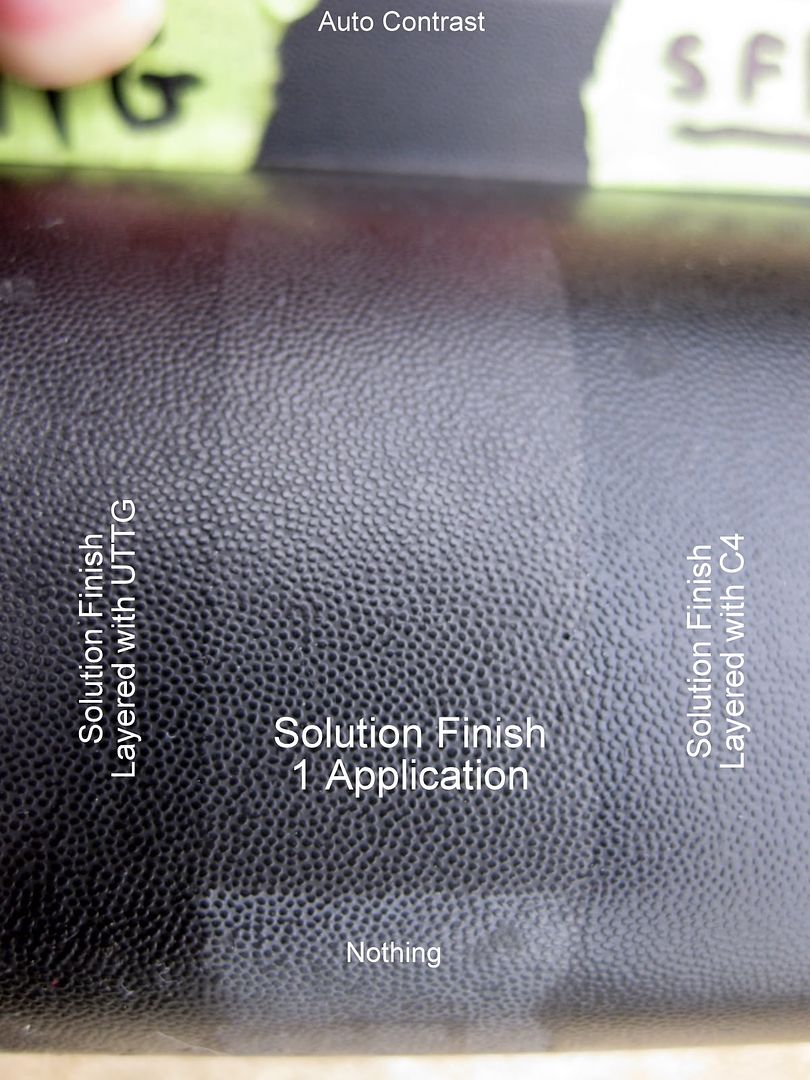
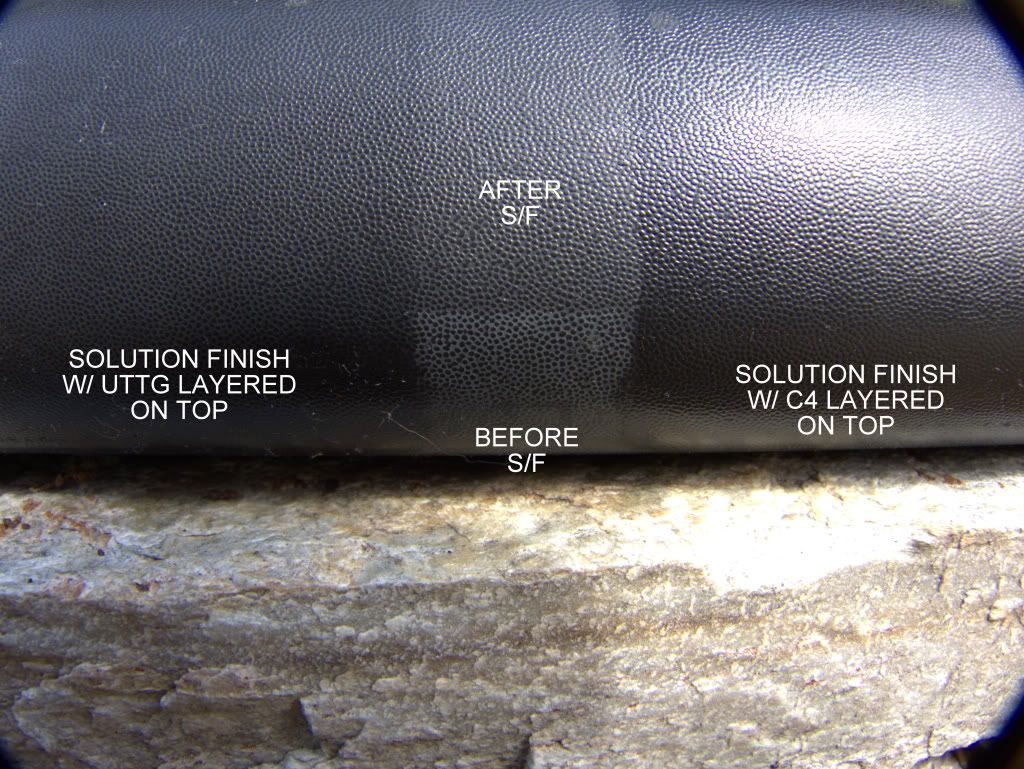
After chatting with pops (Old Tiger) on the way home I decided to get back to it with some testing on my 1997 Saturn trim. In all fairness to Solution Finish I can't very well expect the way it acts over a nano coating to be indicative of its typical results, which was why I tested on other vehicles as well. But here we would be testing to see how it does actually perform over remnants of C4, Ultima Trim & Tire Guard, and Wolfgang ETS.
I applied C4 over these surfaces approximately 9 months ago. And 7 months ago I applied UTTG on a portion of the right side of the front bumper and WG ETS on a portion of the left. Interestingly enough over the following 7 months you can see from past reviews the C4 area faded much more than the area that had UTTG and ETS over the C4.
Anyway, these 3 products cannot be removed by any cleaners I have tried so now you understand why this is a different test. Here we will find if Solution Finish will penetrate through those products and also if durability will be affected. Based on what I understand to be the size of the particles in Solution Finish I tend to think it will penetrate through all 3 of these existing products.
You know how it is applied at this point so here's some pictures. Video was scrapped halfway through editing for now.
What if I get it on the paint?
SF states it will not stain protected paint and that masking off the surrounding area is optional. Furthermore they state that if you do accidentally spread product onto the painted area or glass you should simply remove it with a safe APC mix. I used IPA right away the few times I got some on the paint and had no issue.
In many cases it's just easier to stretch out a piece of tape so you can apply SF quickly without worrying about removing any over wipe, but for those that don't mask or didn't have tape that day I decided to put together a test.
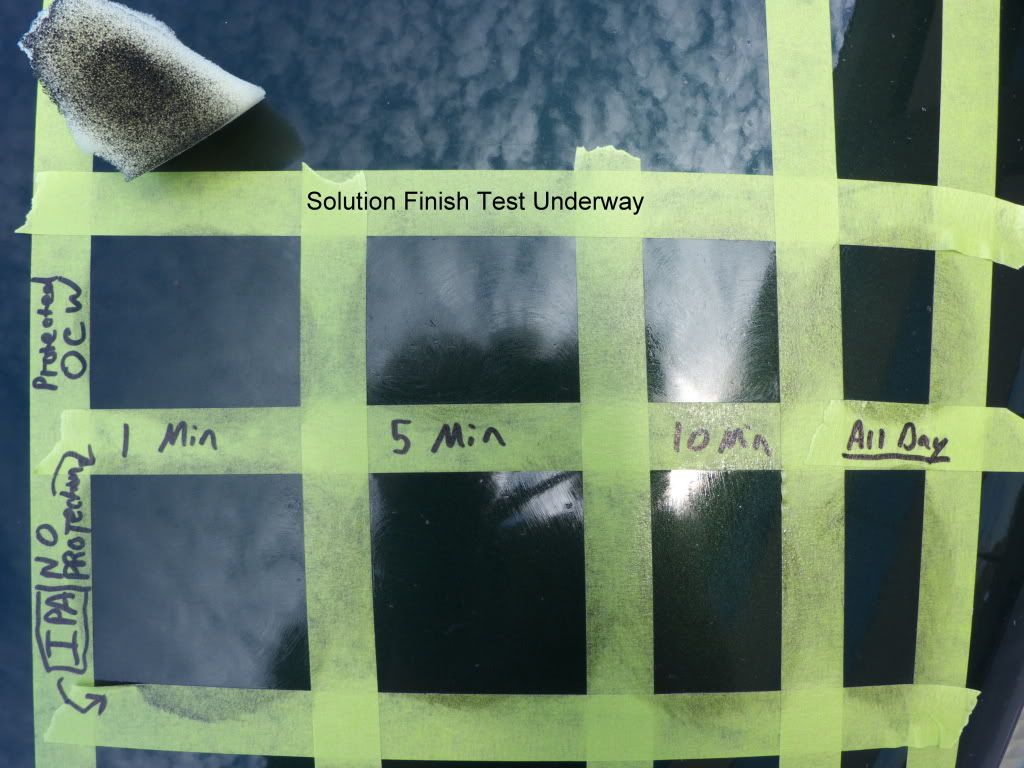
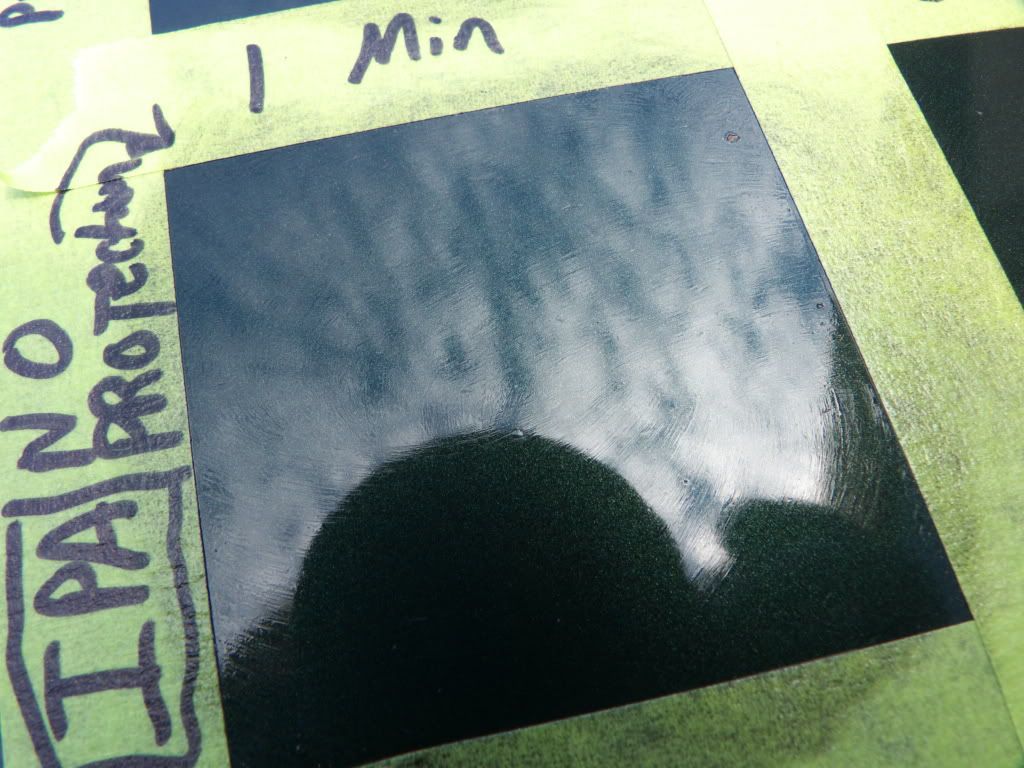
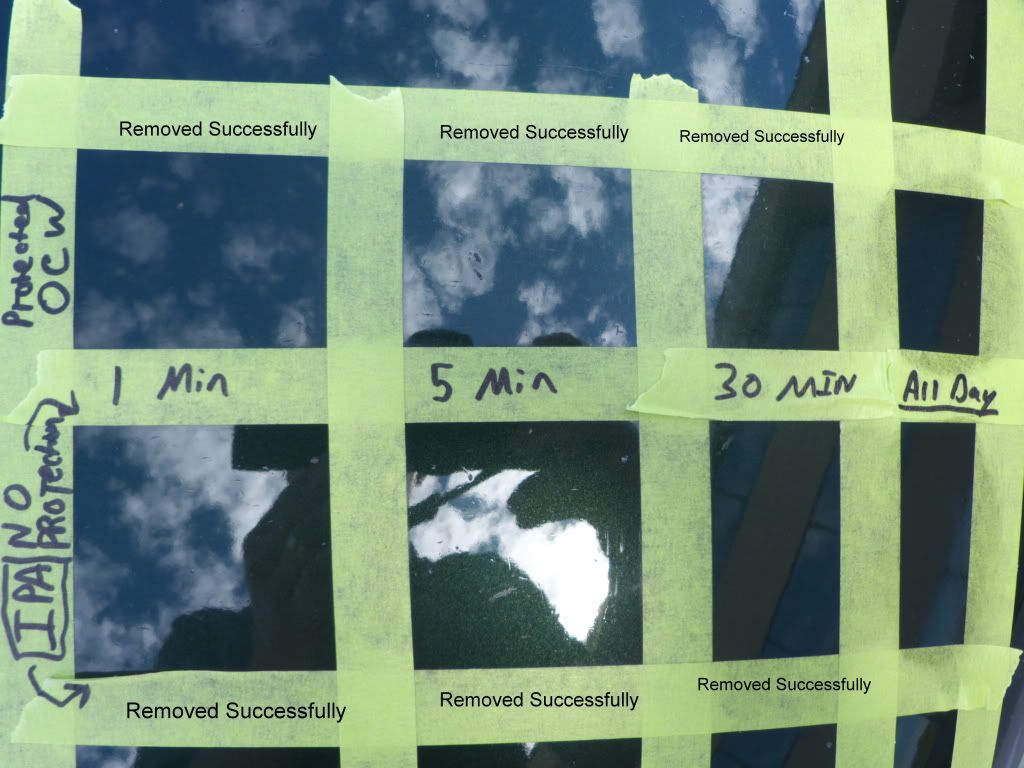
Intentional Paint testing:
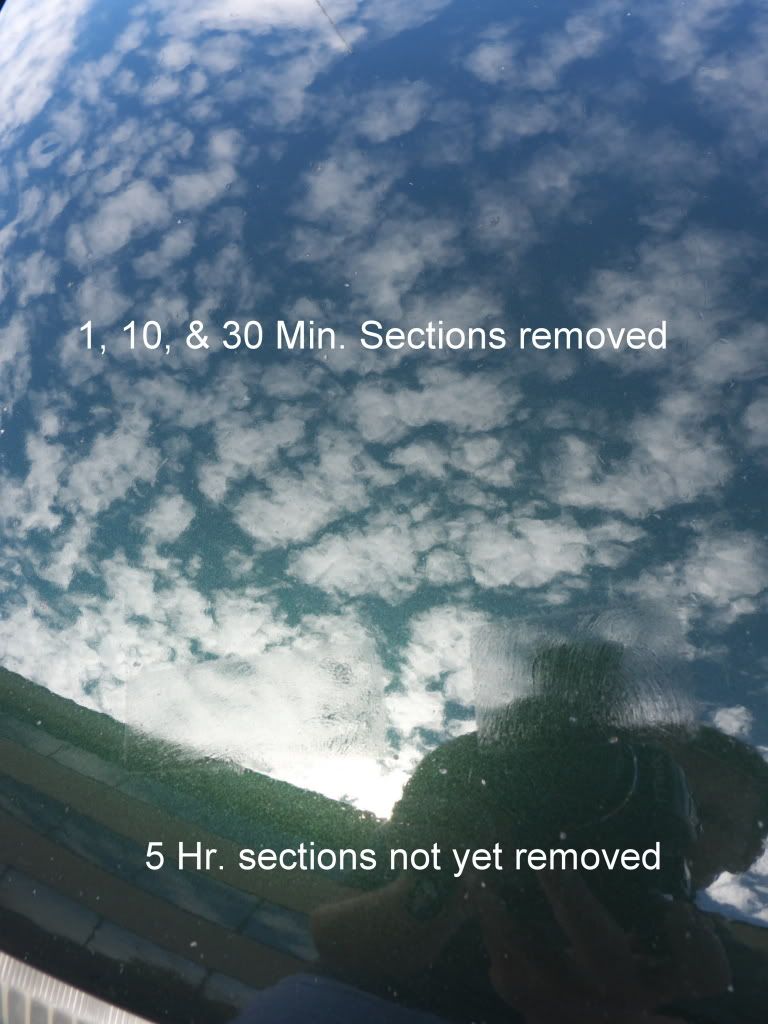
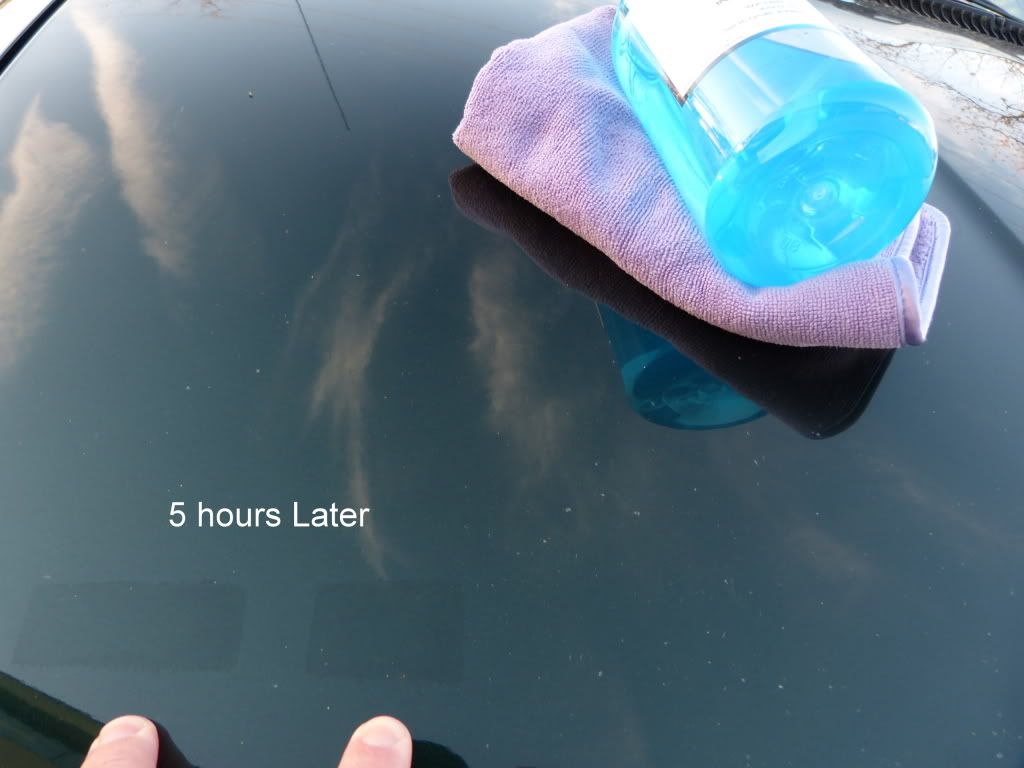
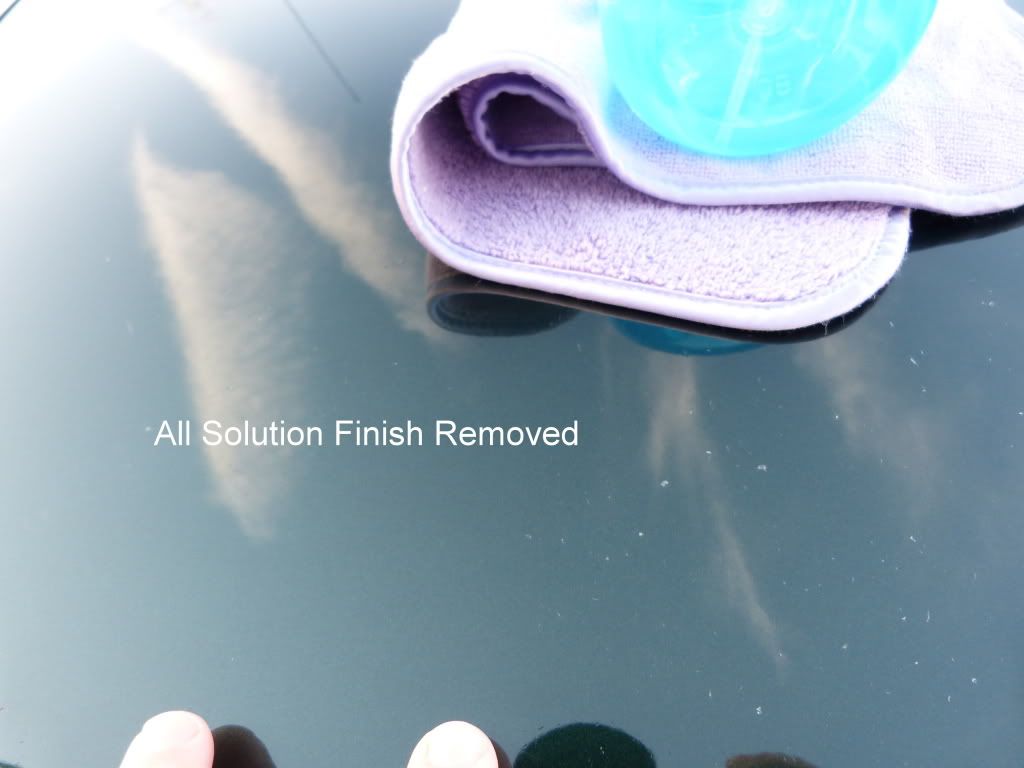
The following test focuses on 8 test sections. 4 sections have protection (OCW) on them and 3 sections have no protection. I applied SF directly to the paint on all 8 sections. On the first set I removed SF after 1 minute. On the second set I waited 10 minutes before removing SF. And on the third set I waited 30 minutes. On the final set I waited 5+ hours to remove the SF.
Each time I removed SF with 30% IPA and on the final section I used Eraser. I don’t have a white test panel so I worked with what I have. Here are the pictures.
Product Claims:
Solution Finish is an incredible new product that restores originally black surfaces to a deep, rich black "wet look" shine that dries quickly with no greasy residue. This unique formula combines ancient ingredients with advanced polymer technology to provide a spectacular, long-lasting, black, protective finish. Formulated for professional use only, Solution Finish is a silicone-free solution that uses all natural oils and is VOC compliant.
Solution Finish was developed by professionals for professionals – you won't find this product on the wax walls in your local retail outlets. It is formulated using only the finest ingredients that you don't usually find in mass-produced, OTC products. Solution Finish is ideal for restoring, conditioning and protecting any originally black surfaces.
If it oxidizes, Solution Finish can restore it!
Introduction:
Ahhh, the age-old question of what to use for faded trim? There's a long history of evolution in plastic trim detailing products. From the dime a dozen "dressings" to a couple durable polymer sealants to the latest in nano tech coating technology there have been many attempts at addressing the problems associated with plastic trim. Let's review the (2) generalized issues with a quick op-ed on the current status of solutions and then delve into why we haven't yet seen a true solution to issue #2. Next we will move forward into the interesting science behind Solution Finish and how it seeks to overcome the obstacles others have faced when it comes to restoration of faded trim. And finally we will get into the application, function, and real world results of Solution Finish with pictures, video and analysis followed by regular durability updates.
1.- Protecting new trim
In recent years we have seen huge advances in solving this one. There are a few products available now that do a good job of protecting new trim, leaving a non-greasy finish, and boasting many months of durability. But do they stop the trim from oxidizing? More on that later.
2.- "Restoring" old trim
While there are many products out that "dress" (temporarily darken) old faded trim by leaving a layer of some type of dressing nothing I have used actually restores the plastic. Now the main reason that matters to most people is as follows. Many of these old school products fall short in at least one of the following ways.
A.- Rain partially or completely washes them off of the plastic trim and/or leaves rain spots.
B.- While some don't noticeably wash off in the first few rains they do fade with each rain. Some last a week or two and a couple may even make it a month but in challenging conditions I haven't personally seen any make it beyond a few weeks without being seriously compromised.
C.- Greasy to the touch
D.- Are made of compounds that actually aid in the oxidation of your plastic trim and reinforce the vicious cycle of needing more dressing.
The Exception:
I would be negligent to act as if there is nothing that seriously darkens faded trim and lasts for months while leaving a dry to the touch surface. There is a coating (C4) made for trim that claims 1-2 years and is a good product but in my testing it began to fade within 5 months on the horizontal surfaces. While it still beads a little and the vertical surfaces are decent the fading on horizontals was very disappointing for the price. At 2.3X to 9X the cost of Solution Finish it’s very pricey and does not work on extremely faded plastic.
Why does trim fade and eventually turn chalky white:
We are all familiar with the affect sun has on surfaces and just like me you probably assumed the bleaching affect was the only reason trim becomes faded. During my research and thanks in large part to the time Chris West spent explaining the oxidation process of plastic I now have a better understanding of the full story. I learned a ton but will try to summarize just a few points in the interest of moving forward.
Manufacturing uses cheap fillers when creating plastic trim in order to save on cost. These fillers begin to break down soon after and as they do they emit peroxide gases. These gases in turn cause the oxidation and further speed the process of breaking down yet more of the surface.
To "fix" the faded trim in the past people have applied some type of dressing. As I touched on previously, many of the dressings used contain silicones that also react with the cheap fillers in the plastic, which once again speeds the oxidation and causes further fading.
The Solution?:
Solution Finish attempts to address faded trim on many of these fronts simultaneously. First the product works on an extremely small scale to penetrate down into the pockets and crevices that exist and were further created during the emission of the peroxide gas. Once there, Solution Finish basically re-impregnates the plastic on a nano scale with the high quality ingredients that the plastic manufacturers should have used in the first place.
There are also ingredients in SF to stop the oxidation by not allowing peroxide gas to form or react with the oxygen and UV rays.
Details:
1.- Packaging: Plastic Bottle
2.- Directions: Very simple
3.- Viscosity: Oily
4.- Color: Black
5.- Scent: Nuts? (Not very strong)
6.- Size: 1 oz. / 12 oz. / 32 oz. / Kits also available soon
7.- Price: $29.95 / $125.00 / $250.00 /
8.- Manufacturer: Solution Finish
9.- Made in: USA
Products used for prep:
1.- 50% IPA
2.- MF towels
Products used for application:
1.- Solution Finish
2.- Microfiber applicator
3.- Microfiber towel
Conditions:
Surface Temperatures:
Preparation, Application, and Noted Observations:
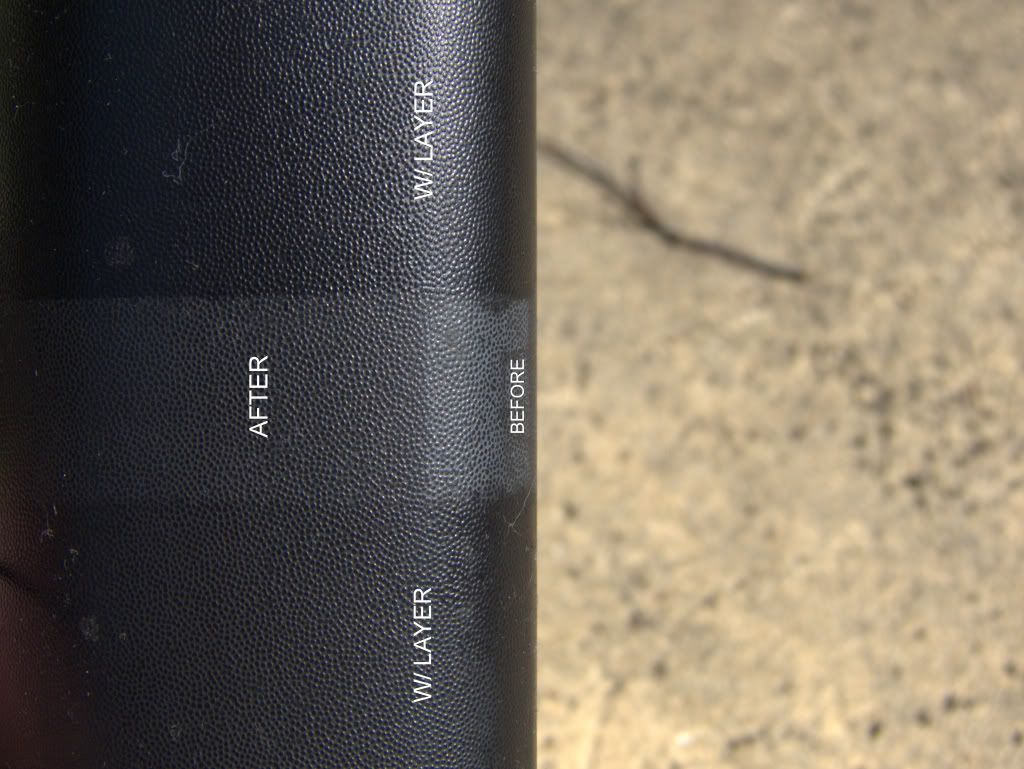
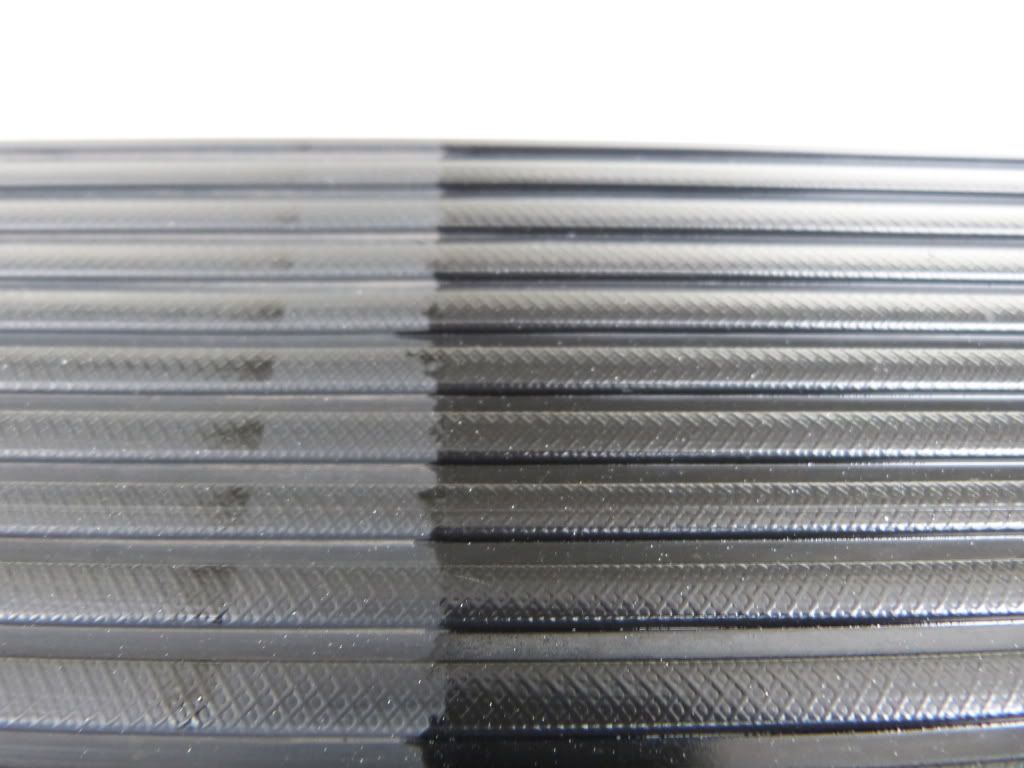
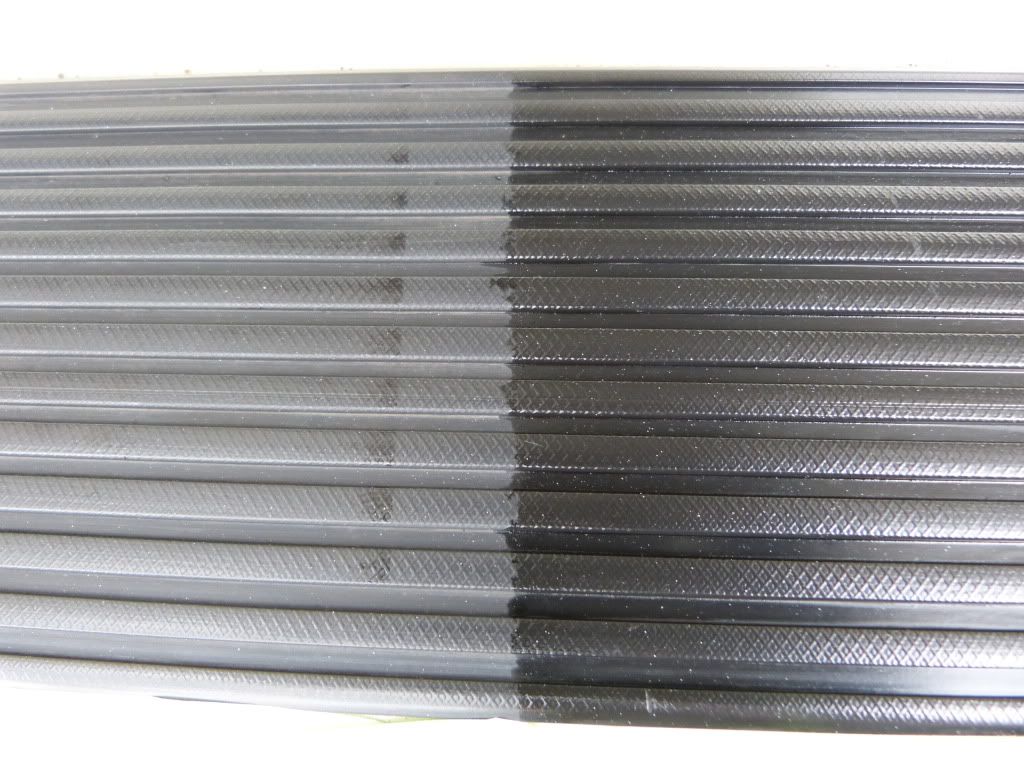
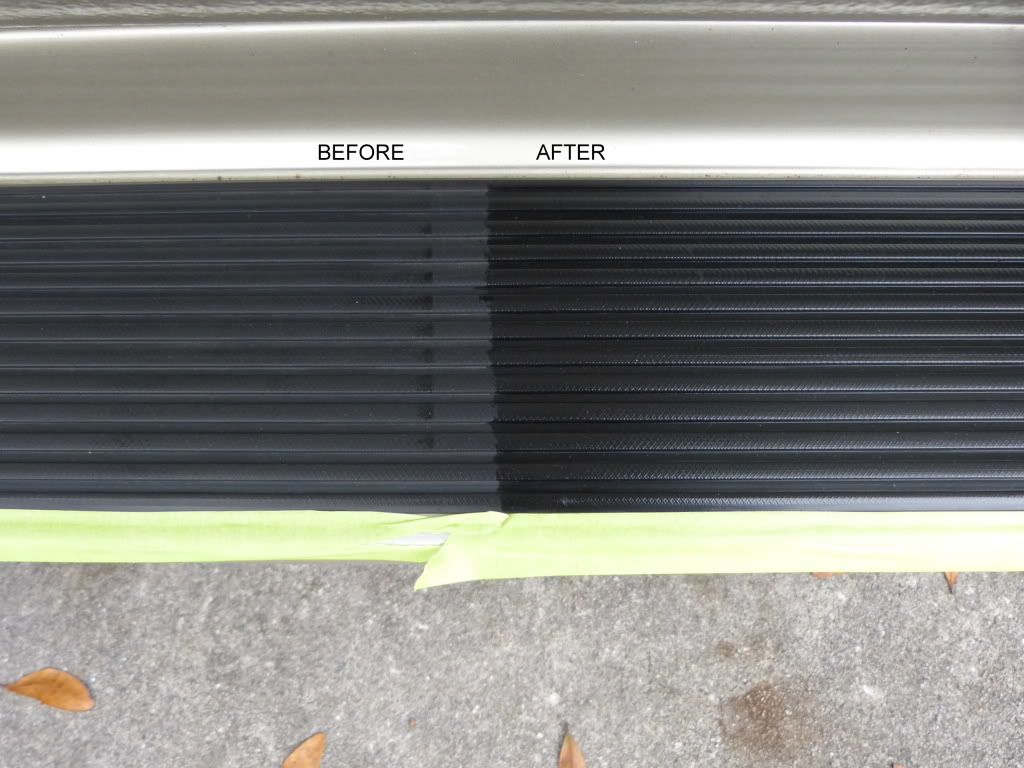
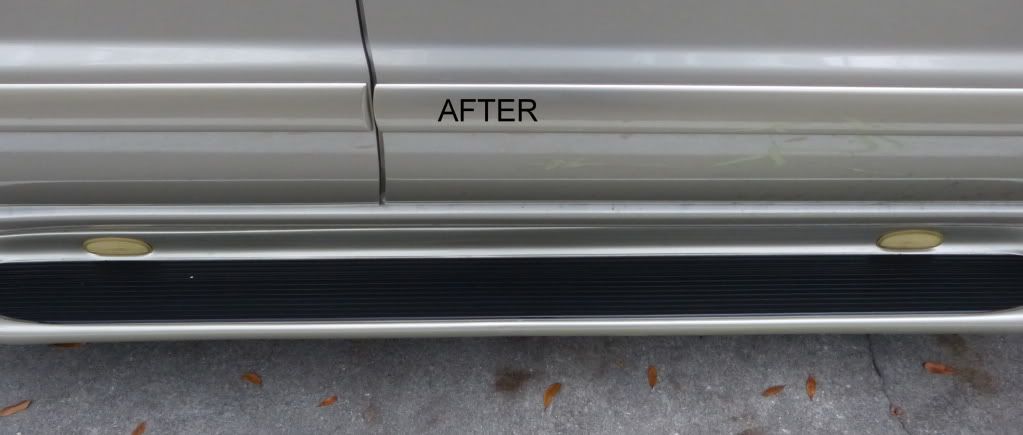
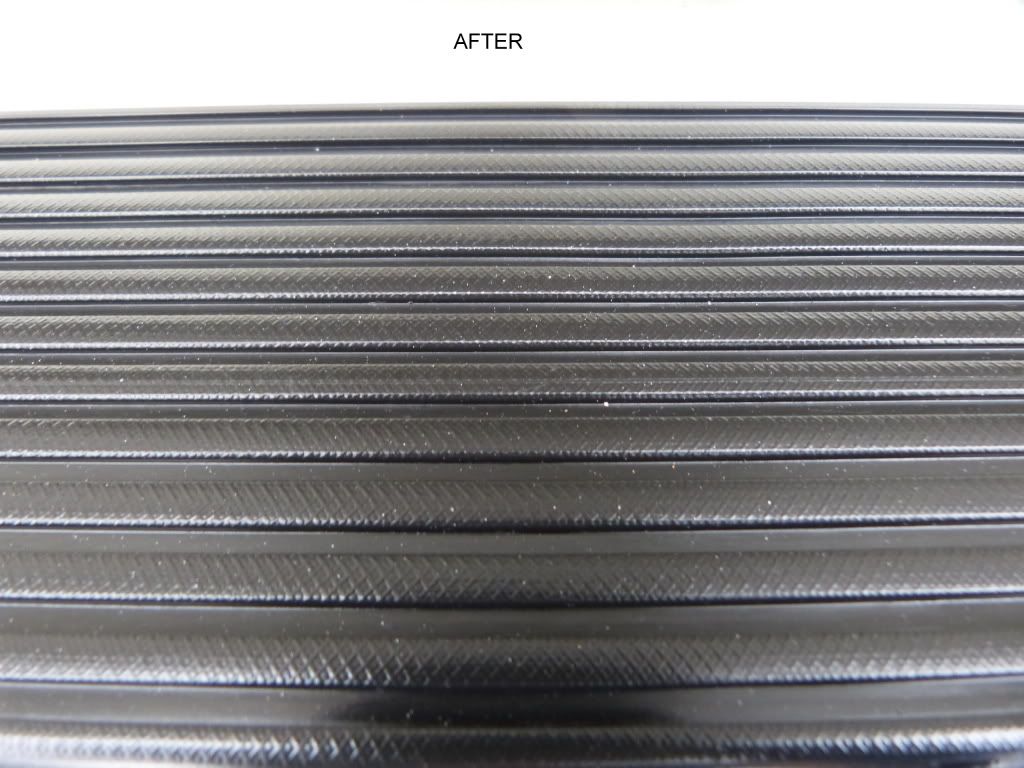
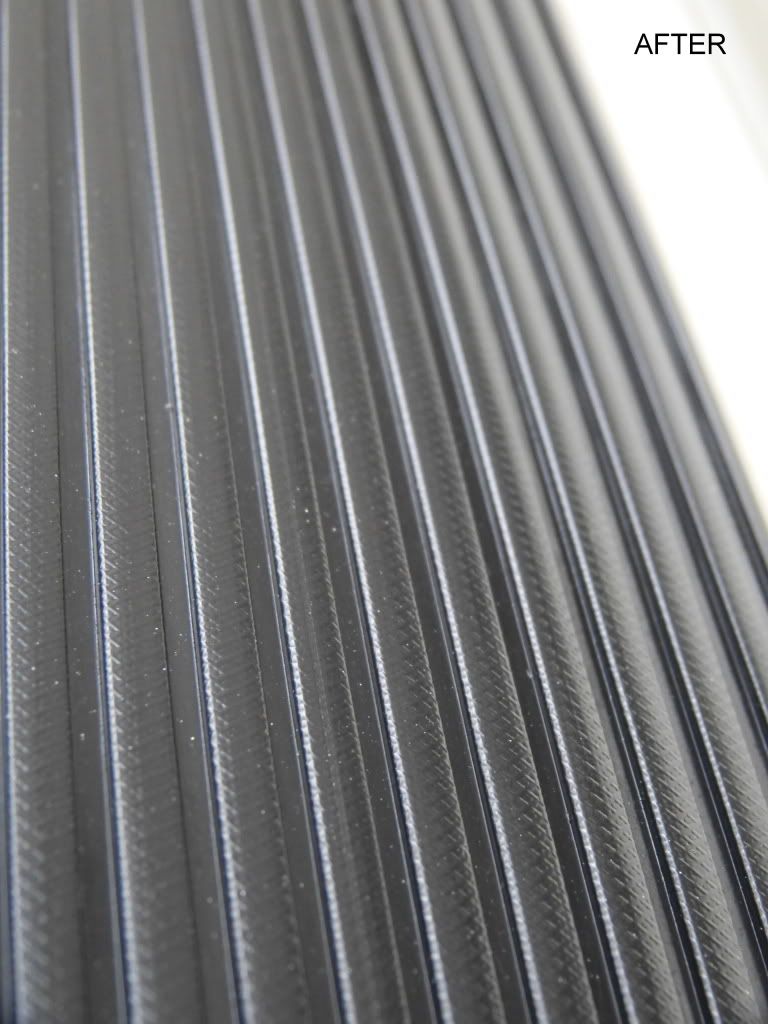
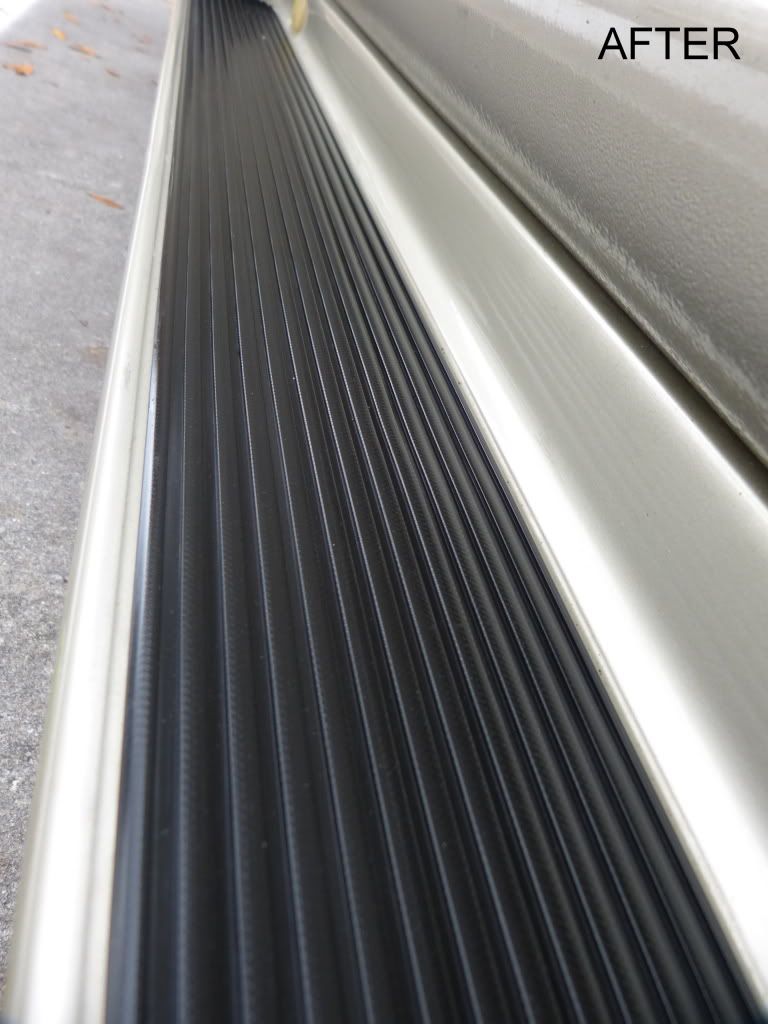
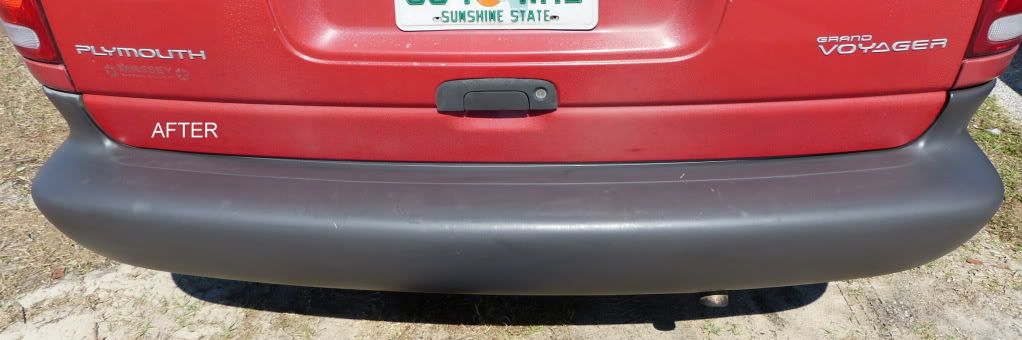
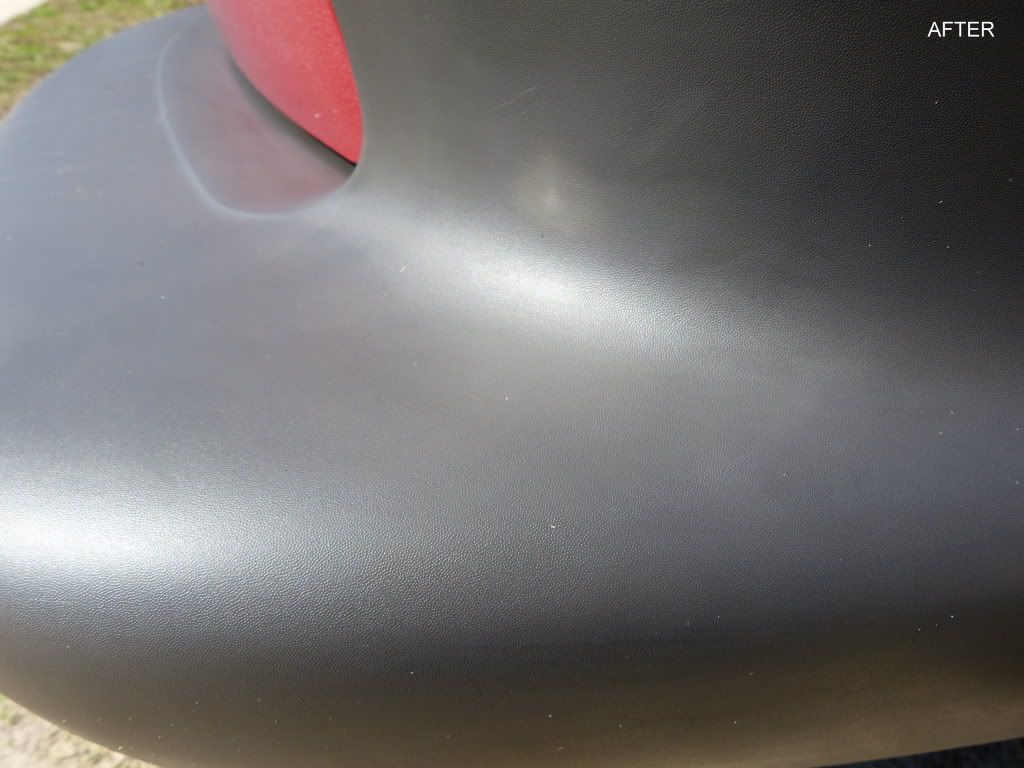
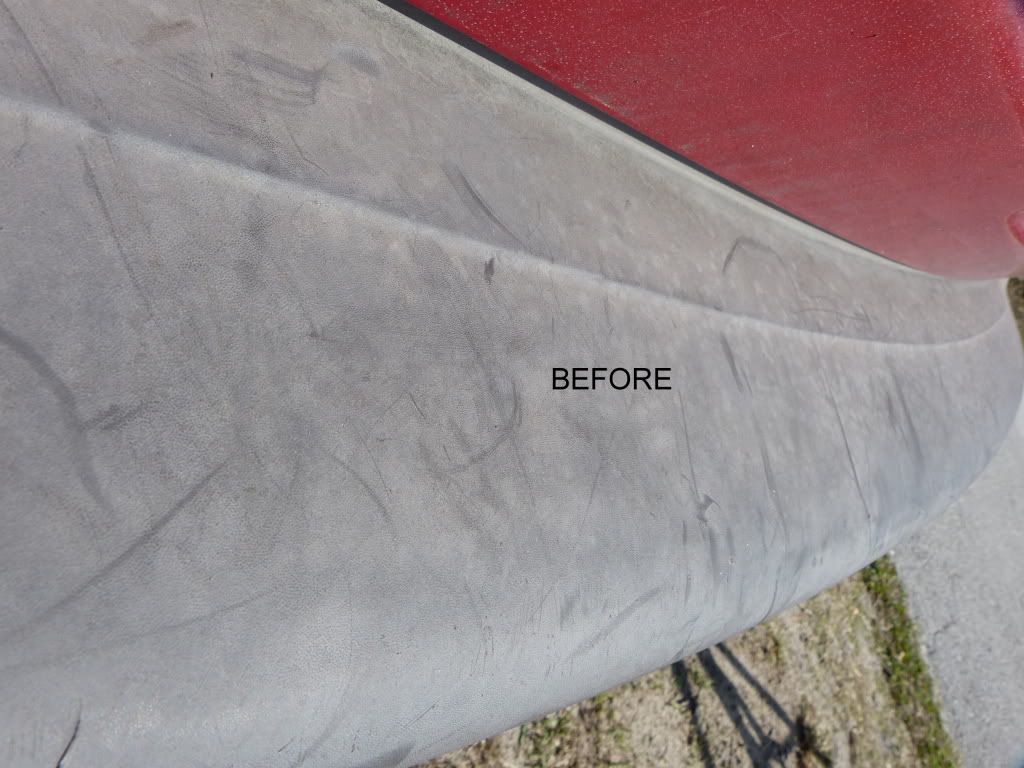
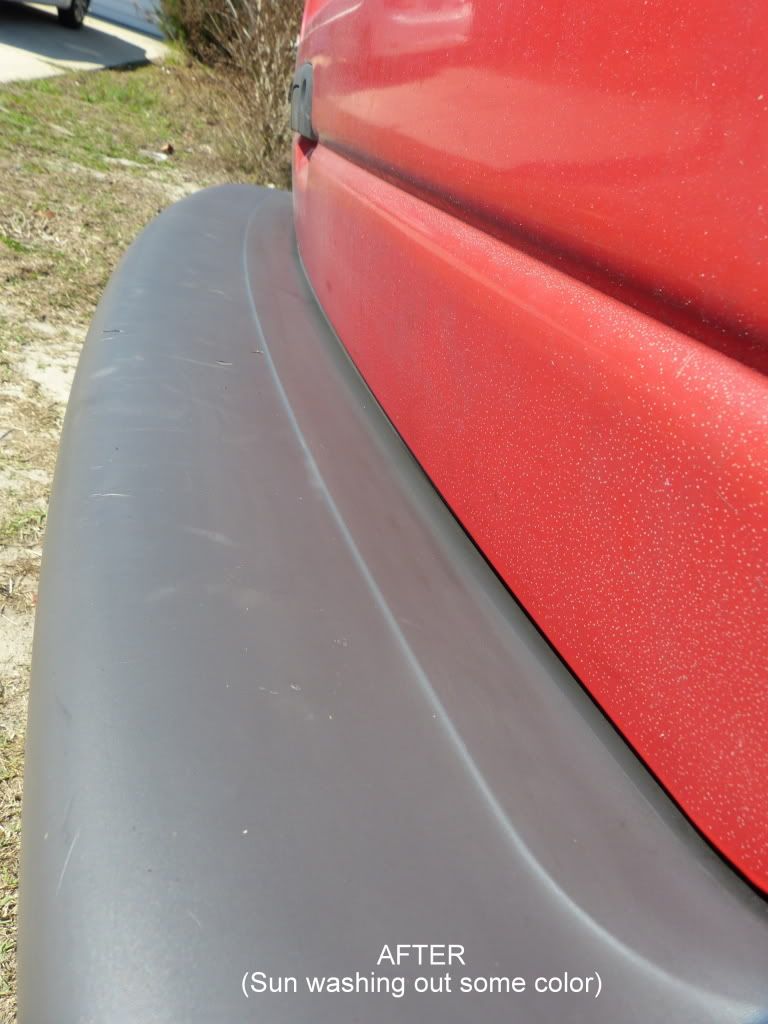
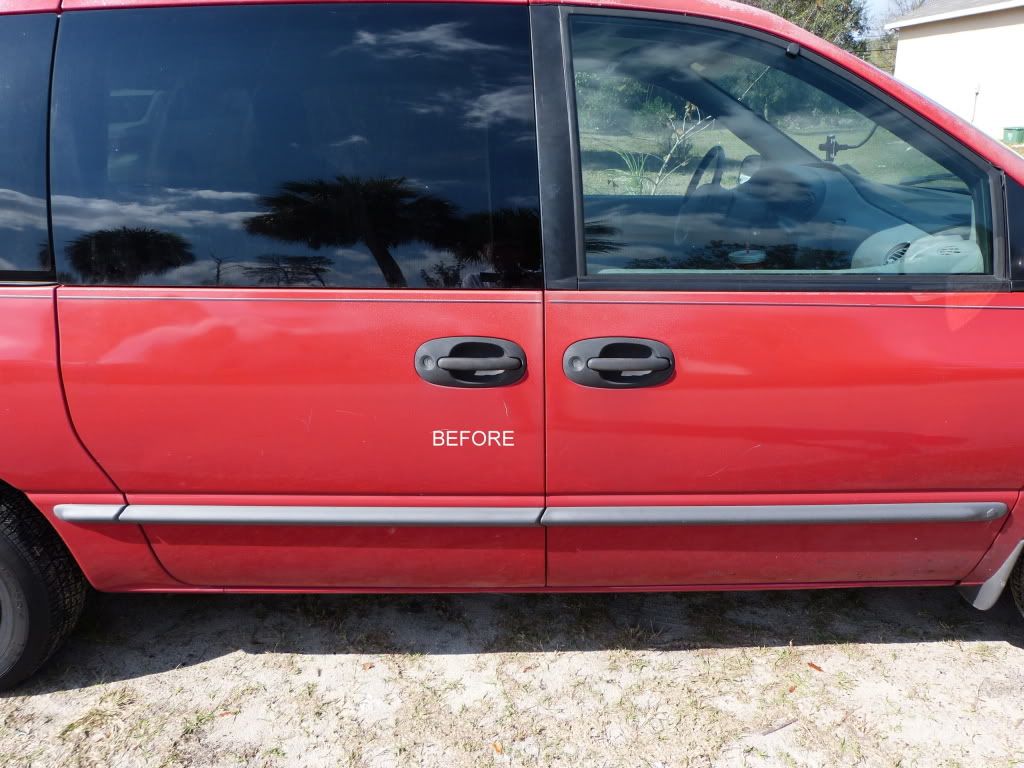
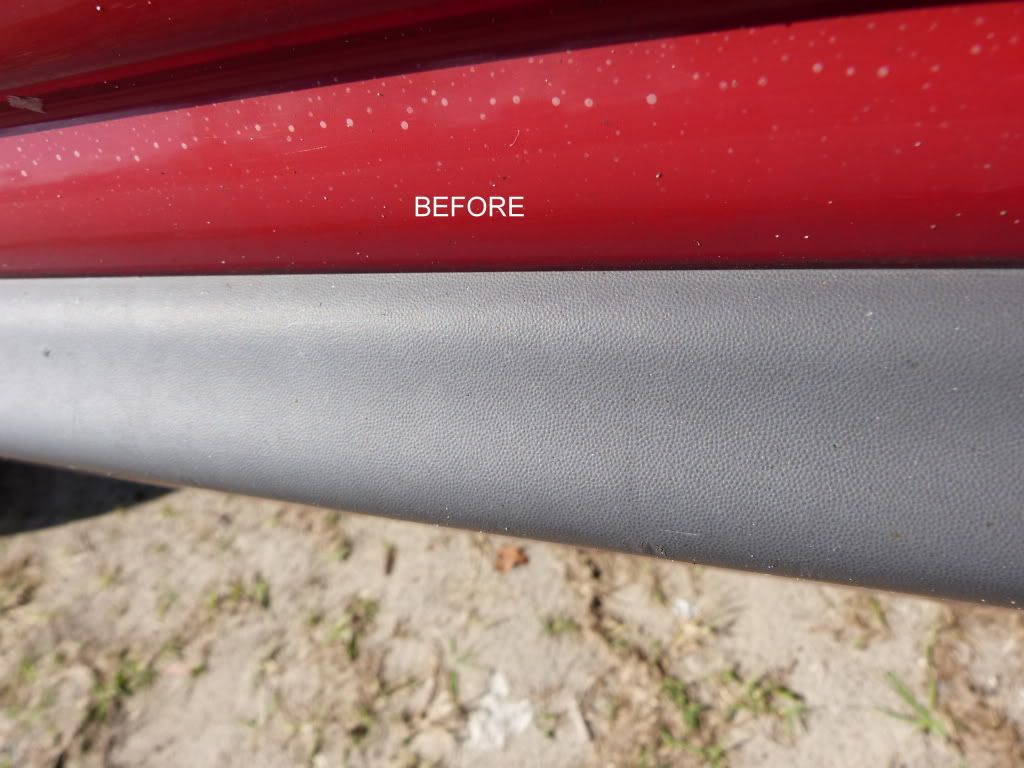
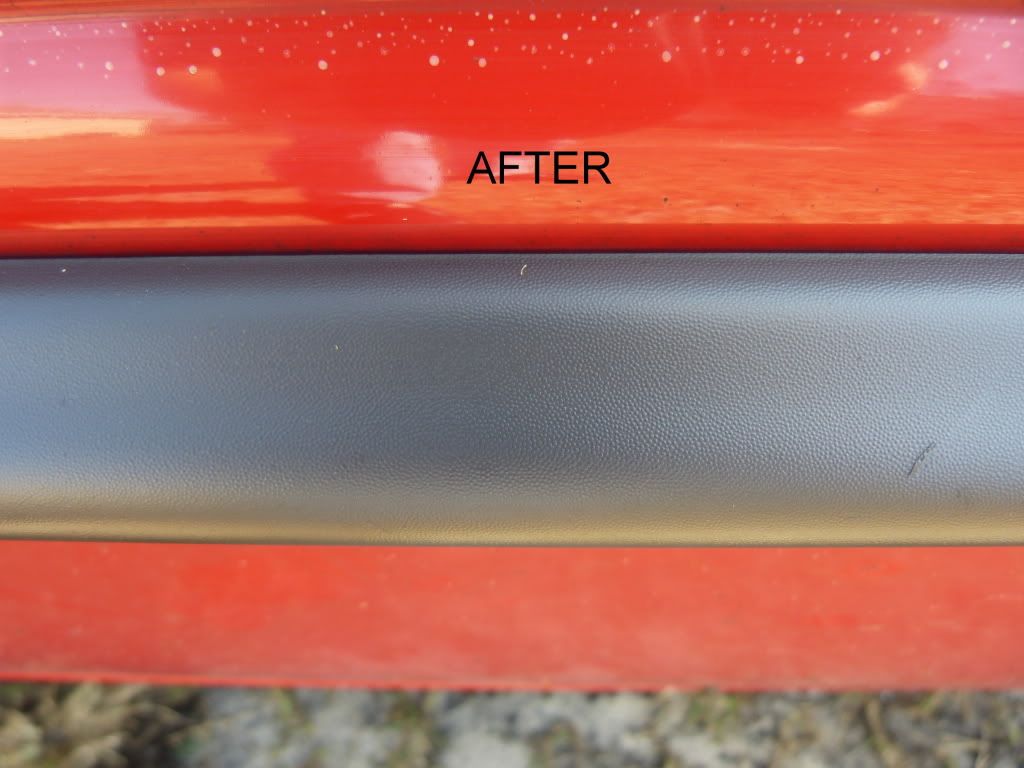
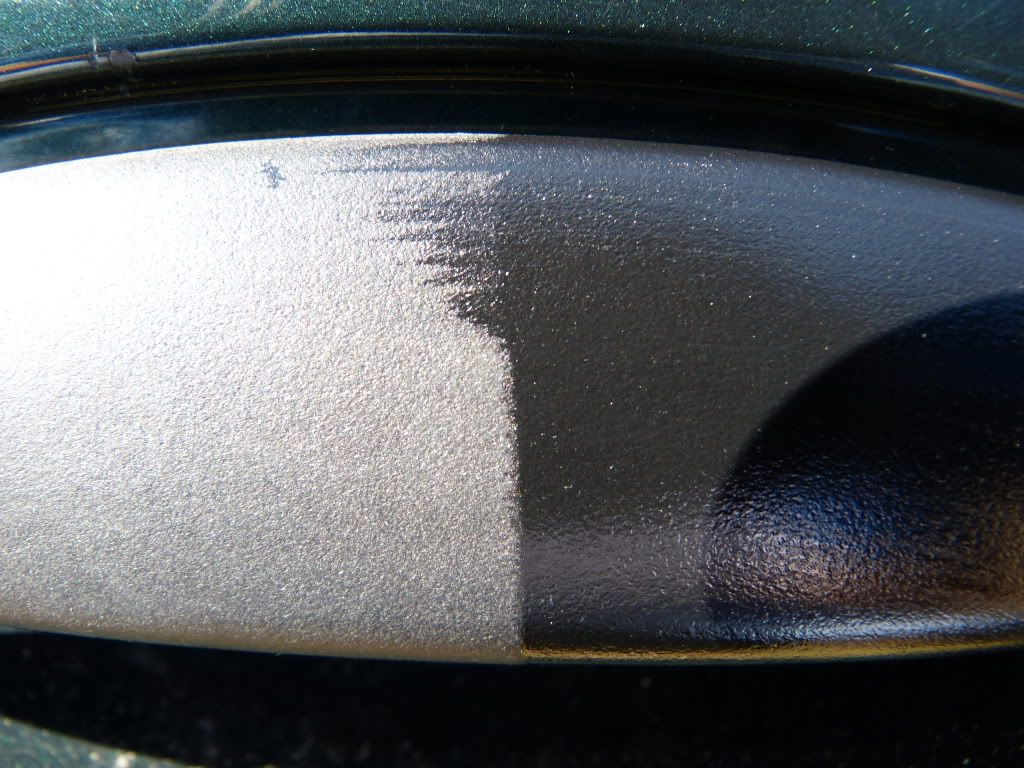
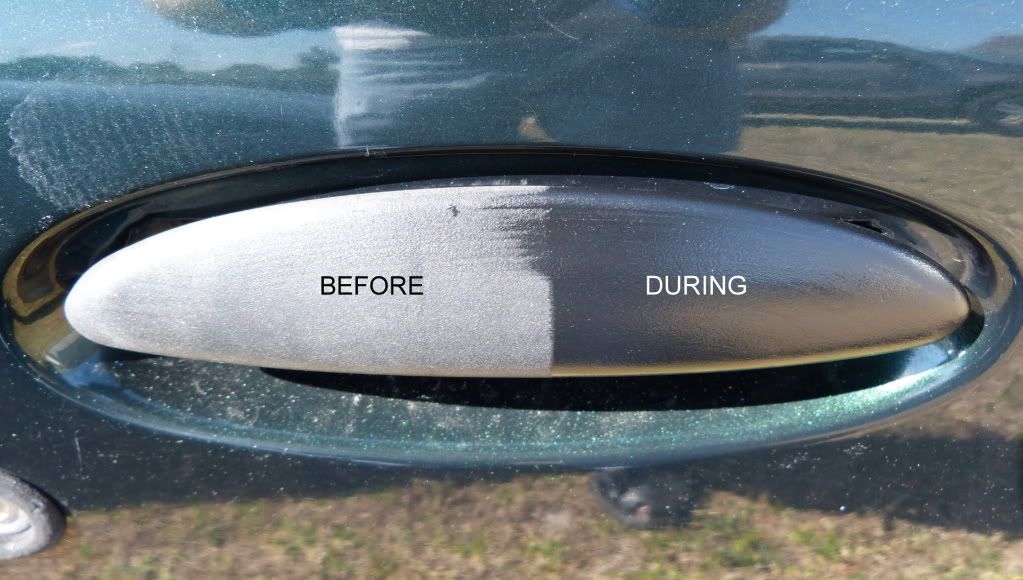
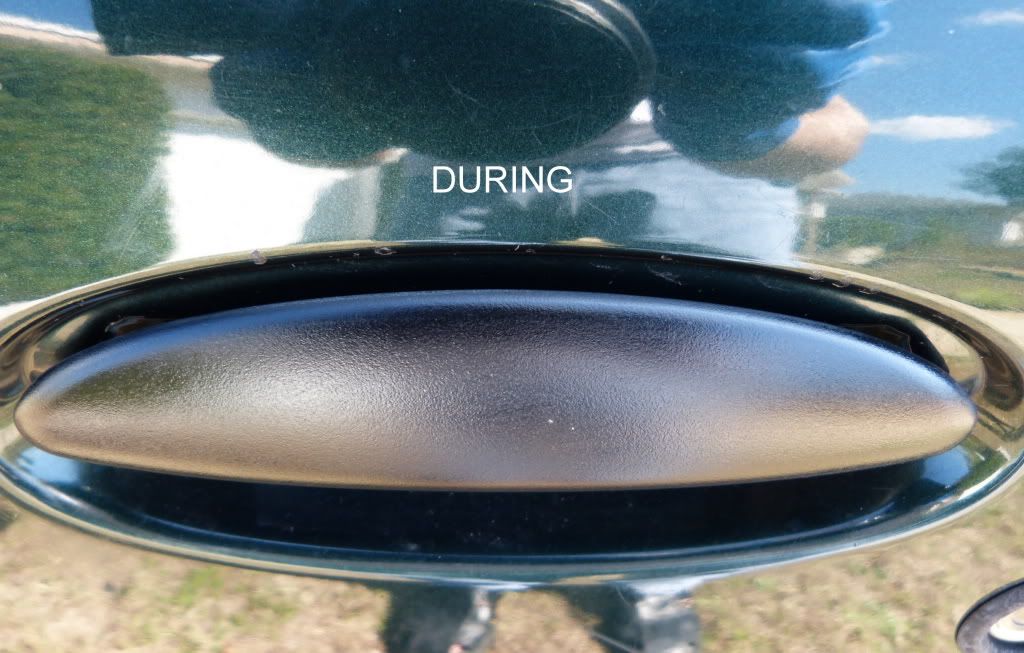
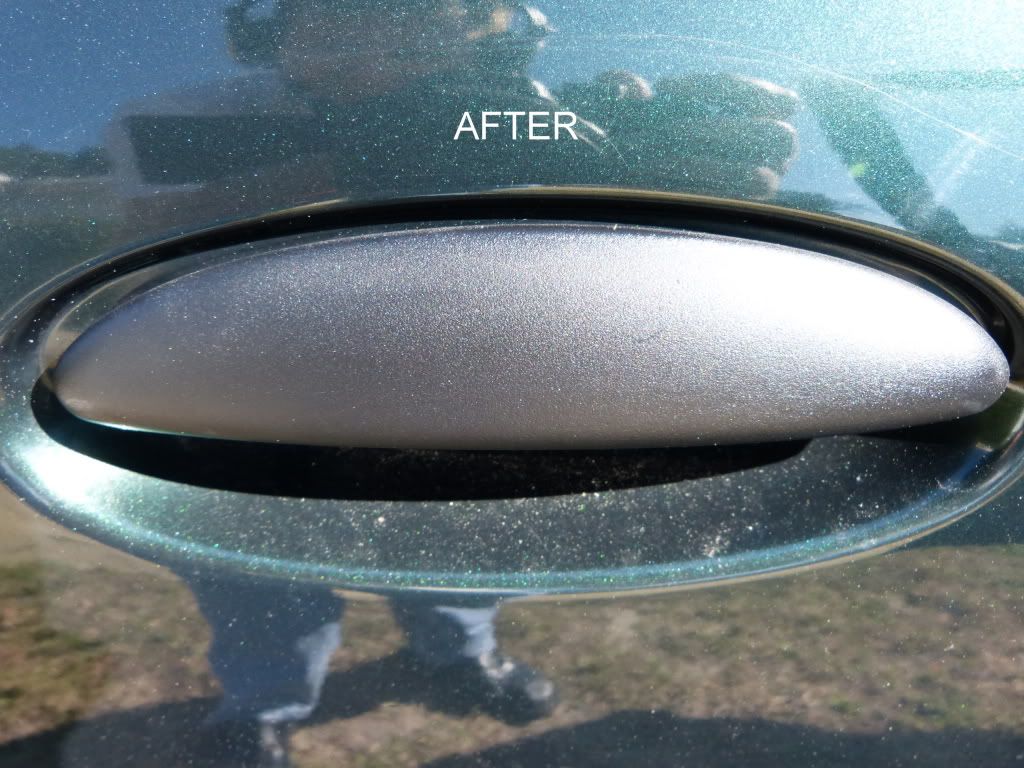
A.- Slightly Faded Trim
I wanted to really put SF to the test on completely whitened trim (more on that later) but my adventure and first application actually starts on the type of fading that you see on most vehicles.
On my lunch break I decided to do a little testing on my buddies vehicle. The trim was dirty but without access to water or my master blaster dryer it was straight to the SF DIY Kit I went. I retrieved the bottle of 50% IPA solution and after 2 quick passes (using a microfiber towel) I was ready to either apply SF or tape off the surrounding area first.
On the passenger side I masked one side of the trim. With a combination of the enclosed mf applicator and a foam swab I began to apply SF to the plastic running boards. My first observation was how far just a dab or two of product went. It goes on thin and spreads very easily. I had thought the trim was in decent condition and that SF wouldn't impress me much for this case but I was wrong. The difference was night and day!
On the drivers side I made the decision to get straight to it without taping. Once or twice I did overlap onto the paint but a quick wipe with IPA using an mf towel and I was once again moving forward.
After application I took a clean mf towel and completely buffed off the excess product. This is an important step. The excess buffs off easy and after finishing I flipped to a clean side to wipe once more just to be sure nothing else was coming off.
Total time spent on restoration was approximately 15 minutes per side.
Video: Application of Solution Finish
High Definition Option
Typical Trim.mp4 - YouTube
Standard Definition Option
Typical Trim.mp4 - YouTube
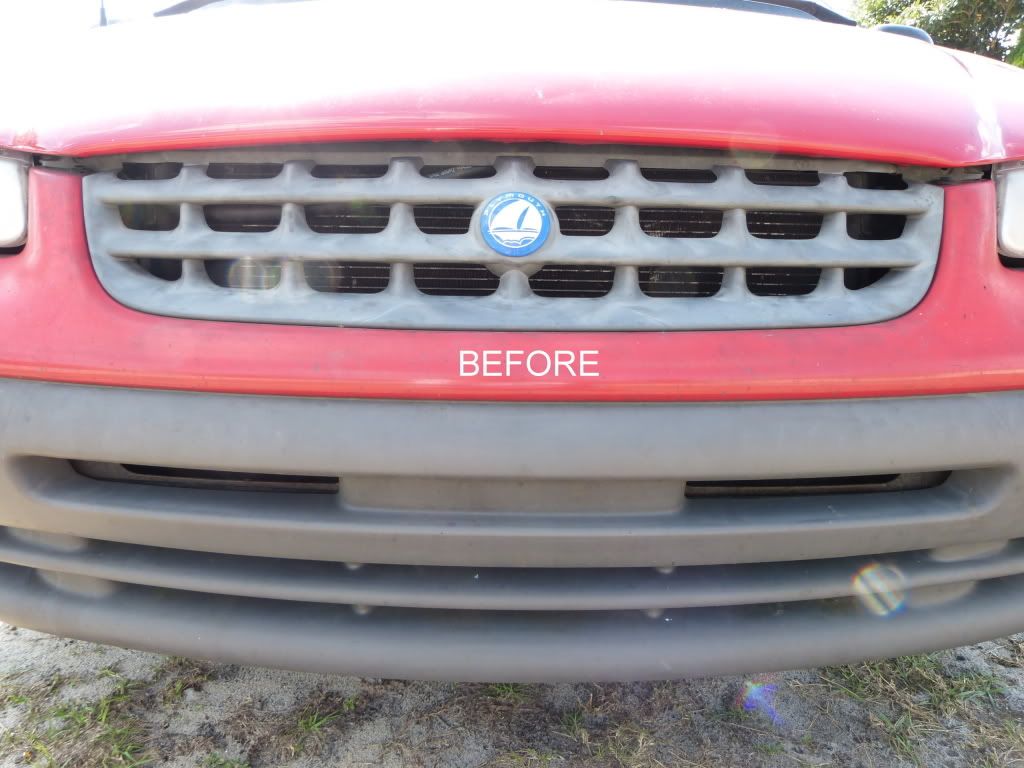
B.- Extremely Faded Trim
The next morning I was on a quest to find some seriously faded trim. I had no vehicles scheduled with the deplorable condition of trim I was looking for so after calling a scrap yard and considering other options I decided to scan the surrounding neighborhood. The first subject I found was a Jeep with severely faded trim but alas the owner would be leaving with his vehicle shortly.
The next house I went to would have been a great case but it was not to be. After explaining to the owner that this product would turn his trim back to his original black color he looked at me as if I was crazy. "Black!?" he said, "It's gray, not supposed to be black". Well, with no time and in no mood to educate or argue with him I moved onto the 3rd subject I had scouted.
Upon answering the door I told him I had noticed his severely faded trim and I showed him the Solution Finish brochure which shows before and after of the product in action. His lovely family had gathered at the door and was captivated by what I was offering.
After setting up my tripod and camera I set about the process of restoring his trim. It was so terrible nastified I would really have preferred to scrub it down with a strong cleaner and water before drying with my master blaster. However once again this was not an option and I would have to really on my SF kit for the full process. It was extremely windy and my tripod tipping over was a fear, but onwards I marched!
After a couple scrubbings of IPA no more dirt was coming off and I moved onto the application phase. The rear of the van was facing into the sun so I thought what better time to test application in direct sun. As I got started I wiped a thin layer across the surface working out from the center. I found that even if I applied a little too much and left it thick for a few minutes it still behaved the same when I came back to spread it in the other direction. In direct sun that observation was important to me and definitely considered a check mark in the plus column. Note: I would later find in my Q&A with Chris that using Solution Finish in the sun is actually recommended. Solution Finish is proving to be extremely simple to apply regardless of the conditions.
After the rear was completed I found I had not properly engaged my video. I moved onto the front and sides where I was sure to get some good video throughout the process. As I was working on the side the owner came out to tell me he had seen the difference from the window and just had to look closer. He asked if I could wipe that in the paint too or if there was anything I could do for his paint, which unfortunately was missing in many areas. When I said I could help the areas where there was still paint left we both had a good laugh! But I explained really it was in need of a new paint job and after that I could make it look a lot better than whatever the painters left him with.
After buffing off the excess I gave the whole van a look over and the difference in the trim was indeed impressive. I think for severely faded trim such as this a second layer (after allowing the first to cure) may achieve additional darkening properties. Unfortunately I had spent a little more time than what I had promised and I knew a second coat was not a possibility as they were waiting on my completion before they could leave.
They were so enthralled with the results they attempted to give me a handful of cash, which I refused. That was not part of the deal from the beginning and I'm sure they didn't really have it to handover. I told him that was really very cool of him and I really appreciated it but I wouldn't accept it in this case.
As I climbed into my car with my tripod they were getting into their van as I heard the little girl say, "Now were going to the party!". Oops, I didn't know I'd been holding up a little girl’s birthday party!
Eek!! No wonder she was casting me dirty looks
j/kTotal time spent was approximately 45 minutes.
Video: Solution Finish vs. Dead Trim
High Definition Option
Extremely Faded Trim.mp4 - YouTube
Standard Definition Option:
Extremely Faded Trim.mp4 - YouTube
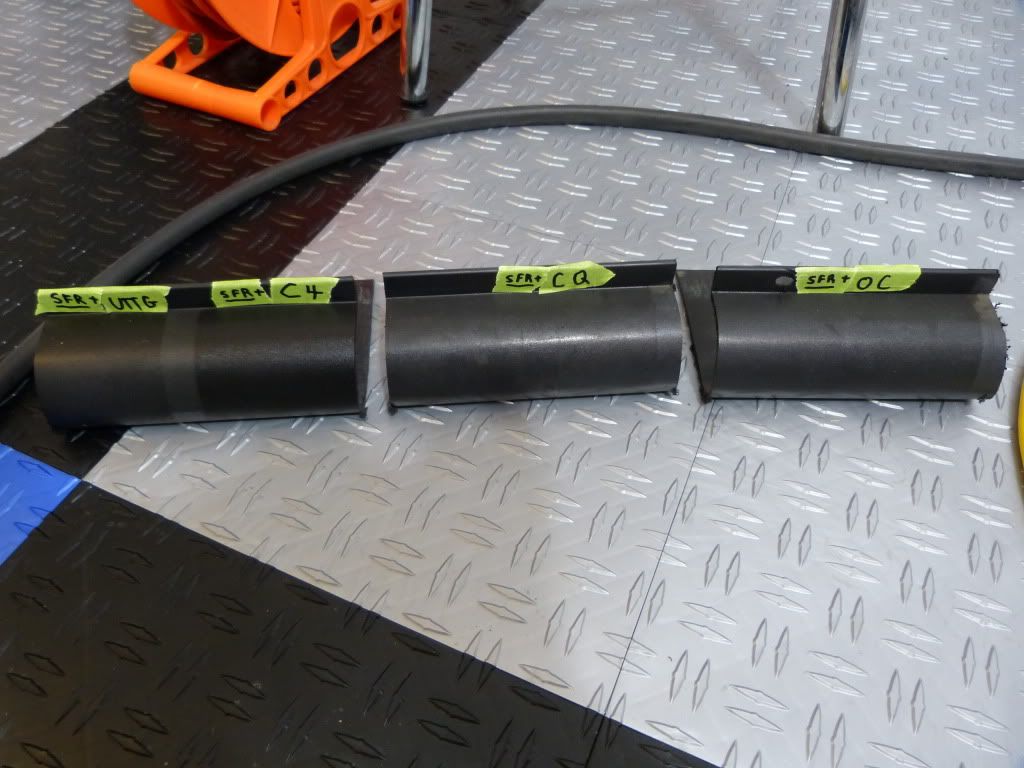
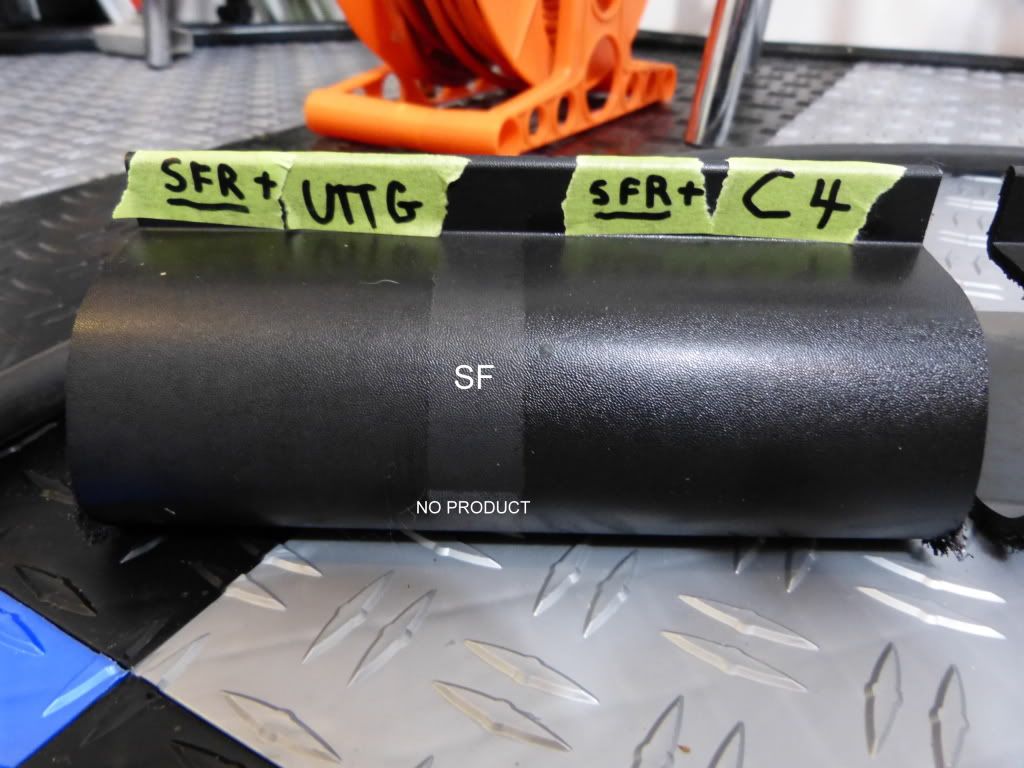
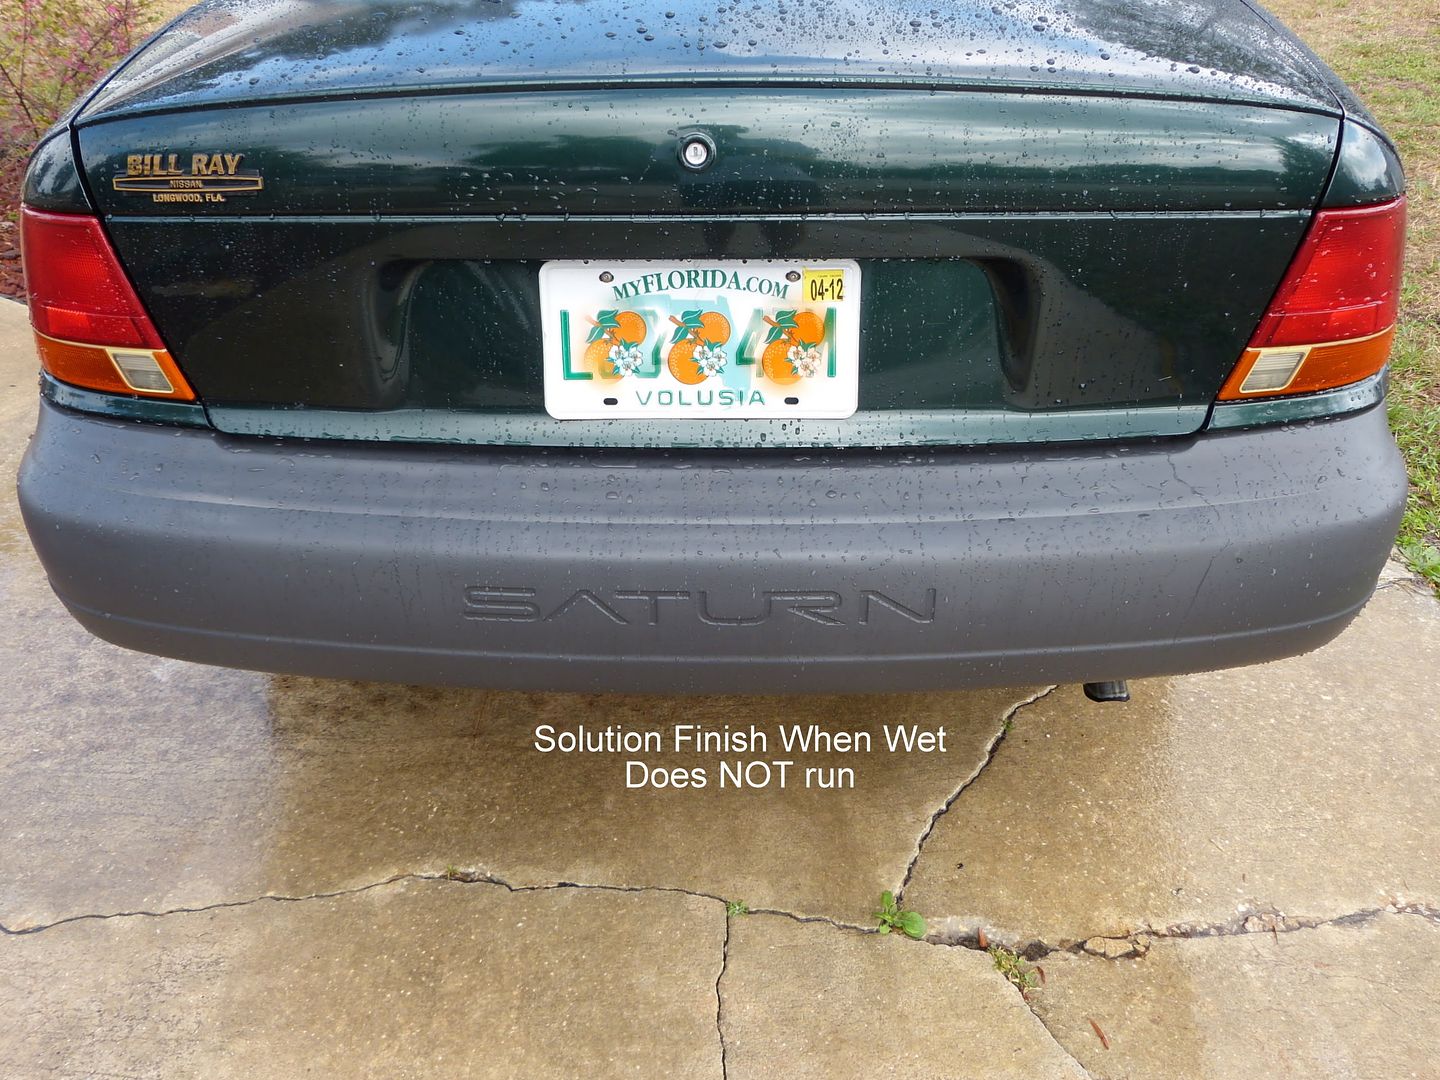
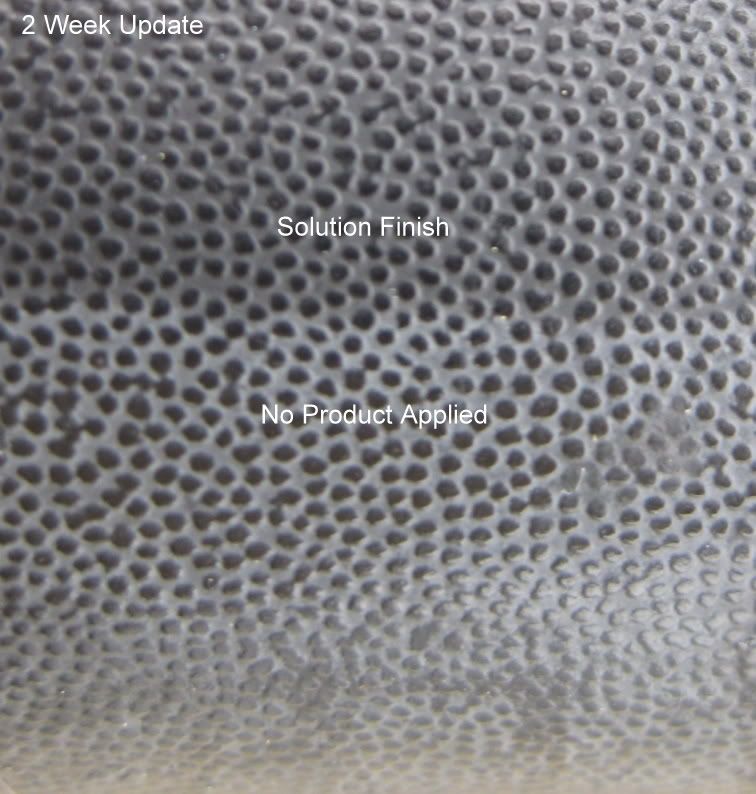
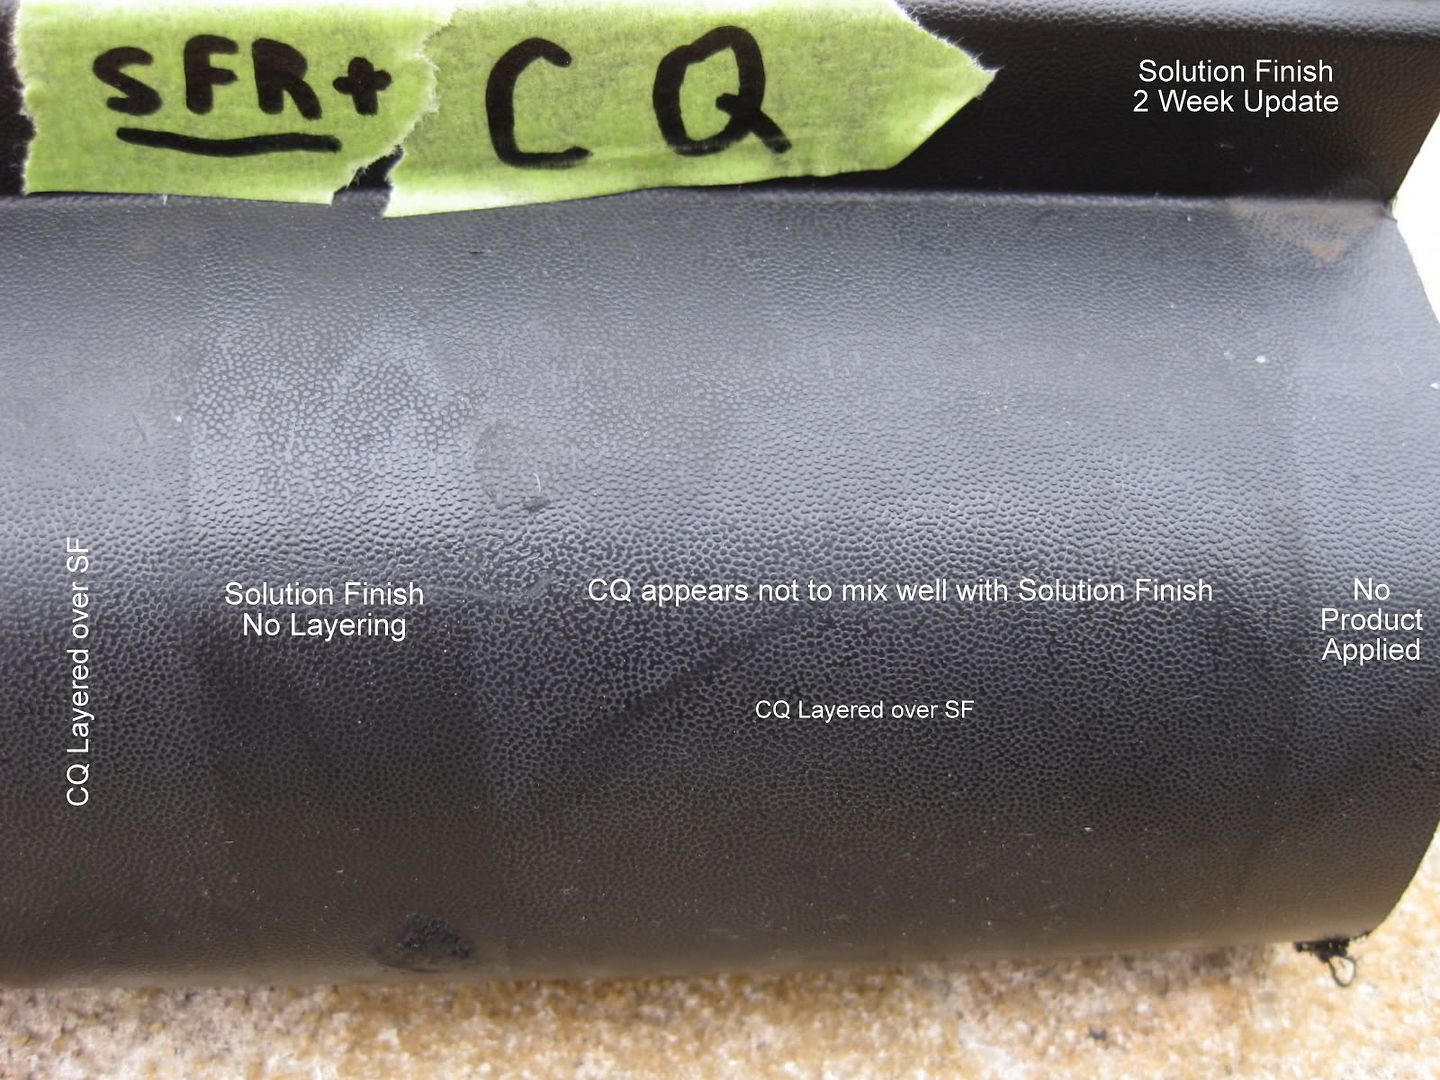
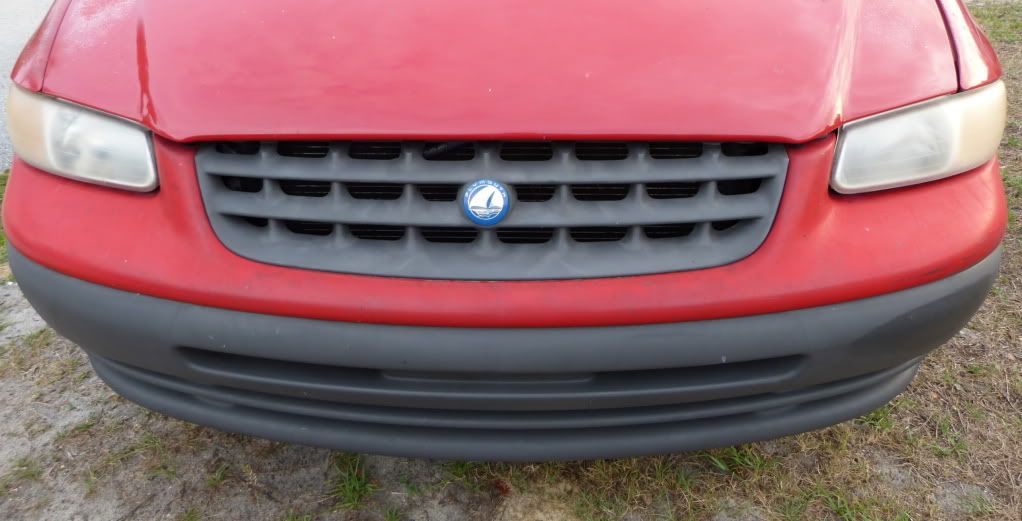
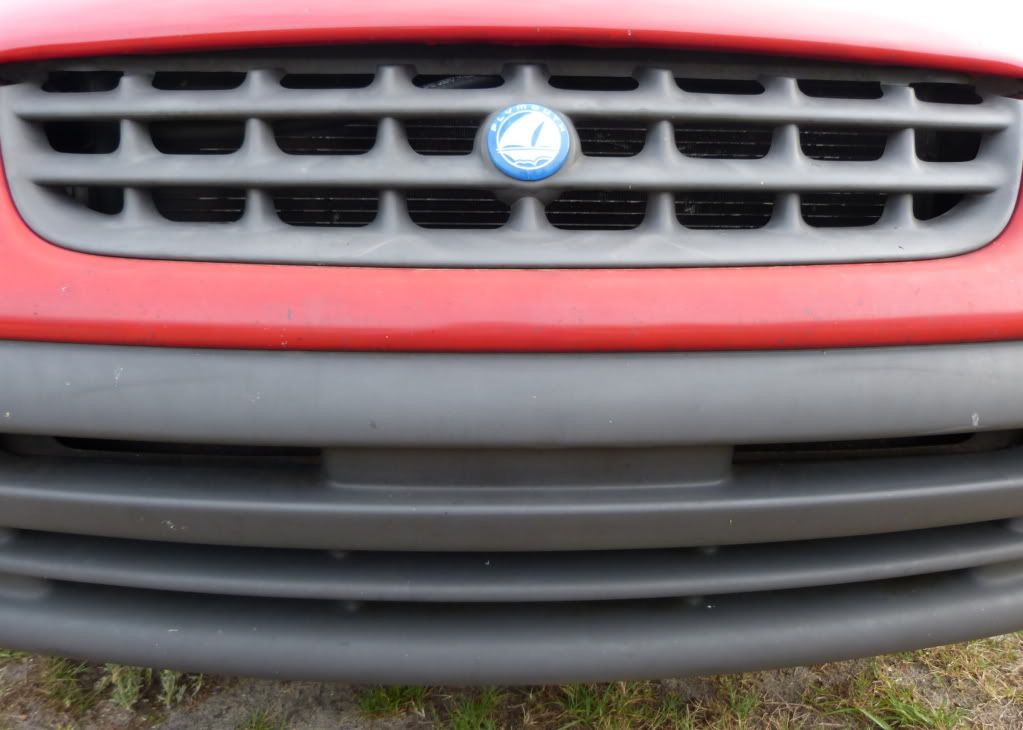
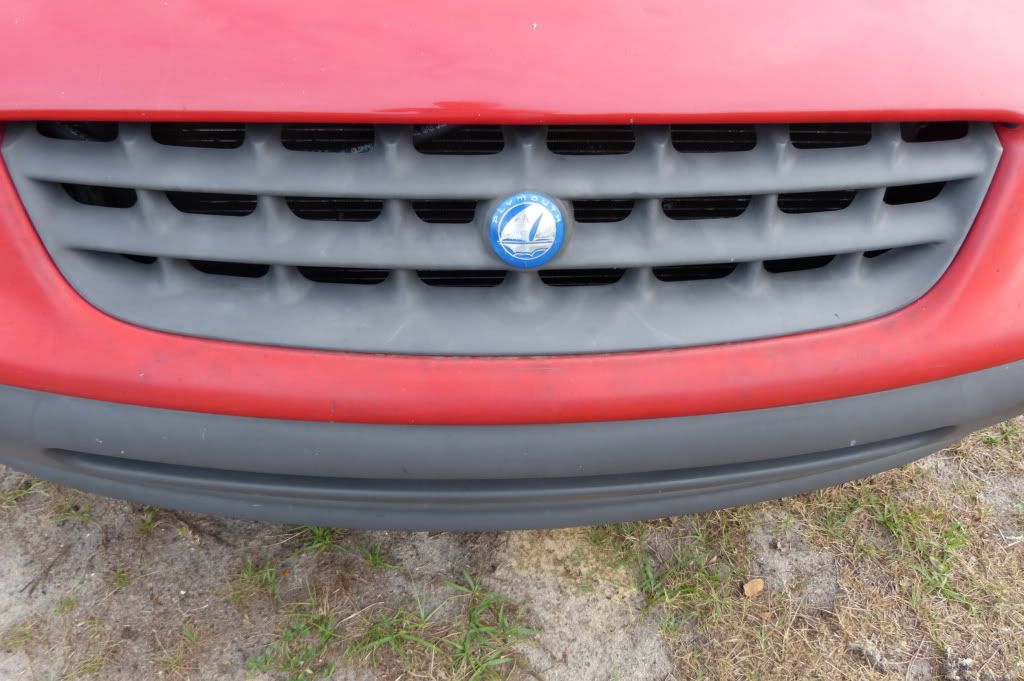
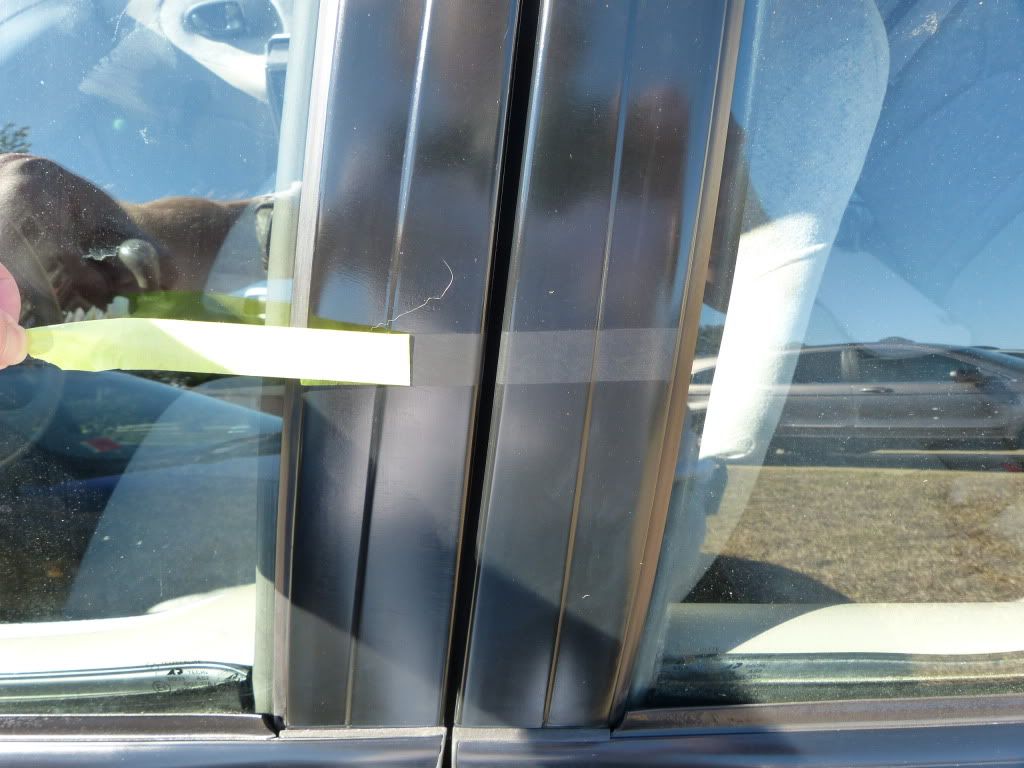
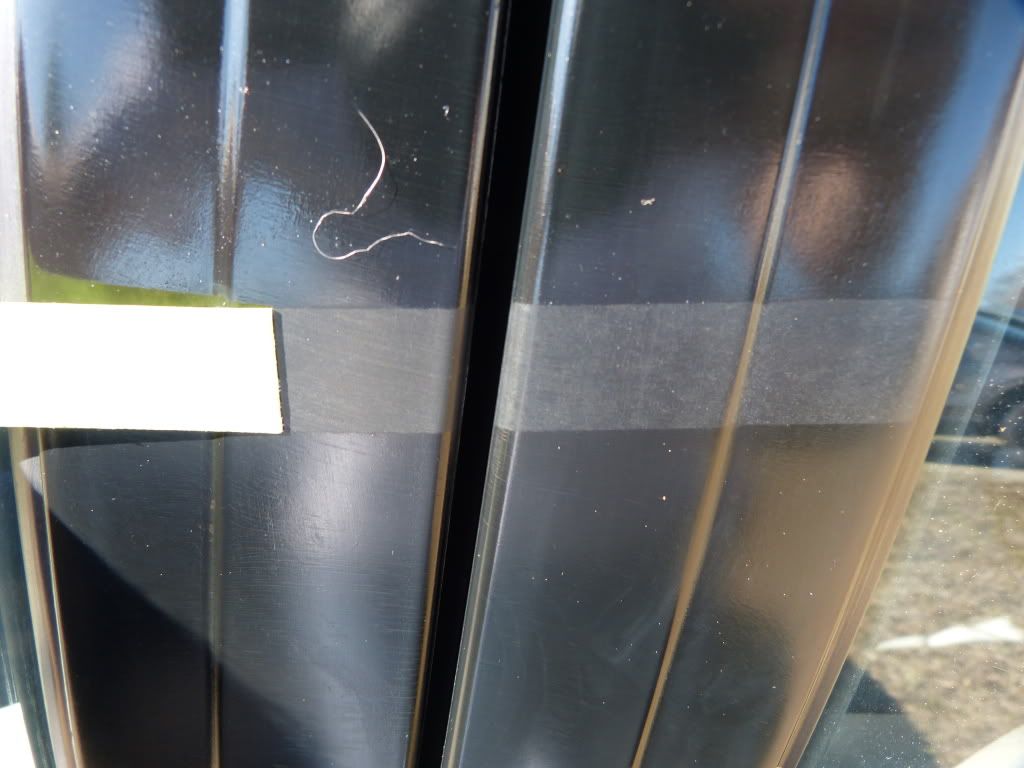
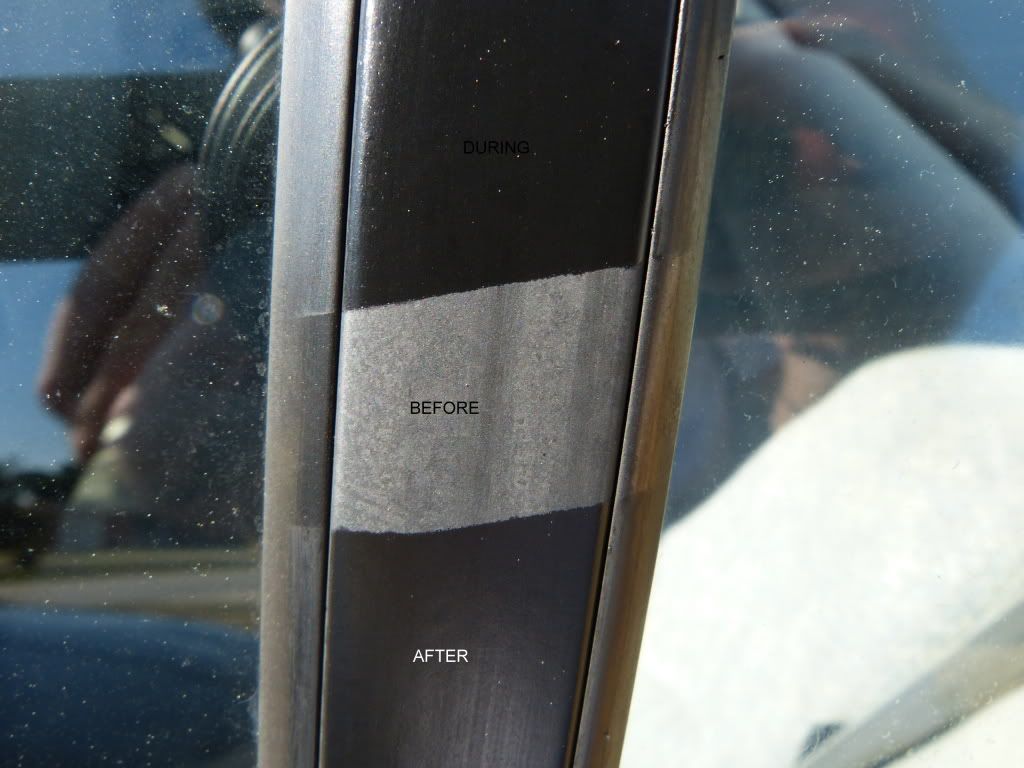
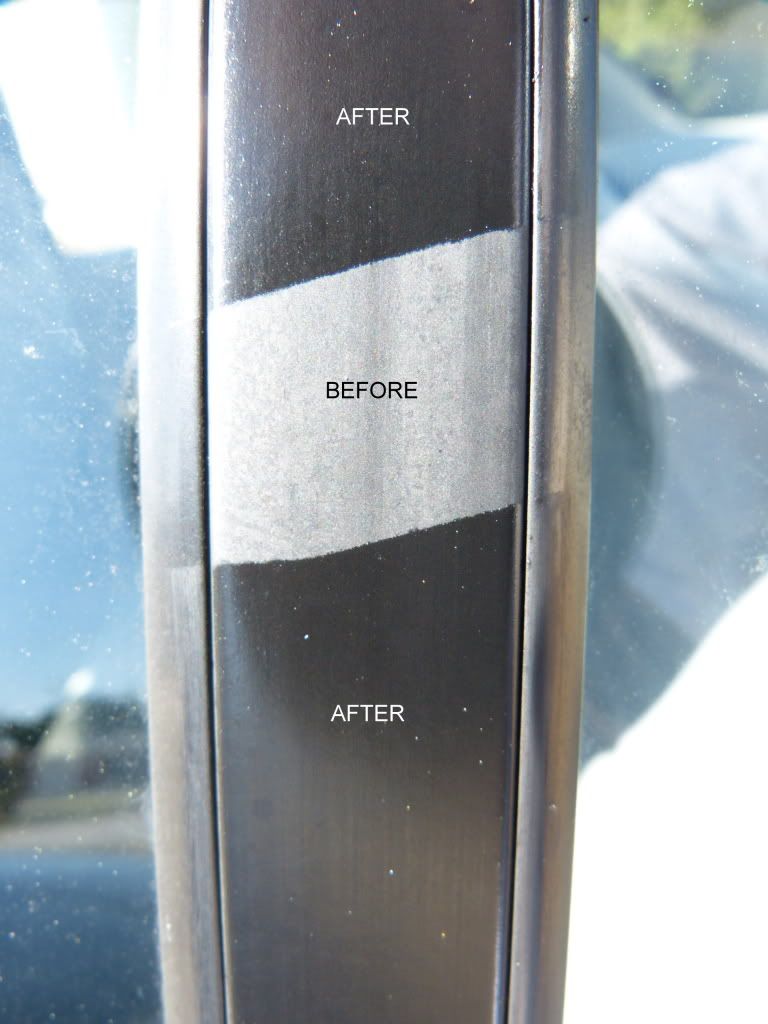
C.- Application over the remnants of polymer sealants and Nano Coatings
After chatting with pops (Old Tiger) on the way home I decided to get back to it with some testing on my 1997 Saturn trim. In all fairness to Solution Finish I can't very well expect the way it acts over a nano coating to be indicative of its typical results, which was why I tested on other vehicles as well. But here we would be testing to see how it does actually perform over remnants of C4, Ultima Trim & Tire Guard, and Wolfgang ETS.
I applied C4 over these surfaces approximately 9 months ago. And 7 months ago I applied UTTG on a portion of the right side of the front bumper and WG ETS on a portion of the left. Interestingly enough over the following 7 months you can see from past reviews the C4 area faded much more than the area that had UTTG and ETS over the C4.
Anyway, these 3 products cannot be removed by any cleaners I have tried so now you understand why this is a different test. Here we will find if Solution Finish will penetrate through those products and also if durability will be affected. Based on what I understand to be the size of the particles in Solution Finish I tend to think it will penetrate through all 3 of these existing products.
You know how it is applied at this point so here's some pictures. Video was scrapped halfway through editing for now.
What if I get it on the paint?
SF states it will not stain protected paint and that masking off the surrounding area is optional. Furthermore they state that if you do accidentally spread product onto the painted area or glass you should simply remove it with a safe APC mix. I used IPA right away the few times I got some on the paint and had no issue.
In many cases it's just easier to stretch out a piece of tape so you can apply SF quickly without worrying about removing any over wipe, but for those that don't mask or didn't have tape that day I decided to put together a test.
Intentional Paint testing:
The following test focuses on 8 test sections. 4 sections have protection (OCW) on them and 3 sections have no protection. I applied SF directly to the paint on all 8 sections. On the first set I removed SF after 1 minute. On the second set I waited 10 minutes before removing SF. And on the third set I waited 30 minutes. On the final set I waited 5+ hours to remove the SF.
Each time I removed SF with 30% IPA and on the final section I used Eraser. I don’t have a white test panel so I worked with what I have. Here are the pictures.