Removing Clear Coat From Aluminum

Beemerboy

Just One More Coat
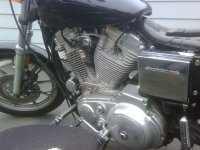
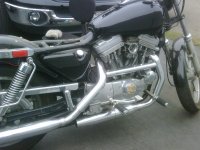
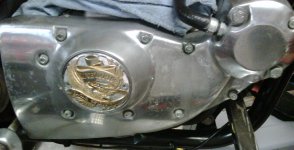
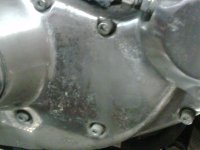
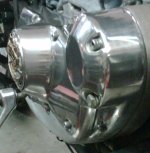
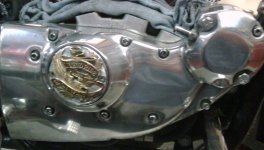
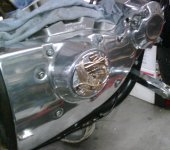
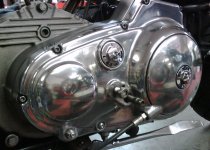
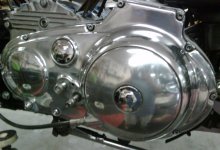
I'm wondering if anyone has removed clear coat from Aluminum?


I was working on a older Harley that had parts where the clear had come off and other parts where it wasn't


I was able to remove quite a bit of it, threw polishing with a cotton bob and wool pad but that was very slow, there has to be an easier method

I did try some Acetone and Lacquer thinner on a spot to see how it would work and that was no use.

Anyone?
 
found this on EHow...


Wash the clear coat with warm soapy water and rinse.


Sand with 180-grit sandpaper. Use some caution and check frequently so as not to sand too deeply. Once all of the clear coat has been sanded off, sand with 320-grit paper, then sand with 500-grit paper and finally sand with 1000-grit paper to remove all sanding scratches in the aluminum.


Spray or brush airplane paint remover on your aluminum clear coat and allow to soak for 10 minutes out of direct sunlight. Hose off. Inspect and apply second coat if needed. Hose off.
 
I saw the same thing Gus but was wondering who might have some hands on experience with it

Are you sure its not anodized aluminum because is more like a plating just sanding you will notice like blend lines where you break through. Aircraft paint stripper will take clear off but I dont know if you are working on the bike or off the bike with the parts. If it is anodized you can get the remover from Eastwood. Old Fords had anodized aluminum trim I have restored many of them. Hope this helps if you need some other resources or info Id be glad to get them for you.
 
Well founds the solution online and went and took the clear off the aluminum already

After some research I read that aircraft paint stripper would do the trick, stopped in at the bike shop to tell him my findings, and he hands me a can of aerosol paint stripper. Says try this and lets see what happens

I sprayed in on and just like the article I had read the clear crinkled up on impact. Let that set for 5 minutes as the instructions on the car and ALL of the clear that was left on the metal fell off.

No discoloration to the metal at all, now what I need to do is go back over those areas so that they match the parts where the clear had worn off over time

I have some before and will get after pics to show the difference
 
Are you sure its not anodized aluminum because is more like a plating just sanding you will notice like blend lines where you break through. Aircraft paint stripper will take clear off but I dont know if you are working on the bike or off the bike with the parts. If it is anodized you can get the remover from Eastwood. Old Fords had anodized aluminum trim I have restored many of them. Hope this helps if you need some other resources or info Id be glad to get them for you.

No its not anodized metal I know what that looks like

This is an older Sporters Hardly where the bottom part of the motor had aluminum cases, on some areas the clear coating had worn off, while other parts had not.

So what I had after polish was the non-clear coated metal looked like glass while the rest was sort of yellow or dull and you could see the line of the clear. I knew that I had to get the clear off to make it look right

will be posting pics tomorrow


Ok willl check them out. Will do whatever I can do to help.
 
Here are the pics that I took of some of the before and afters, I didn't have my real camera with me so these are taken with my cell

For any of you looking at PB PP2 this was what I used to complete this

I used a rotary with a wool pad (3 inch pad) and polished, then I switched over to a cotton bob on the rotary and cut even more. The super tight areas I used my Dremel with various bottom tips. The I finished back with a foam pad on the rotary to buff out any small buffer trails

I finished it by hand with cotton applicator

Sorry about some of these pics but you can see how it turns out

The owner of the shop was very impressed and now I am his polish go to guy
 

Attachments

  • IMG00362-20100826-0952.jpg
    IMG00362-20100826-0952.jpg
    213.5 KB · Views: 10
  • IMG00363-20100826-0952.jpg
    IMG00363-20100826-0952.jpg
    227.9 KB · Views: 8
  • IMG00374-20100902-1059.jpg
    IMG00374-20100902-1059.jpg
    142.5 KB · Views: 9
  • IMG00376-20100902-1059.jpg
    IMG00376-20100902-1059.jpg
    103 KB · Views: 9
  • IMG00384-20100903-1202.jpg
    IMG00384-20100903-1202.jpg
    86.1 KB · Views: 11
  • IMG00385-20100903-1203.jpg
    IMG00385-20100903-1203.jpg
    158 KB · Views: 9
  • IMG00386-20100903-1203.jpg
    IMG00386-20100903-1203.jpg
    228.3 KB · Views: 11
  • IMG00387-20100903-1203.jpg
    IMG00387-20100903-1203.jpg
    217.7 KB · Views: 7
  • IMG00388-20100903-1203.jpg
    IMG00388-20100903-1203.jpg
    184.1 KB · Views: 10
Looks great, glad it worked out what did you coat it with? One of the guy's who is into bikes swears by ZoopSeal
 
BB thanks it was time well spent $ and plenty of it

I haven't sealed them yet, they are going to pit the bike together, they are doing the top end. Then I will do a finish detail on the bike
 
Back
Top