Gidday!
I contribute over on the Mothers boards, so some of you may think I'm coming from a position of slight bias, but nothing could be further from the truth.
I would like to comment on this, mainly to clear up what might be perceived as a misapprehension.
Admitted, this looks similar to the red Powerball that some use on their wheels, and when you think 'wheels', you think the dirty part of the car, and the scotoma might be like this.....dirt.........catching in this..........inducing marring.
That may be the case for the red ball that you use on your wheels, but look at this ball like this.
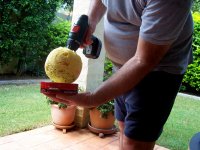
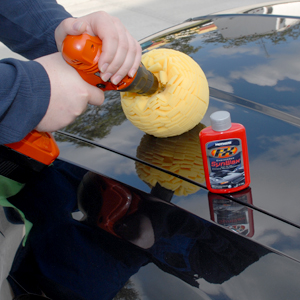
See the colour. Yellow.
It's made of foam.
The same as your small round yellow foam applicators that you use to apply products to your paint.
I'm not a user of any of the rotary buffers, mainly because of the US Australia voltage differences, yours being 120Volts and ours being 240 Volts, so any buffer you use has to be either completely rewired for operation here in Australia or you need to purchase a transformer unit to break our 240 down to the PC's 120. Technical I know, but consider this. To bring a Porter Cable into Australia, you're looking at around $200 and then you'll need the correct Transformer, retailing around $160, and then because the supply frequencies are different also, your 60Hz our 50Hz, then the operating parameters are slightly different, and then there's the pads, also imported.
Admitted, I could go with a Bosch or the other tools but I'm an old guy now on a small superannuation income which doesn't stretch that far.
So, I do all my work by hand, hence that small round yellow foam applicator.
I got hold of one of these when I asked a friend in the US to send me one of them, and they will be on general sale here in Australia in another month or so.
I used it with a few products and found that it is an immense time saver, but the thing I would like to point out is the product I tested it with on the Sunday just gone, and I wrote in an email to my friend in the US a small resume of the work, so I'll just copy that and include it here rather than rewrite the whole thing.
At the end I'm including a photograph of the ball, and it's a little better focussed than the one above, because it clearly shows the small, fingers. Why I did this is to comapre the size of the ball with the size of the tub of wax.
The thing to keep in mind here is the time saving aspect here and this is a double time saver. Time saved over doing the work by hand and time saved over application with a buffing tool because you don't need to remove the paste from the tub, and put it on the pad.
As I mentioned, I used the ball with a few products, and also used differing amounts of downward pressure, speeds of the drill, and using the ball head down or on its side, and at no time ever did I see any evidence at all of marring.
Because of the lack of money, hence no access to a costly buffer, I was resigned to the fact that all my work would be done by hand and I didn't mind that at all.
So, after using this, and especially for the Paste Wax, I'm of a similar opinion to kbshadow above. I'm only ever going to have access to one buffing tool, and this accesory is the one.
FOLLOWING COPIED FROM MY EMAIL TO MY FRIEND
However, the thing today was that I timed the process, if only to work out the real time saving element here.
When I use one of those small round yellow foam applicators, to do the whole car takes just around 2 hours per product, wax included.
Assuming that the removal process is the same with a microfibre polishing cloth, then that time stays around the same. Because the removal entails wiping over a relatively large area with the MF, the bulk of the time then is on the application, So the removal process is around a third of the whole time as application means small round tight circles to get full coverage, hence more time spent on that part of the process.
So, removal takes about a third of the 2 hours, or 40 minutes.
Today, the whole task took me 50 minutes.
So, if it takes the same 40 minutes for removal, then the time spent with the actual application process took only 10 minutes against the 80 minutes previously, so one eighth of the time.
Also it must be a saving on muscle effort, so the tiring factor is reduced as well.
The only down side I see is that with the small applicators used by hand, you can get in tighter spots more easily, and more accurately closer to the trim areas, but surely the same applies for those guys using buffers
The advantage with the Paint ball, is you can work on areas larger than the usual 2 foot by 2 foot.
I experimented a little with the ball, and found it easiest like this.
Spray a single squeeze of Showtime into the wax and then place the ball in the tub of wax. Move it around in a circle once and then squeeze the trigger minimally so the drill just ticks over in the wax for around 2 seconds, moving the head of the ball around while you're doing this to get coverage on the front and part of the sides.
Then apply to the panel, moving the drill around on the paint in a figure of eight prior to gently squeezing on the trigger, and then holding the drill directly upright, work on the whole area across the paint in one direction for each strip, and then across in the opposite direction. Each section should take around 30 seconds, (if that) for full coverage, and that was for the largest area, half the roof.
Squirt one shot of Showtime onto the wax itself before each time you put the ball in the wax.
This to me is the real time saving aspect of the ball.
With each other liquid product, if I use that blue dish, there is obviously a time saving aspect, but with the tub of wax that time saving is even greater because the product is already in the tub.
Besides saving time with hand application of pure wax, there is also the fact that it would be quicker than using a buffer even, because with that you still have to get the wax from the tub onto the buffer's pad.
This is where I will be most using the Paint ball. It brings the application of Paste wax into the same timeframe as for any of the spray waxes.
Another thing for when you finish, and are cleaning the ball. Wash the ball in warm soapy water, soak and squeeze, soak and squeeze, and then squeeze any product out of the small yellow pieces. I used water just a little hotter than medium warm, and had it really sudsy, and I used handwashing soap from one of those squirt dispensers, only because it was by the laundry sink.
Then squeeze out as much water as you can. Then rinse the ball in warm water, and squeeze it dry as best you can.
Then place the ball back in the drill, and take it outside. Run the ball at full speed and hold out your other hand flat. Then, just touch the rotating ball to the fingers of your flat hand, so it's rotating away from your fingers, and watch the drops of water flying off to get more water out of the ball. Do this for say, ten, fifteen seconds.
Then take the ball out of the drill, and spend two three minutes going around the ball teasing the yellow fronds back out.
Then let it dry in the air.
Again, I know this is a frightfully long post, but what's a review if you don't tell everything.
Tony.
PS Click on the thumbnail below for the full sized photo.
 ) and let us know. :nervous2: