Marc08EX
New member
Wheels/Tires:
Sonax Full Effect Wheel Cleaner on wheels
CG Citrus Wash And Gloss on wheels
Meguiar's APC on tires and wheel wells
Meguiar's Hyper Dressing on tires
Swissvax Wheel brush for wheels, calipers and small crevices
EZ Detail Brush for wheel barrels
Meguiar's Ultimate Quik Wax on wheels
Wash:
CG Citrus Wash and Gloss via Foam Gun and 2BM
Meguiar's Microfiber Wash Mitt
Meguiar's Water Magnet
Clay:
Nanoskin Autoscrub Towel
Meguiar's Last Touch
Paint Correction:
Rupes 21ES with 5" BP
Meguair's G100 / 7" and 3" LC Backing Plate
Meguiar's M100 / Meguiar's 5" and 3" Microfiber Cutting Discs
Meguiar's M205 / Meguiar's 7" W9207 Foam Finishing Pads
Pad Conditioning Brush
LSP:
Wolfgang Fuzion
Interior:
Meguiar's Quik Interior Detailer
Vacuum
Exhaust:
Mother's Metal Polish
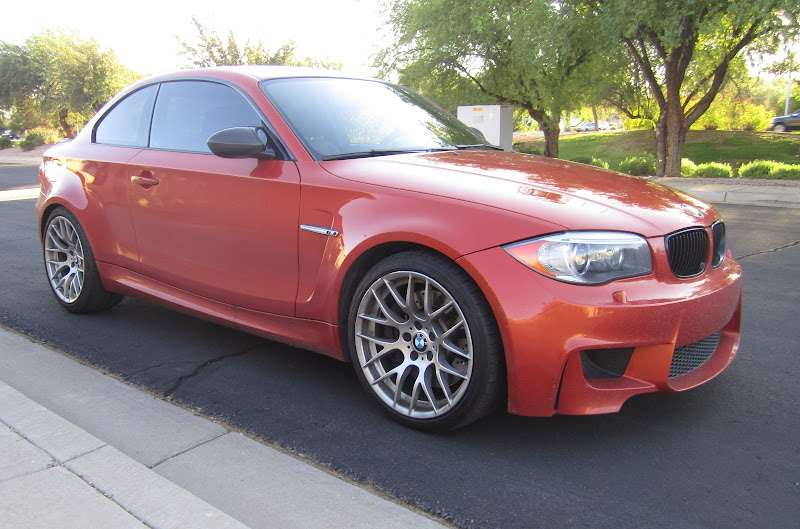
I had the pleasure of recently detailing this uber rare 2011 BMW 1M. The car had a ton of water spots and a few swirl marks. The owner wanted to get rid of these defects and wanted the car to look its best. This was indeed an amazing opportunity and I want to thank the owner for trusting me with his baby. Now, we'll let the pictures do the talking.
Here are some pictures of the car when the owner dropped it off.


I really wanted to start the wash but the car was still hot. While waiting for the car to cool off, I decided to start cleaning up the interior. Here are some pictures of it:
Interior Before:

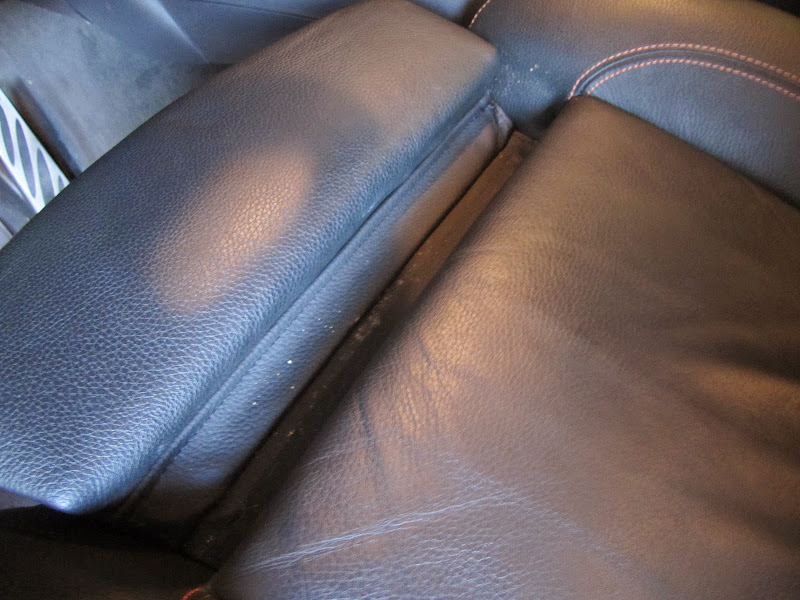
Seat Before:

I vacuumed the whole interior. Here are some after pictures:


After vacuuming the cabin, I proceeded to wipe down the interior using Meguiar's Quik Interior Detailer and a clean microfiber towel. This stuff rocks!

The sun was setting really fast and it was getting dark outside. I really wanted to get the wash process started before it gets dark out.
As usual, I always get started with the wheels. Here are the tools I used for this task:

Spraying Sonax Wheel Cleaner:

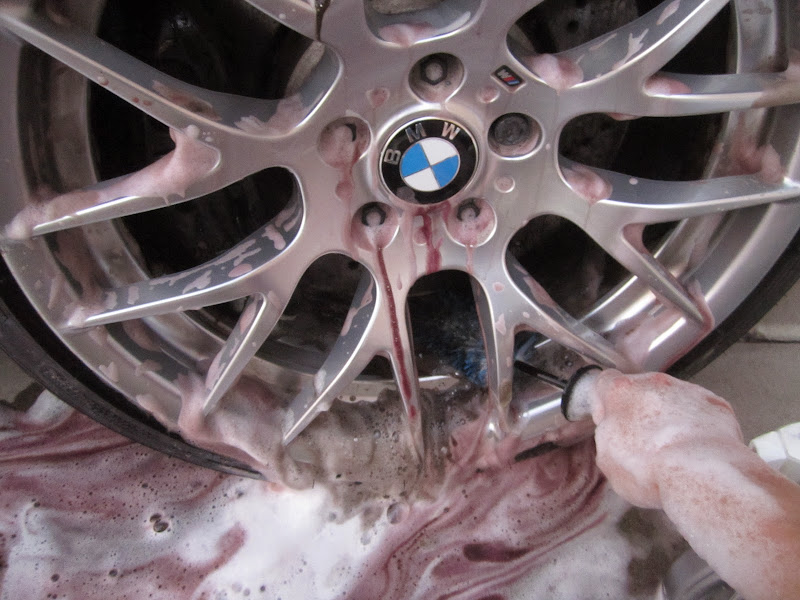
Letting Sonax dwell and do its thing on that nasty BMW brake dust. I had to do 2 applications because the brake dust was caked on.

Washing the wheel face:

Brushing the wheel face:

Cleaning the wheel barrel:

Cleaning the tires:

Clean wheels/tires:

After all this was done. I foamed the car to loosen all the dirt and proceeded with a 2 bucket wash.

After drying the car, I inspected the paint for the presence of bonded contaminants. The paint didn't feel like it had a lot of contaminants but I decided to clay it anyways. For this task, I used the Nanoskin Autoscrub towen with Meguiar's Last Touch as my clay lube.

Now on to the polishing phase. Since the owner wanted his car to look its best, I suggested we do a 2 step polish and he agreed. For the initial compounding step, I elected to use Meguiar's M100 with the 5" Meguiar's microfiber cutting pad along my Rupes 21ES with the 5" BP installed. Of course, I have my traditional DA (G100) hooked up with a 3" backing plate for those hard to reach areas. After the initial compounding step, I decided to polish the paint and amp up the gloss with Meguiar's M205, Meguiar's 7" Foam finishing pad and the G100 with the appropriate BP installed.
Equipment to be used:

The following pictures are from the initial compounding step.
Hood Before: You can see that the paint has nasty water spots and swirl marks.

Hood 50/50:

Hood After:

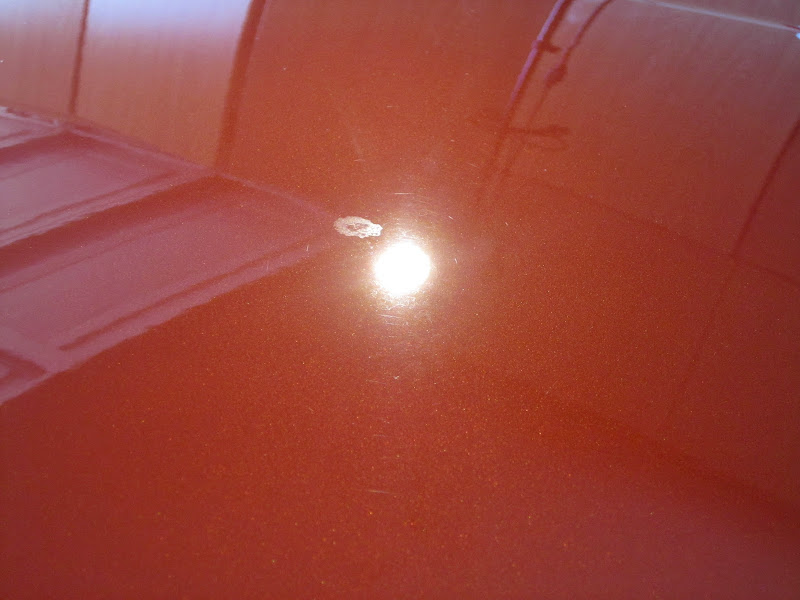
Bird Poop Etching On The Hood Before: There were a total of 4 etchings that were polished out.

Bird Poop Etching On The Hood After:

Sonax Full Effect Wheel Cleaner on wheels
CG Citrus Wash And Gloss on wheels
Meguiar's APC on tires and wheel wells
Meguiar's Hyper Dressing on tires
Swissvax Wheel brush for wheels, calipers and small crevices
EZ Detail Brush for wheel barrels
Meguiar's Ultimate Quik Wax on wheels
Wash:
CG Citrus Wash and Gloss via Foam Gun and 2BM
Meguiar's Microfiber Wash Mitt
Meguiar's Water Magnet
Clay:
Nanoskin Autoscrub Towel
Meguiar's Last Touch
Paint Correction:
Rupes 21ES with 5" BP
Meguair's G100 / 7" and 3" LC Backing Plate
Meguiar's M100 / Meguiar's 5" and 3" Microfiber Cutting Discs
Meguiar's M205 / Meguiar's 7" W9207 Foam Finishing Pads
Pad Conditioning Brush
LSP:
Wolfgang Fuzion
Interior:
Meguiar's Quik Interior Detailer
Vacuum
Exhaust:
Mother's Metal Polish
I had the pleasure of recently detailing this uber rare 2011 BMW 1M. The car had a ton of water spots and a few swirl marks. The owner wanted to get rid of these defects and wanted the car to look its best. This was indeed an amazing opportunity and I want to thank the owner for trusting me with his baby. Now, we'll let the pictures do the talking.
Here are some pictures of the car when the owner dropped it off.
I really wanted to start the wash but the car was still hot. While waiting for the car to cool off, I decided to start cleaning up the interior. Here are some pictures of it:
Interior Before:
Seat Before:
I vacuumed the whole interior. Here are some after pictures:
After vacuuming the cabin, I proceeded to wipe down the interior using Meguiar's Quik Interior Detailer and a clean microfiber towel. This stuff rocks!
The sun was setting really fast and it was getting dark outside. I really wanted to get the wash process started before it gets dark out.
As usual, I always get started with the wheels. Here are the tools I used for this task:
Spraying Sonax Wheel Cleaner:
Letting Sonax dwell and do its thing on that nasty BMW brake dust. I had to do 2 applications because the brake dust was caked on.
Washing the wheel face:
Brushing the wheel face:
Cleaning the wheel barrel:
Cleaning the tires:
Clean wheels/tires:
After all this was done. I foamed the car to loosen all the dirt and proceeded with a 2 bucket wash.
After drying the car, I inspected the paint for the presence of bonded contaminants. The paint didn't feel like it had a lot of contaminants but I decided to clay it anyways. For this task, I used the Nanoskin Autoscrub towen with Meguiar's Last Touch as my clay lube.
Now on to the polishing phase. Since the owner wanted his car to look its best, I suggested we do a 2 step polish and he agreed. For the initial compounding step, I elected to use Meguiar's M100 with the 5" Meguiar's microfiber cutting pad along my Rupes 21ES with the 5" BP installed. Of course, I have my traditional DA (G100) hooked up with a 3" backing plate for those hard to reach areas. After the initial compounding step, I decided to polish the paint and amp up the gloss with Meguiar's M205, Meguiar's 7" Foam finishing pad and the G100 with the appropriate BP installed.
Equipment to be used:
The following pictures are from the initial compounding step.
Hood Before: You can see that the paint has nasty water spots and swirl marks.
Hood 50/50:
Hood After:
Bird Poop Etching On The Hood Before: There were a total of 4 etchings that were polished out.
Bird Poop Etching On The Hood After:
