Gray_Panther
New member
This BMW that was detailed is actually owned by me. I bought it brand new last June with 9 miles on the odometer. I was initially looking to own a black 1 series, however there weren't any that were optioned to my liking. When my dealer told me about a deep sea blue metallic 1 series it really made me dwell on it. There was something about the name of the colour that made me envision myself looking down into the deep, blue sea. So without looking at one in person, I of course shook his hand and sealed the deal!
When it was shipped over from Connecticut, the dealer of course gave it a wash down and especially gave it a good ole'scrubbin' on the hood. I didn't mind too much, I just couldn't wait to drive it :bounce.
But now with spring cleaning fever, I managed to sneak in a full correction and opti-coat over the weekend. I have not opti-coated the wheels because I will be installing a new suspension and figured I'll clean and opti-coat them then, one at a time.
I actually did an experiment with this car prior to correction. I didn't wax it...Ever. All I did was a clay-job in the beginning, and either a weekly foam wash or an ONR wash. I wanted to see how many swirls I could induce. After 5,000 miles I was pretty impressed. The car wasn't riddled with swirls or RID's. Of course there were the existing defects from the dealer wash, but all in all it was in great shape.
Tools Used:
PC 7424XP
Meguiars' Cutting Pad
Meguiars' Polishing Pad
Extension Cables
MF Towels
Products Used:
Meg's Claybar
Meguiars' #105
Meguiars' #205
Opti-Coat 2.0
Optimum No Rinse Wash and Shine
ONR lube (1 cap to a full spray bottle of water)
IPA (For final wipedown)
Opti-Coat 2.0
Deep Sea Blue Metallic still suffers from BMW's soft clear. I found it easy to mar the paint after wiping away compound/polish. Great care was taken to keep pads clean and used as little pressure to remove substances off the paint. Heads up to my fellow detailers.
Ante, Onto the pictures after a wash and a clay:
1 minor defect

Nice scratch. This one required some wetsanding to get out. Given that this is my car and with only 5000 miles, I opted not to wetsand but rather compound it out as best I could. It will be corrected later on during its life.

Some holograms that have been there since the beginning.


The taillights needed attention.

One of the 5 scratches on the hood. 4 of the RIDs extended almost all the way down the hood (Couldn't get a picture, because, well, my camera stinks). Still trying the figure out how it only happened on the hood and nowhere else on the car. :think:

Another defect.

My correction process was simple. In the above pictures with the defects (excluding the taillights) I did some spot compounding with Meg's cutting pad and #105. For compounding, I worked the product in to a haze then set my PC to 5 and began buffing. Afterwards I did one final sub-pass at speed 4 to finish it down better. After compounding the entire hood and other specific areas on the baby BMW, I switched over to Meg's polishing pad and #205 and worked my way around the entire car. For polishing I worked the polish in with my PC set to 2.5-3 then switched it up to 4 and finished it back down to 3.
I am confident in my process used for compounding, but not so much in polishing. If you have any advice for a better tactic to use while polishing please feel free to comment on it.
Corrected! (Before Opti-Coat, after IPA wipedown)


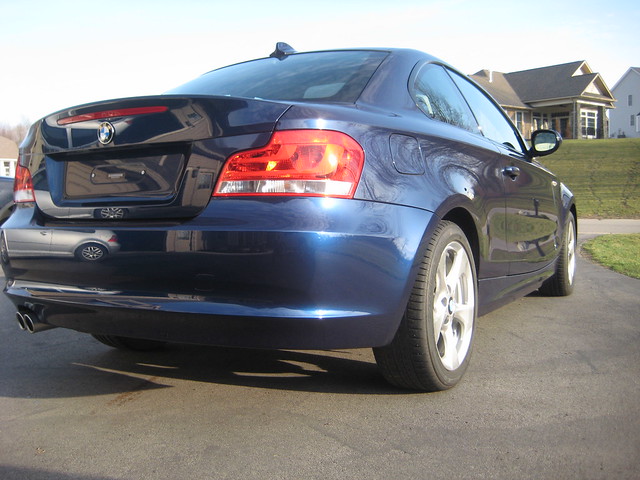
Taillights perfected. I was really amazed by the design of these taillights. I literally spent 15 minutes looking into them. They are clear so you can see the entire assembly including the bulbs. Fantastic design and they look great at night too!

More paint perfection. (Before Opti-Coat, after IPA wipedown)


The sun was setting, but no worries I was able to get better sun-shots the next day after the Opti-Coat cured for 24 hours.


Some "Cyclops" pictures:


Added my own little touch, thanks to Grafixpressions. They made me a quality sticker.
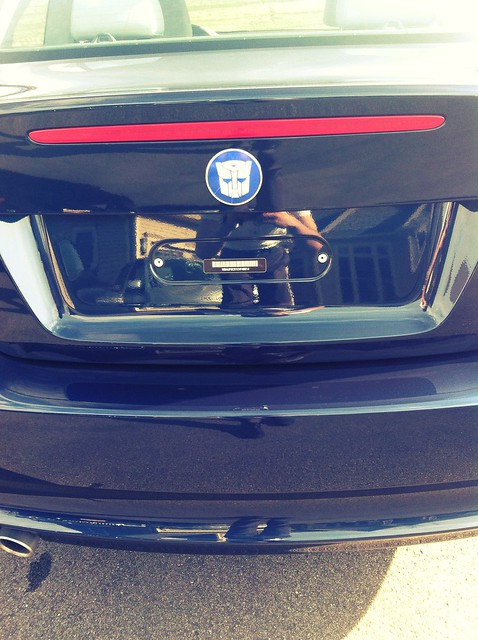
Definitely going to make some little kid's day when he sees a "transformer" in front of him.
It took me 14 hours from start to finish. I would have taken me about an hour less if I didn't spend so much time gawking at the paint after I finished polishing a section. This is my favourite colour bar none.
Gratitude for reading.
When it was shipped over from Connecticut, the dealer of course gave it a wash down and especially gave it a good ole'scrubbin' on the hood. I didn't mind too much, I just couldn't wait to drive it :bounce.
But now with spring cleaning fever, I managed to sneak in a full correction and opti-coat over the weekend. I have not opti-coated the wheels because I will be installing a new suspension and figured I'll clean and opti-coat them then, one at a time.
I actually did an experiment with this car prior to correction. I didn't wax it...Ever. All I did was a clay-job in the beginning, and either a weekly foam wash or an ONR wash. I wanted to see how many swirls I could induce. After 5,000 miles I was pretty impressed. The car wasn't riddled with swirls or RID's. Of course there were the existing defects from the dealer wash, but all in all it was in great shape.
Tools Used:
PC 7424XP
Meguiars' Cutting Pad
Meguiars' Polishing Pad
Extension Cables
MF Towels
Products Used:
Meg's Claybar
Meguiars' #105
Meguiars' #205
Opti-Coat 2.0
Optimum No Rinse Wash and Shine
ONR lube (1 cap to a full spray bottle of water)
IPA (For final wipedown)
Opti-Coat 2.0
Deep Sea Blue Metallic still suffers from BMW's soft clear. I found it easy to mar the paint after wiping away compound/polish. Great care was taken to keep pads clean and used as little pressure to remove substances off the paint. Heads up to my fellow detailers.
Ante, Onto the pictures after a wash and a clay:
1 minor defect
Nice scratch. This one required some wetsanding to get out. Given that this is my car and with only 5000 miles, I opted not to wetsand but rather compound it out as best I could. It will be corrected later on during its life.
Some holograms that have been there since the beginning.
The taillights needed attention.
One of the 5 scratches on the hood. 4 of the RIDs extended almost all the way down the hood (Couldn't get a picture, because, well, my camera stinks). Still trying the figure out how it only happened on the hood and nowhere else on the car. :think:
Another defect.
My correction process was simple. In the above pictures with the defects (excluding the taillights) I did some spot compounding with Meg's cutting pad and #105. For compounding, I worked the product in to a haze then set my PC to 5 and began buffing. Afterwards I did one final sub-pass at speed 4 to finish it down better. After compounding the entire hood and other specific areas on the baby BMW, I switched over to Meg's polishing pad and #205 and worked my way around the entire car. For polishing I worked the polish in with my PC set to 2.5-3 then switched it up to 4 and finished it back down to 3.
I am confident in my process used for compounding, but not so much in polishing. If you have any advice for a better tactic to use while polishing please feel free to comment on it.
Corrected! (Before Opti-Coat, after IPA wipedown)
Taillights perfected. I was really amazed by the design of these taillights. I literally spent 15 minutes looking into them. They are clear so you can see the entire assembly including the bulbs. Fantastic design and they look great at night too!
More paint perfection. (Before Opti-Coat, after IPA wipedown)
The sun was setting, but no worries I was able to get better sun-shots the next day after the Opti-Coat cured for 24 hours.
Some "Cyclops" pictures:
Added my own little touch, thanks to Grafixpressions. They made me a quality sticker.
Definitely going to make some little kid's day when he sees a "transformer" in front of him.
It took me 14 hours from start to finish. I would have taken me about an hour less if I didn't spend so much time gawking at the paint after I finished polishing a section. This is my favourite colour bar none.
Gratitude for reading.