Anthony O.
New member
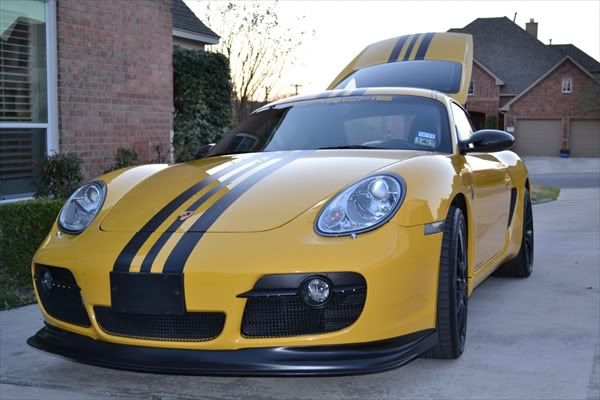
This Speed Yellow CaymanS came to our shop with one demand from the new owner..."See what you can do with it"
So we set about brainstorming what we all we can do. We wanted to remove the stripes and Porsche badges but the new owner had grown to like them so we will leave those for another day.
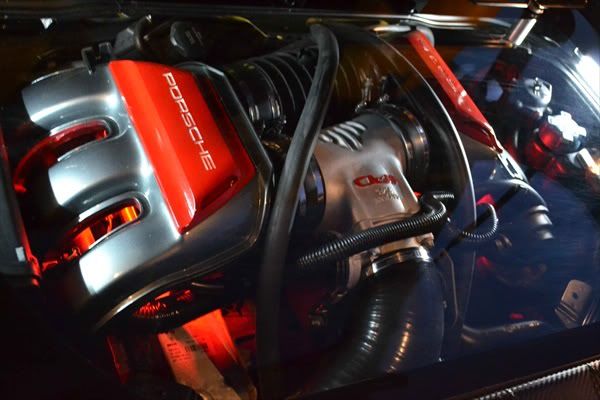
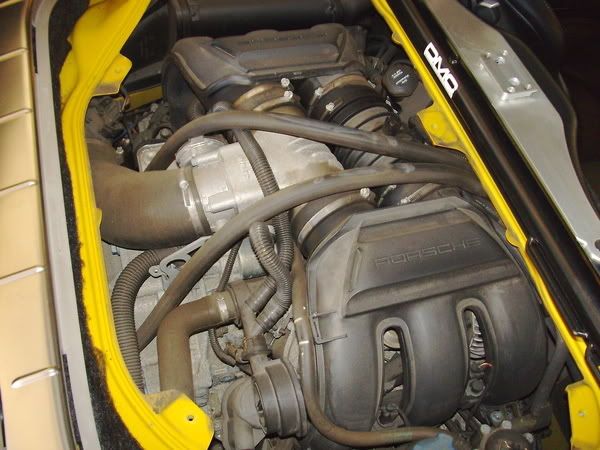
We now have a growing reputation for our engine painting and enhancements so this is where we started first. Of course being a mid-engine sports car the engine is covered and underneath that cover lies a filthy engine. Here is a "before" picture of the engine.

And....
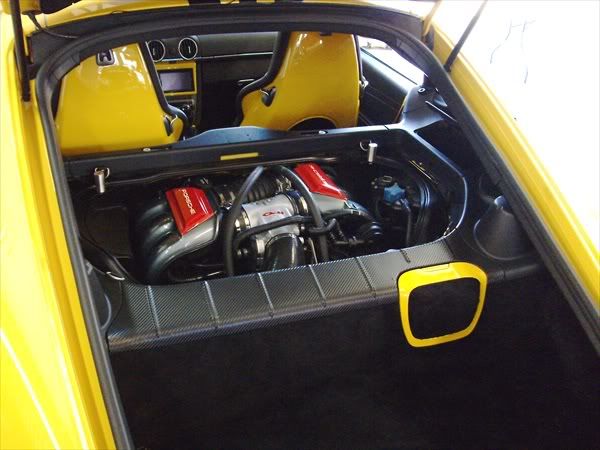
So we set about cleaning the engine and surrounding area with our steam vapor machines and then started developing a color scheme. Of course it's Speed Yellow so the obvious might be "yellow" but there was so much yellow going on already that we didn't want more in the rear engine area.
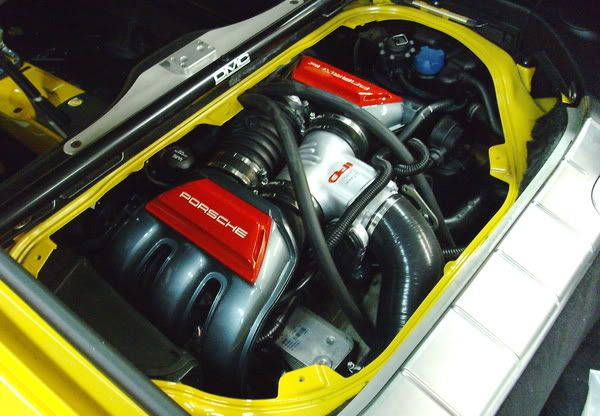
I went with the vent caps red with white Porsche lettering to match the brake calipers but choose a Lexus silver/green metallic color for the intakes. We also removed the mass air flow intake and painted that with a high heat paint as it was really dull looking even after cleaning. Ron added some red paint to that piece to bring out the lettering. Here is the engine cleaned and painted.
Looks a bit different eh?
We also of course added some lights to the engine area. We chose red lights to "glow" the lower portion of the engine block and white to give the top painted areas a nice glow also. I do apologize for not having any good pictures of the finished product all light up but, even though I am biased, it looks fantastic.
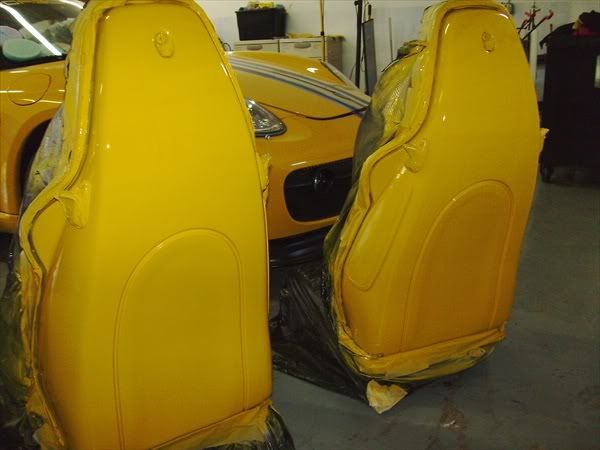
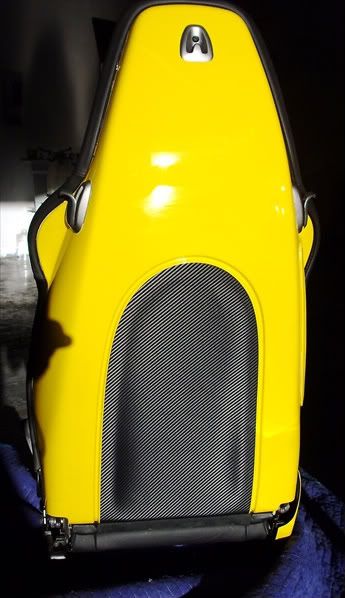
Next came the seats. We talked the owner into removing some horrible looking Porsche patches from the backs of the seats, as you can see here.
These patches were epoxied to the seat backs so when removed they also removed the factory finish! So what we then did was sanded down the whole seat backs, removed the lower seat pieces and we sprayed them Speed Yellow.
We then added a little something extra to break up the yellow a bit. We installed some carbon fiber film to the seats rear cut outs and it really made the seats pop now.
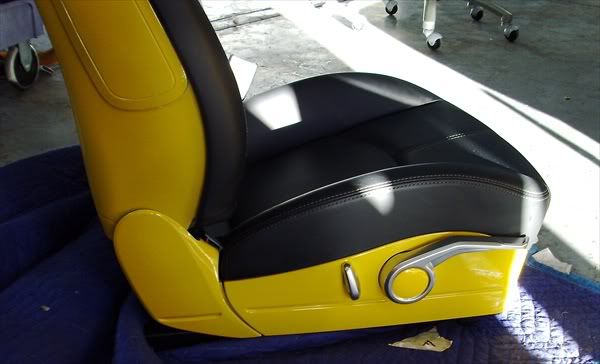
OK, so now the seats are done and after being re-assembled they look like this.
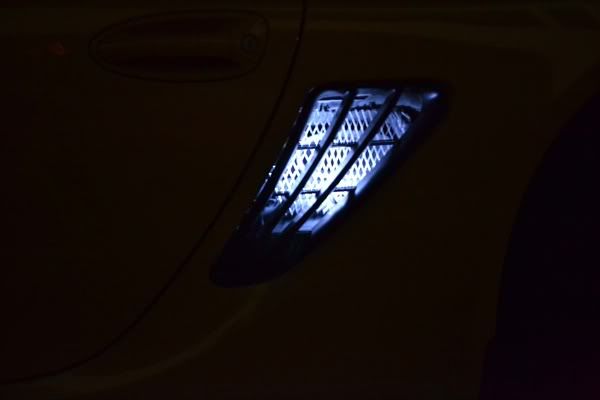
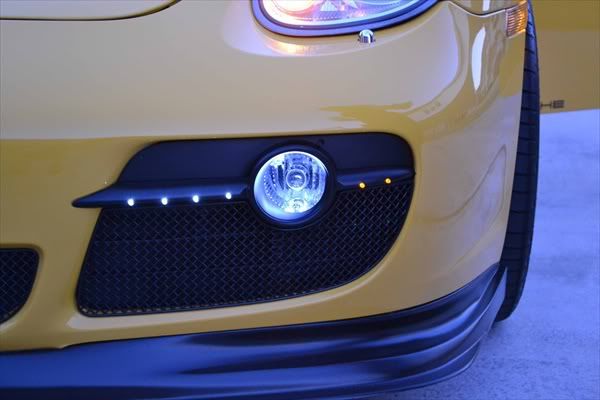
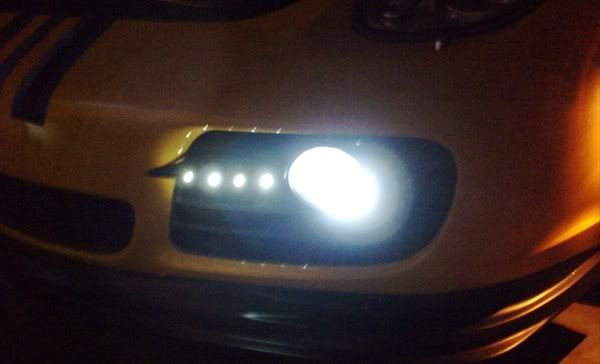
Now on to the front of the car. Here we find a not so good attempt at LED lighting. Here is a "before" pic.
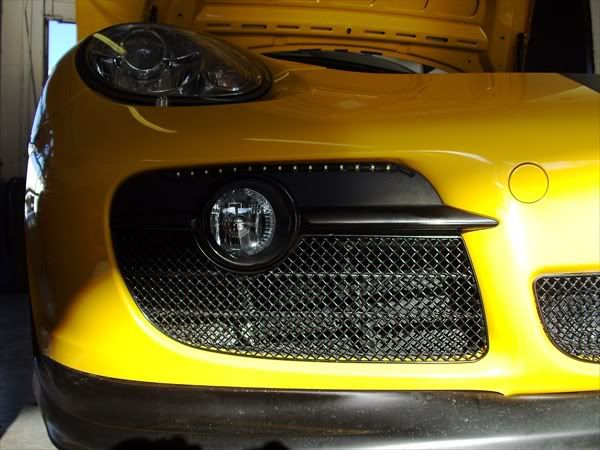
Notice the string of lights at the top? Well we figured we could do a much more custom job so we removed the lights, center piece and screens. Cleaned up and painted the trim pieces and hard wired a series of LEDs in. We also tied in some amber colored lights to act as front turn signals.
Here is the finished LEDs now.
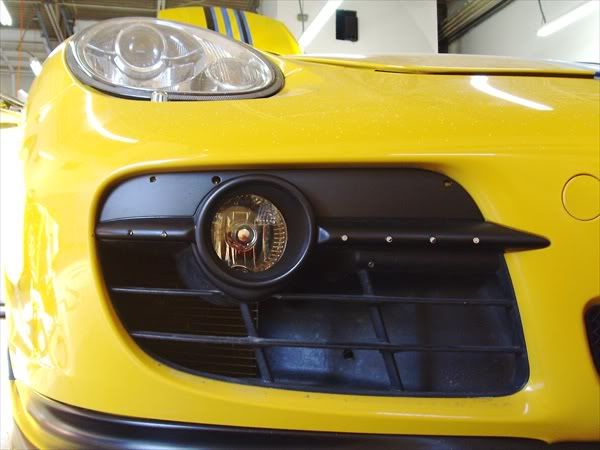
And here they are lit up, please forgive the poor picture quality.
We couldn't leave the interior just stock so we removed the center console, sanded it down and painted it Speed Yellow also. We added some carbon fiber film to a center bezel piece to break up the yellow scheme a bit.
Here is a "before"
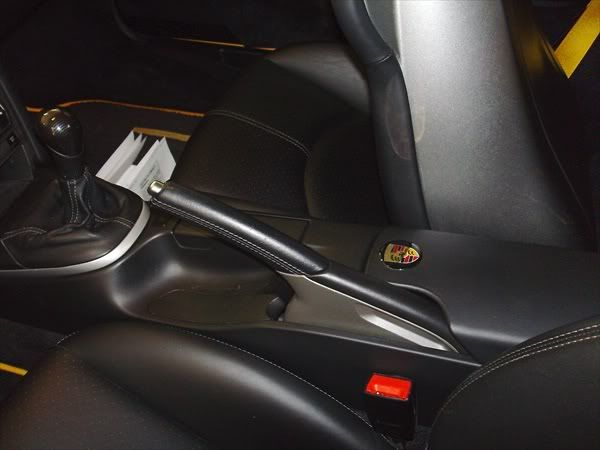
And here it is all finished and back in the car.
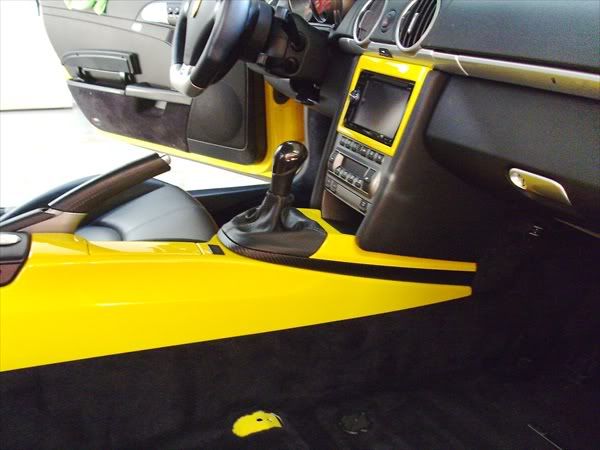
Looks pretty nice.....but again I am biased!
Well we then moved back to the rear engine area as the owner wanted to do some extra things but just didn't know what he wanted so we asked him to trust us.
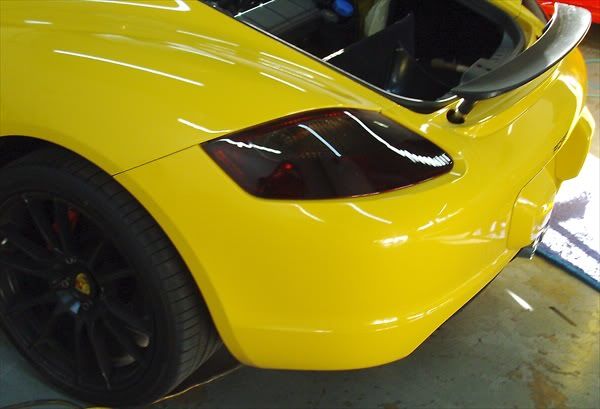
The engine area looked nice but the yellow trim around it was very distracting so we prepped that area. covered the engine and painted that yellow trim area a matte black. We also remove the rear wing, a bezel piece next to the engine and also the oil/coolant cover piece, as seen in the picture below.
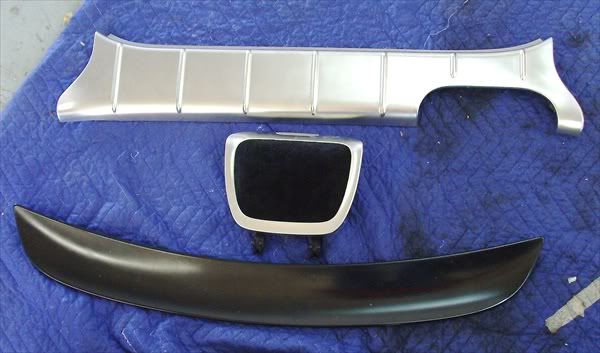
After some brainstorming we came up with the idea to lay carbon fiber film over the wing and bezel piece and spray the cover piece speed yellow to break up the black a bit.
Now take a look at the results.

Notice how the blacked out area now brings more attention to the painted engine area?
Now to set it off and finish it up we had to do something to these bright red tail lights.
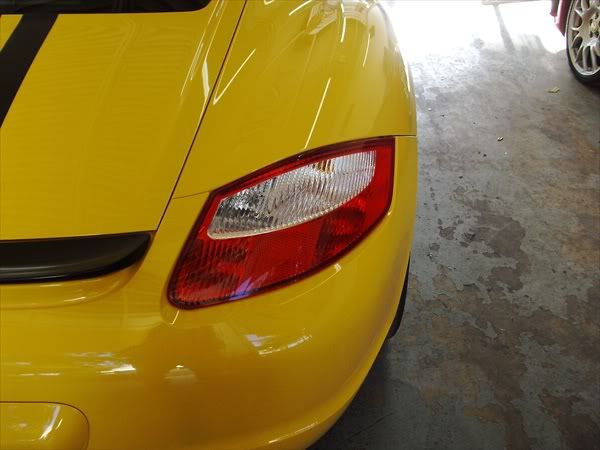
So we removed them and tinted them. Back in they now look like this.
We also did a full paint correction to this CaymanS but I have not yet loaded those pictures up. I also hope to get some lighted pictures of the engine area and I will be sure to post those up.
This will be our car of the month at Concours Auto Salon web site so check there as we will have more pictures of it.
Anthony
So we set about brainstorming what we all we can do. We wanted to remove the stripes and Porsche badges but the new owner had grown to like them so we will leave those for another day.
We now have a growing reputation for our engine painting and enhancements so this is where we started first. Of course being a mid-engine sports car the engine is covered and underneath that cover lies a filthy engine. Here is a "before" picture of the engine.
And....
So we set about cleaning the engine and surrounding area with our steam vapor machines and then started developing a color scheme. Of course it's Speed Yellow so the obvious might be "yellow" but there was so much yellow going on already that we didn't want more in the rear engine area.
I went with the vent caps red with white Porsche lettering to match the brake calipers but choose a Lexus silver/green metallic color for the intakes. We also removed the mass air flow intake and painted that with a high heat paint as it was really dull looking even after cleaning. Ron added some red paint to that piece to bring out the lettering. Here is the engine cleaned and painted.
Looks a bit different eh?
We also of course added some lights to the engine area. We chose red lights to "glow" the lower portion of the engine block and white to give the top painted areas a nice glow also. I do apologize for not having any good pictures of the finished product all light up but, even though I am biased, it looks fantastic.
Next came the seats. We talked the owner into removing some horrible looking Porsche patches from the backs of the seats, as you can see here.
These patches were epoxied to the seat backs so when removed they also removed the factory finish! So what we then did was sanded down the whole seat backs, removed the lower seat pieces and we sprayed them Speed Yellow.
We then added a little something extra to break up the yellow a bit. We installed some carbon fiber film to the seats rear cut outs and it really made the seats pop now.
OK, so now the seats are done and after being re-assembled they look like this.
Now on to the front of the car. Here we find a not so good attempt at LED lighting. Here is a "before" pic.
Notice the string of lights at the top? Well we figured we could do a much more custom job so we removed the lights, center piece and screens. Cleaned up and painted the trim pieces and hard wired a series of LEDs in. We also tied in some amber colored lights to act as front turn signals.
Here is the finished LEDs now.
And here they are lit up, please forgive the poor picture quality.
We couldn't leave the interior just stock so we removed the center console, sanded it down and painted it Speed Yellow also. We added some carbon fiber film to a center bezel piece to break up the yellow scheme a bit.
Here is a "before"
And here it is all finished and back in the car.
Looks pretty nice.....but again I am biased!
Well we then moved back to the rear engine area as the owner wanted to do some extra things but just didn't know what he wanted so we asked him to trust us.
The engine area looked nice but the yellow trim around it was very distracting so we prepped that area. covered the engine and painted that yellow trim area a matte black. We also remove the rear wing, a bezel piece next to the engine and also the oil/coolant cover piece, as seen in the picture below.
After some brainstorming we came up with the idea to lay carbon fiber film over the wing and bezel piece and spray the cover piece speed yellow to break up the black a bit.
Now take a look at the results.
Notice how the blacked out area now brings more attention to the painted engine area?
Now to set it off and finish it up we had to do something to these bright red tail lights.
So we removed them and tinted them. Back in they now look like this.
We also did a full paint correction to this CaymanS but I have not yet loaded those pictures up. I also hope to get some lighted pictures of the engine area and I will be sure to post those up.
This will be our car of the month at Concours Auto Salon web site so check there as we will have more pictures of it.
Anthony
")