Chip to bare metal on Motorcycle Gas Tank

sillywilly88

New member
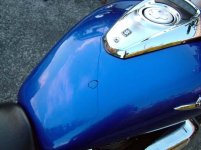
I finally got a picture. It has been edited in Photoshop for cropping and changing size of file. The defect area should be obvious. The dark blue show the sides of the chip defect. The size was about as wide as the digits in this post and almost 2-3/4 inch long. The depth was all the way to the metal. I used 3 pens from Color-Rite: Primer, Color, and Clearcoat (2 applications each using the "dabbing" technique. I want to know if I should now sand (wet/dry), cut-polish, or what. I have never attempted anything like this before.

Some of this is repeated from the Newby Introduce yourself forum, lol.

The defect is circles in black using Photoshop. To see more clearly what it looks like after the steps I performed so far might require opening in Photoshop or other editing program and magnifying that area.

Any help will be appreciated.:thanks
 

Attachments

  • M50-painted-chip--defect.JPG
    M50-painted-chip--defect.JPG
    50.8 KB · Views: 33
Fill the chip up higher than the paint around it then progressively sand it down. Try to stay off the original paint as much as possible but kind of "blend" out where you touched up. Wet sand starting with 2000 grit and work down to 3000 then buff away the wet sand scratches and polish. rewax and that should hide it a little, it'll never be perfect but its better than a big rusty chip.

Hope this helps


Hunter
 
Bunta said:
Fill the chip up higher than the paint around it then progressively sand it down. Try to stay off the original paint as much as possible but kind of "blend" out where you touched up. Wet sand starting with 2000 grit and work down to 3000 then buff away the wet sand scratches and polish. rewax and that should hide it a little, it'll never be perfect but its better than a big rusty chip.

Hope this helps


Hunter

Thanks. It semed like a long time and no response so I tried what I thought might work. I used the Primer Pen and dabbed a coat of that. After drying applied two coats of color with drying between coats, then the clearcoat pen. I put 3 coats, 5 minutes drying between first 2 coats and 5 days for 3rd coat. I then Wet sanded by hand using 2000 grit followed by some Turtle Wax Compound Paste and Turtle Wax polish, and the paint is all flush, shiny and smooth now , but maybe I sanded too much or something as the color is a very light blue in that area as though I mixed a lot of white with original color (like a Royal blue with Cerulean blue metallic chips).

Hoping to find out how to correct that. The area is now much larger but still small, like half the diamater of a penny. Would I have to bring that area down
by sanding again and give it another try? Any other idea short of a paint job?
 
I try to stay just in the chip so it doenst get any bigger. Also just so you know touch up never matches perfect and doesnt make chips disapear its just a bandaid. good luck and stay safe. I ride also but a little different bike(xr100:D).


Hunter
 
Bunta said:
I try to stay just in the chip so it doenst get any bigger. Also just so you know touch up never matches perfect and doesnt make chips disapear its just a bandaid. good luck and stay safe. I ride also but a little different bike(xr100:D).


Hunter
;

I discovered one of my problems was PB Optimum Polish as it was not the newly formulated version; it was not nice and creamy but more like water and shaking didn't help. I got it from eshine in Canada. I have PB Swirl Remover SR2.5 on the way as I already have SR1 and SR2. I hope it helps.

I ride a Cruiser since I like to travel and I am 72. It can still go plenty fast; I had it to 160 KM (100 mph) for aout two minutes as it was too scary for me; my comfort range is from 120 to 140 KM. I just got back from a ride. Since I got this bike April 24, 2006, I have put on just over 23,800 KM. Not bad for an old man eh?
 
Back
Top