Hey folks. I'm new to the forum and am learning via youtube, the forum, and by practicing on my cars.
The first car I did was my black 1990 Integra with a lot of clear coat failure and you name it - it has it. I think the previous owner parked it somewhere on...THE SUN..for 5 years. I then moved on to my silver Accord, my metallic black Mazdaspeed3, and then on to my silver NSX. My confidence coming off those cars was very high.
I am now working on my black 1993 Acura NSX. OK... non metallic black? This is the Big Leagues. This is the most painful experience so far so feel free to share your thoughts please.
This car was a quasi barn-find. It was driven 7k miles in FLA and put away in the 90's. It was driven again in South Carolina for a year and I bought the car with 9k miles on it then. I see no indication that it had seen anything other than poor technique hand washing or drive-thru washing (including under my ownership before I discovered what proper paint care was. To me and to my mechanic, it looks like a brand new car - even from underneath. I want to get the paint to the point that the car deserves.
It had some sort of wax at some point as it took me hours and hours to get this white stuff off small areas of the car. It was not easy. I used different plastic tools with microfiber towels wrapped around them and a claybar to remove the old wax.
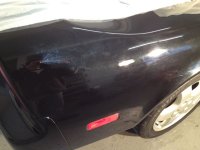
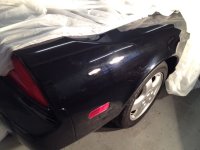
Here is a before shot.

This is the Before Right Rear Quarter Panel after claying.
I started with CG V38 on an orange hex pad. It did not seem to do as much with the scratches that I wanted and it as also gumming up. I went down to V36 and then to V34. It was gumming up and hard to remove. I could not finish a 2' X 2' section because it would get dry. I never had this happen in the past. It was as though the paint was thirsty. My garage was 55 degrees so I thought it was too cold. I let the panels warm up a little under non LED lights which seemed to help a little. I tried spritzing the pad with water, less product, more product - if it was dry - the product was hard to remove. If I used water to hydrate the pad, I got a fog on the finish when I was done that I would have to use polish and high speed DA to get off. I was pretty horrified and thought what am I doing screwing with this car being such a newbie.
After many hours of frustration, I made small adjustments. I heard a guy (Buff Daddy - Kevin Brown I think?) on the Smoking Tire podcast which was interesting, I then saw the magnified pic on his web site of what a primed pad looks like.
I regrouped. The V38 was the most oily and did not dry out as much on the car. So I went V38 on a black hex pad. No longer putting pea sized dollops on the pad, but smearing the polish in my gloved fingers and lightly wiping it on the pad to get disbursement. When needed, I put very small daps of polish on the pad. I was working with less product but getting good result finally. I had some Dodo Juice Lime Prime. I used it to help remove the V38 which was really stuck on the paint after DA'ing. It (and the harder compounds) wipe right off my other cars - but not this car.

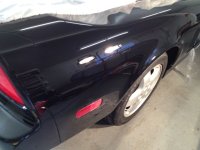
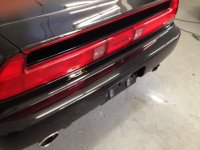
This is the After picture. This is after V38 and finishing with black light on a DA (Rupes 15).
I decided that since I was having success with most scratches on my 3rd pass of this black hex/V38 combo that I would not change pads or compound for more cutting. I am too inexperienced and I was having success. What I found is that treating V38 like a compound (some pressure, using it to remove scratches) and then treating CG Black Light like a polish (light pressure, high speed) was working well. I did the doors, rear quarters, trunk lid, roof and b-pillars this way. Lime Prime to help lube the removal of the V38.
After a black light polish, I'd follow up with a coat of Black Light applied by hand. This helped seal it slightly, and most importantly - make it slick which and allows me to get polish dust off of any parts that it creeps into with more ease.
Then I realized how much improv detailers must do. I did this approach on the hood? It was terrible. There were irregular blotches of haziness after this process. What the HECK? Lime Prime was not removing it, so it was not just polish sitting on the top. I went back to look at the rest of the car with the same lights (I have regular lights, LED lights, and I use a head mounted light for caving that I like a lot) - they did not have this problem. The hood was just acting differently. How many times per day do you guys want to kill yourselves?
So I had to V38 the hood again with a black pad to rid of the cloudiness. I then used a red hex fine finish pad and V38 to get that burnished finish and hand applied black light.

non metallic black paint is really unforgiving. But I am not stopping until it's right. I am leaving some scratches in there that I cannot get out - I know that as I improve I will be able to get them; but for my skill level now I am really pleased so far with the result. Not so much the level of effort though.
The first car I did was my black 1990 Integra with a lot of clear coat failure and you name it - it has it. I think the previous owner parked it somewhere on...THE SUN..for 5 years. I then moved on to my silver Accord, my metallic black Mazdaspeed3, and then on to my silver NSX. My confidence coming off those cars was very high.
I am now working on my black 1993 Acura NSX. OK... non metallic black? This is the Big Leagues. This is the most painful experience so far so feel free to share your thoughts please.
This car was a quasi barn-find. It was driven 7k miles in FLA and put away in the 90's. It was driven again in South Carolina for a year and I bought the car with 9k miles on it then. I see no indication that it had seen anything other than poor technique hand washing or drive-thru washing (including under my ownership before I discovered what proper paint care was. To me and to my mechanic, it looks like a brand new car - even from underneath. I want to get the paint to the point that the car deserves.
It had some sort of wax at some point as it took me hours and hours to get this white stuff off small areas of the car. It was not easy. I used different plastic tools with microfiber towels wrapped around them and a claybar to remove the old wax.
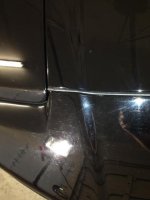
Here is a before shot.
This is the Before Right Rear Quarter Panel after claying.
I started with CG V38 on an orange hex pad. It did not seem to do as much with the scratches that I wanted and it as also gumming up. I went down to V36 and then to V34. It was gumming up and hard to remove. I could not finish a 2' X 2' section because it would get dry. I never had this happen in the past. It was as though the paint was thirsty. My garage was 55 degrees so I thought it was too cold. I let the panels warm up a little under non LED lights which seemed to help a little. I tried spritzing the pad with water, less product, more product - if it was dry - the product was hard to remove. If I used water to hydrate the pad, I got a fog on the finish when I was done that I would have to use polish and high speed DA to get off. I was pretty horrified and thought what am I doing screwing with this car being such a newbie.
After many hours of frustration, I made small adjustments. I heard a guy (Buff Daddy - Kevin Brown I think?) on the Smoking Tire podcast which was interesting, I then saw the magnified pic on his web site of what a primed pad looks like.
I regrouped. The V38 was the most oily and did not dry out as much on the car. So I went V38 on a black hex pad. No longer putting pea sized dollops on the pad, but smearing the polish in my gloved fingers and lightly wiping it on the pad to get disbursement. When needed, I put very small daps of polish on the pad. I was working with less product but getting good result finally. I had some Dodo Juice Lime Prime. I used it to help remove the V38 which was really stuck on the paint after DA'ing. It (and the harder compounds) wipe right off my other cars - but not this car.
This is the After picture. This is after V38 and finishing with black light on a DA (Rupes 15).
I decided that since I was having success with most scratches on my 3rd pass of this black hex/V38 combo that I would not change pads or compound for more cutting. I am too inexperienced and I was having success. What I found is that treating V38 like a compound (some pressure, using it to remove scratches) and then treating CG Black Light like a polish (light pressure, high speed) was working well. I did the doors, rear quarters, trunk lid, roof and b-pillars this way. Lime Prime to help lube the removal of the V38.
After a black light polish, I'd follow up with a coat of Black Light applied by hand. This helped seal it slightly, and most importantly - make it slick which and allows me to get polish dust off of any parts that it creeps into with more ease.
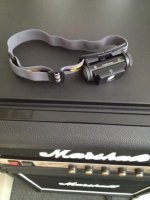
Then I realized how much improv detailers must do. I did this approach on the hood? It was terrible. There were irregular blotches of haziness after this process. What the HECK? Lime Prime was not removing it, so it was not just polish sitting on the top. I went back to look at the rest of the car with the same lights (I have regular lights, LED lights, and I use a head mounted light for caving that I like a lot) - they did not have this problem. The hood was just acting differently. How many times per day do you guys want to kill yourselves?
So I had to V38 the hood again with a black pad to rid of the cloudiness. I then used a red hex fine finish pad and V38 to get that burnished finish and hand applied black light.
non metallic black paint is really unforgiving. But I am not stopping until it's right. I am leaving some scratches in there that I cannot get out - I know that as I improve I will be able to get them; but for my skill level now I am really pleased so far with the result. Not so much the level of effort though.