Migue
New member
Owner contacted me concerned about some random deep scratches on the rear driver's side of his truck. He mentioned taking it to the body shop but they were not successful at removing them (incredible huh?) . I quoted him for the repair of the scratches ( we agreed that it would be a 90% improvement, i don't like to promise anything with 100% or perfection) . He then decided he wanted to detail the interior and exterior with a coat of paint sealant to go along with the fresh scratch repair. He did not want paint polishing/correction aside from the scratches we discussed.
Exterior:
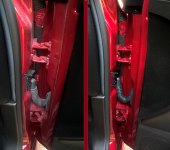
-Doorjambs were cleaned with Megs APC 10:1 and various brushes
-Wheels cleaned with Sonax FE, tires and wells cleaned with Megs APC 4:1
-Thorough rinse off to remove any loose dirt/dust
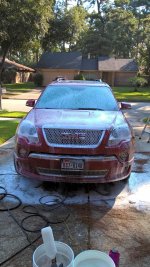
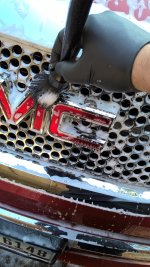
-Foam Bath from a cannon,let dwell for a few moments as i agitated crevices with a soft hair brush
-Rinse off loose dirt from foam bath
-2 bucket wash
- I performed a small test spot with my Blue Nanoskin sponge and Glide as lube to ensure that marring was not going to occur,since i was not going to polish the paint. test was successful so i proceeded with mechanically decontaminating the entire paint surface with light to no pressure on the application.
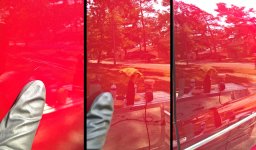
-Random scratches were approached with 3k grit(wet) sand paper, PC with 4" pads and M105 then finish with M205. LC CCS Pads in order of use: Yellow(M105),Orange(M105),White(M205).
-Paint was sealed using Collinite 845 applied via PC and a red LC CCS Pad.
-Interior vacuumed, floormats lightly shampooed, surfaces/leather seats cleaned and interior protection with 303. No interior shots, nothing was trashed, just standard dirt from lack of constant vacuum and what not.
Not too many shots, but it shows you the basic idea of the process and before/after on the scratches since those were the customer's main concerns:


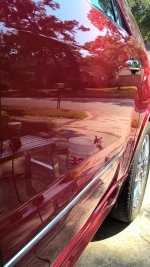
Scratches, random and grouped in a few areas along driver's side rear door and 1/4 panel:


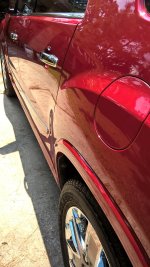
After Shots:


Thank you all for reading/watching .
Exterior:
-Doorjambs were cleaned with Megs APC 10:1 and various brushes
-Wheels cleaned with Sonax FE, tires and wells cleaned with Megs APC 4:1
-Thorough rinse off to remove any loose dirt/dust
-Foam Bath from a cannon,let dwell for a few moments as i agitated crevices with a soft hair brush
-Rinse off loose dirt from foam bath
-2 bucket wash
- I performed a small test spot with my Blue Nanoskin sponge and Glide as lube to ensure that marring was not going to occur,since i was not going to polish the paint. test was successful so i proceeded with mechanically decontaminating the entire paint surface with light to no pressure on the application.
-Random scratches were approached with 3k grit(wet) sand paper, PC with 4" pads and M105 then finish with M205. LC CCS Pads in order of use: Yellow(M105),Orange(M105),White(M205).
-Paint was sealed using Collinite 845 applied via PC and a red LC CCS Pad.
-Interior vacuumed, floormats lightly shampooed, surfaces/leather seats cleaned and interior protection with 303. No interior shots, nothing was trashed, just standard dirt from lack of constant vacuum and what not.
Not too many shots, but it shows you the basic idea of the process and before/after on the scratches since those were the customer's main concerns:
Scratches, random and grouped in a few areas along driver's side rear door and 1/4 panel:
After Shots:
Thank you all for reading/watching .
Attachments
-
 Doorjamb B4-After.jpg600.2 KB · Views: 73
 -
 Foam(resized).jpg327.2 KB · Views: 74
 -
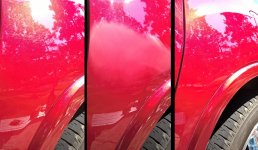 QT Panel B4-During-After.jpg279 KB · Views: 75
 -
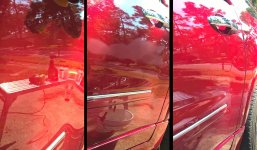 RR Door B4-During-After.jpg332.1 KB · Views: 75
 -
 Scratch B4-After.jpg729.1 KB · Views: 76
 -
 WP_20150814_09_14_33_Pro.jpg732.6 KB · Views: 75
 -
 RR Door 4.jpg690.7 KB · Views: 75
 -
 WP_20150814_15_18_49_Pro.jpg731.6 KB · Views: 75
 -
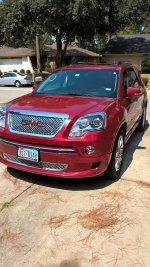 Final Shot(resized).jpg860.8 KB · Views: 74
 -
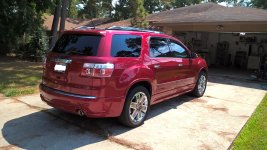 Final Rear(resized).jpg706.2 KB · Views: 74