Dellinger
New member
A very nice gentleman gave me a call about 2 months ago with a general uneasiness of how his Chevelle appeared in the sun light. The car is a relatively fresh build in a resto- mod style (LS3 V8, 4L60E, tubular A-arms... general upgrades so that the car drives and handles a bit like a newer car.) Paint system is PPG Deltron 4000, Tabasco Red to be exact and was painted almost 8 months ago.
Now, the gentleman and I had some scheduling issues... some of it was on my end (busy and just experienced the birth of my first child) and some on his (unforeseen issues with front suspension and steering when he thought all he needed was an alignment.) So, the two months of May/ June evaporated quickly and that is really a tough pill to swallow in the Pacific NW because you only have 3- 4 *good* months of decent weather of which to take the car to shows and cruise-ins. Anyway, I will get to the particulars...
(Sorry, no real prior shots to really show the heavy trails in the paint but it was overcast the day the car was dropped off.)
The car was rife with buffer trails, heavy swirling, and some deep scratches from someone bending over the tops of the front fenders and some minor sanding marks from the refinishing process required removal.
Car was relatively clean, used D114 for a rinseless wash followed by a fine clay bar to remove any amount of bonded stuff. Steam and D114 was used on wheels/ wells/ jambs to clean.
I ended up cutting with Rupes 21/ Car Pro MF 5.5" pad/ M205 with water spritz.
Refined with LC Orange low profile pad on Rupes 15 with HD Adapt
Finished with traditional 8mm stroke D/A, LC Black pad, Car Pro Reflect.
Pneumatic sander/polisher used in conjunction with a 2" pad for really tight, scalloped areas (tops of fenders, body lines on rear quarters, and below rear deck lid, above bumper.)
All stainless was taped off and wiped down with window cleaner, following. Chrome bumpers (which were basically new) received a very mild polish and sealant.
Some minor spot sanding was required on the hood 1,500 & 2000 grit by hand on Jason Killmer blocks.
LSP was Brite Max Vantage which was forwarded by the graciousness of ShawnF350 (I think that is his screen name.) This is a really nice wax which it is a blend of polymers + carnauba; as of now this wax is what will replace HD Poxy for me because Poxy seperates, after time, and I don`t like that. Again, I am not a LSP junkie, so this will be the only wax I keep on my roster along with two other sealant products.
And as a side note... I tried the Brite Max Pro Max (light compound) and was not impressed with it... will try to post a separate review to illustrate my reasoning, this was also a gift included by ShawnF350.
And on to the photos...
B-pillar, prior to polishing:

B-pillar, after 2 steps, prior to finishing polish and hybrid wax
 _DSC3818
Hood prior to polishing...
 _DSC3887
Hood after 2 steps (appologize for the dust)
 _DSC3888
Close up of typical defects...
 _DSC3798
Defects removed. Finish after two polishing steps.
 _DSC3800
Rear deck lid, prior to polishing.
 _DSC3822
Rear deck lid after polishing with 2 steps.
 _DSC3828
No before picture here (pressed for time both then and now, lol!) Showing lip of front fender and transition areas polished to a high degree.
 _DSC3852
Same with pic below... some minor dust is present.
 _DSC3846
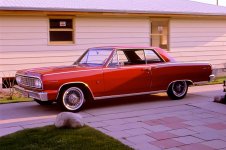
After photos:
 _DSC3957
 _DSC3992
 _DSC3984
 _DSC3982
 _DSC3974
While this `64 is largely not a very *technical* car as far as polishing goes... I spent the necessary time ensuring all transitions contained ZERO micro marring that can be prone to poor technique with a D/A. Consider the below.
 _DSC3969
 _DSC3907
 _DSC3927
And if video is your thing...
Anyway, thanks for checking out my post and hope everyone is well.
Best regards,
-Gabe
Now, the gentleman and I had some scheduling issues... some of it was on my end (busy and just experienced the birth of my first child) and some on his (unforeseen issues with front suspension and steering when he thought all he needed was an alignment.) So, the two months of May/ June evaporated quickly and that is really a tough pill to swallow in the Pacific NW because you only have 3- 4 *good* months of decent weather of which to take the car to shows and cruise-ins. Anyway, I will get to the particulars...
(Sorry, no real prior shots to really show the heavy trails in the paint but it was overcast the day the car was dropped off.)
The car was rife with buffer trails, heavy swirling, and some deep scratches from someone bending over the tops of the front fenders and some minor sanding marks from the refinishing process required removal.
Car was relatively clean, used D114 for a rinseless wash followed by a fine clay bar to remove any amount of bonded stuff. Steam and D114 was used on wheels/ wells/ jambs to clean.
I ended up cutting with Rupes 21/ Car Pro MF 5.5" pad/ M205 with water spritz.
Refined with LC Orange low profile pad on Rupes 15 with HD Adapt
Finished with traditional 8mm stroke D/A, LC Black pad, Car Pro Reflect.
Pneumatic sander/polisher used in conjunction with a 2" pad for really tight, scalloped areas (tops of fenders, body lines on rear quarters, and below rear deck lid, above bumper.)
All stainless was taped off and wiped down with window cleaner, following. Chrome bumpers (which were basically new) received a very mild polish and sealant.
Some minor spot sanding was required on the hood 1,500 & 2000 grit by hand on Jason Killmer blocks.
LSP was Brite Max Vantage which was forwarded by the graciousness of ShawnF350 (I think that is his screen name.) This is a really nice wax which it is a blend of polymers + carnauba; as of now this wax is what will replace HD Poxy for me because Poxy seperates, after time, and I don`t like that. Again, I am not a LSP junkie, so this will be the only wax I keep on my roster along with two other sealant products.
And as a side note... I tried the Brite Max Pro Max (light compound) and was not impressed with it... will try to post a separate review to illustrate my reasoning, this was also a gift included by ShawnF350.
And on to the photos...
B-pillar, prior to polishing:
B-pillar, after 2 steps, prior to finishing polish and hybrid wax
_DSC3818 Hood prior to polishing...
_DSC3887 Hood after 2 steps (appologize for the dust)
_DSC3888 Close up of typical defects...
_DSC3798 Defects removed. Finish after two polishing steps.
_DSC3800 Rear deck lid, prior to polishing.
_DSC3822 Rear deck lid after polishing with 2 steps.
_DSC3828No before picture here (pressed for time both then and now, lol!) Showing lip of front fender and transition areas polished to a high degree.
_DSC3852 Same with pic below... some minor dust is present.
_DSC3846After photos:
_DSC3957 _DSC3992 _DSC3984 _DSC3982 _DSC3974 While this `64 is largely not a very *technical* car as far as polishing goes... I spent the necessary time ensuring all transitions contained ZERO micro marring that can be prone to poor technique with a D/A. Consider the below.
_DSC3969 _DSC3907 _DSC3927And if video is your thing...
Anyway, thanks for checking out my post and hope everyone is well.
Best regards,
-Gabe
")